
Still, straight out mending is the pits. Especially replacing zippers. Especially, especially zippers on winter coats. It's mending hell squared.
But how could you not replace a broken zipper on a perfectly good (expensive) jacket? When you know that the alternative is the landfill because no one else is going to fix it either. We crafty types are the last hope to extend the lives of good clothes that just need a bit of mending. In my mind, this justifies a bit of zipper-replacement discomfort.
Or does it? There is nothing quite like a dreaded chore to get the ol' mind ticking away. Knowing that Birdie Boy's hand-me-down jacket needs the zipper fixed NOW has been on mind for a week, but having no zipper to replace the old one with, plus a healthy dose of procrastination (laziness), has made this bit of mending positively loom.
Which was why I was tickled pink when an alternative solution to the broken zipper dilemma presented itself. In fact, it was not only a good way to duck having to replace the zipper, it was actually more environmentally friendly as there is no need for a new zipper and recycles part of an endlessly usable man's button down shirt. All in all, this is cheaper, faster, greener and doesn't require a drink to steady my nerves before I begin.
Ahhhh! I love getting out of mending!
With that huge build up, you all are going to be disappointed at this simple little fix. Here is Birdie Boy (with a stick, as always), with his jacket closed up snug:

Covering a broken zipper with a front placket
(or, what to do when you can't face replacing a zipper)
First, locate a button down shirt in a coordinating or contrasting material.

My shirt here, in addition to being a good-enough matching shade of blue, had already had it's arms removed to make sleevy pants, making it a good candidate for this project. I can see how some fun could be had, turning a boring jacket into something fantabulous with coordinating colours and patterns or contrasting top stitching.
Measure the length of the broken closure and determine an appropriate width for a placket. I chose 3" for my width.

Add 1" to the length measurement for 1/2" on top and bottom for a hem (add more if you require for a double fold hem).
Add 1/2" to the width for a 1/4" seam allowance on the sides.
With your shirt buttoned up and pressed if necessary, use your ruler and tailor's chalk to outline your placket. Keep in mind button placement as it will on the jacket - you want a button fairly close to the top, but not so close as to interfere with the presser foot as you hem the top.

Cut out your placket.
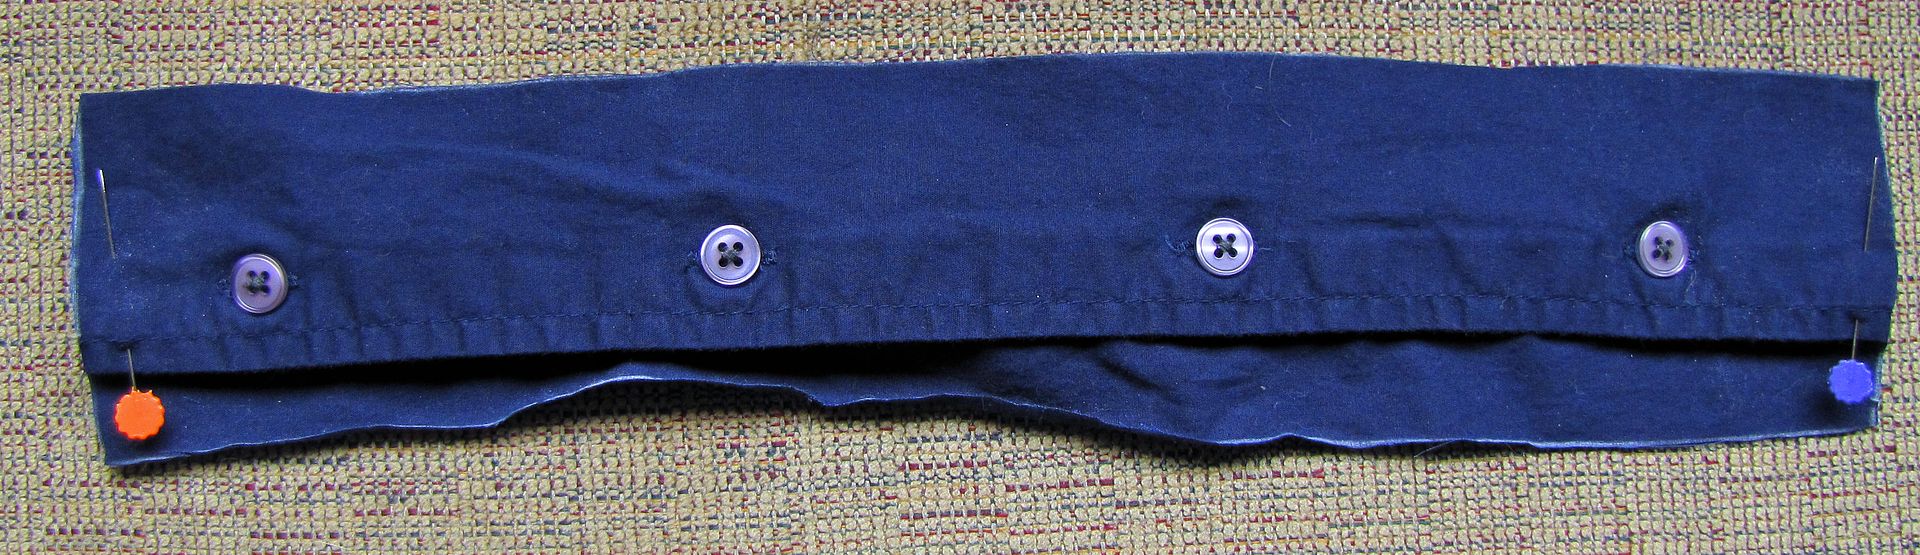
Hem the top and bottom edges (separately from each other - thanks Rachel R) with a 1/4" wide double fold. Finish the raw edges of the sides with either a zig-zag stitch (as shown below) or a serger.

With placket still buttoned, lay it down on top of the jacket with the buttons running down the length of the zipper. Fold under one side edge 1/4" to determine where to stitch on the placket. Turn over whole placket, with folded under edge held in place, and pin placket to jacket, right sides together.

Stitch placket side to jacket at 1/4"
Flip placket back over top zipper and orientate the other side in the appropriate place. Fold in other side edge and put in a couple pins to mark the correct place.

Undo the buttons, turn unsewn side back with right sides together, and pin the placket in place. Stitch side edge to jacket at 1/4".

If you are feeling up to it, top stitch the side edges to the jacket (which I didn't because I was feeling good-enoughness at this point, also see above comments on laziness).
And there it is, one once-again snuggly warm jacket.

I estimate that this bit of repair saved me $2.00 for a zipper, 20 minutes of seam ripping, 40 minutes of sewing in the zipper (including 20 minutes of breaks for deep breathing and centering), and half a bottle of wine (or $5, as I usually get what's on sale). Oh, and the whole cost of a new (previously loved) jacket.
****************************************************
This is a free tutorial and I encourage you to use the information in any way you need to (check the disclaimer at the bottom of the page). If it works for you, please consider supporting my etsy shop by purchasing a Little Print Design pattern or toss a dollar or two in my paypal to show appreciation and to encourage me to offer up even more quality patterns and tutorials.
Thank you!
Questions about the Donation? FAQ here.
I spent I-don't-know-how-long hand-sewing a zipper into a skirt this morning. I wish I'd thought of this--it would have been so much easier. A friend got the skirt on clearance and gave it to me because she knew I liked it, which was nice and all, but I have one thing to say to that: It is NOT a gift if you have to put in a zipper yourself.
ReplyDeleteLOVE IT! And I can so relate to your savings list. My savings list is the deciding factor all the time! :) Thanks so much!
ReplyDeletejb
I love it!
ReplyDeleteCan I point out an additional detail in the tute, though, just 'cause I would totally be stupid enough to overlook it and end up seam-ripping anyway? Make sure that when you hem the top and bottom of the placket, you hem them separately rather than sewing them to each other, or the jacket won't open. :)
I know you did that, but it's not completely clear in the instructions and, as I said, I would totally sew them together and have to tear them back out when I realized later.
I had to replace TWO zippers on my son's winter and spring coats this spring. I replaced with nice metal zippers as opposed to the plastic ones he tore to shreds. What is with these kids??
ReplyDeleteGreat tute and nice way to go, too. Yes, it was a pain to rip them out, and this is a fun way to forgo the seam ripping.
What a wonderful idea. I too hate replacing zippers.
ReplyDeletenow you got me thinking - her last years jacket is plenty big, plenty long, but the sleeves are still just about an inch too short... got to look though the worn pile to see what cuffs I can salvage to add to the bottom of each sleeve. thanks!
ReplyDeleteI love the tute. I too have the same thoughts on what I "need" to sew for my daughter. If it wasnt used, an old flat sheet,table cloth, fabric shower curtain, from the remnant bin, reconed, or $2.00 or less per yard I dont buy it.
ReplyDeleteThanx for the tute I think that I might need to use it on some old worn jackets of my own.
I have a pair of snow pants that I need to replace a zipper and I'm not looking for to it.
ReplyDeleteBut I have already bought a zipper so I think I have to go through with it.
That's pretty clever, and it turned out so cute. I hate mending as well. If something needs to be mended, it might as well go.
ReplyDelete~Jenny~
You my dear are a VERY clever lady. Thank you for taking ht time to make thus tutorial!
ReplyDeleteI love it (well, everything you do). When my daughter was small I revamped lots and lots. My favorite (and most commented on) was a pair of denim overalls that were too short, I cut across the worn out knees and inserted pinstripe denim-weight fabric to lengthen. Too cute. Keep up the good work. YOU ARE QUITE MOTIVATING!
ReplyDeleteAnd I think it looks a lot cuter now then it did to start.
ReplyDeleteThis is so smart!! I posted a link to your tutorial on Craft Gossip Sewing:
ReplyDeletehttp://sewing.craftgossip.com/tutorial-cover-a-broken-jacket-zipper-with-a-button-placket/2009/11/14/
--Anne
Beautiful! Thank you!
ReplyDeleteThat is absolutely brilliant.
ReplyDeleteGreat idea! Thanks for sharing! I need to break out my sewing machine and do more mending. I'm inspired. :)
ReplyDeleteI threw away a perfectly good jacket because I am way too lazy to replace the zipper. I am going to have to dig it out now and try that! (It is in the laundry garbage that rarely gets taken out.) Thanks so much for the idea!!!
ReplyDeleteYou are so awesome for coming up with this. So awesome.
ReplyDeleteGreat idea and your coat looks super -but will it work on my son's ski jacket? given it was -10 this morning I think I'm going to have to find a zip and sew it in so there are no gaps for the cold to get in.But I do HATE sewing zips so I shall try this as soon as then next one breaks.
ReplyDelete(And I know why my son breaks his zips - he is 9 but he still tries to just pull the zip apart instead of unzipping it carefully - brute force instead of manipulation!)
Thanks for all your wonderful ideas.
J
If you're going to drink the wine,make sure it's after you've done the repairing and not during or you might not finish :-)
ReplyDeleteTerry R
so incredibly super smart!
ReplyDelete