Pages

Showing posts with label modifying patterns. Show all posts

7.13.2011

how to shrink a pattern

This tutorial is in response to a question on how to re-size a vintage child's pattern from a size 5 to a 2T.   Below is the general steps to be taken to shrink a pattern.  The actual amount to be shrunk will have to be up to the sewer, who should already know how much distance is to be bridged by either having the child's measurements (allow for room to move and note seam allowances) or a pattern in the correct size that can be measured to obtain a desired length and width.

If your pattern has seam allowances, please note them down or cut them off (of your working pattern, not the original).  They will affect your final measurements.  You can use the method below while leaving on the seam allowance, but remembering they are there is important so that you can still measure your desired lengths and, of course, assemble the pattern correctly when you are done.

Before you start out, trace your original pattern onto paper of some sort to create your 'working pattern'.  Gather sticky tape (or glue), scissors, a straight ruler, a french curve (or curve square) if you can, and a pencil.
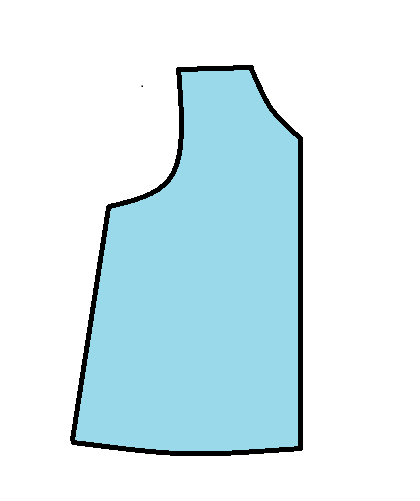
Here is my generic version of a shirt pattern front piece:

  • Photobucket


    • Now to shrink the pattern there are several points which you are going to want to take in.  Because children grow at different rates, their chests do not expand as fast as they lengthen, we can not just make the whole pattern smaller.  Generally, though, for each size smaller take off:

      1/2" of the chest (which is 1/4" off a pattern that is cut on a fold)
      1/8" of armhole
      1/8" of the shoulder
      2" of length

      Exact measurements will help you out to fit a specific child.

      I will start with one area to take in and show how each point can be done using the same general method.  Beginning with shortening the armhole, take your your ruler and draw a line perpendicular to the curve as shown below.

      Photobucket


      Cut along your drawn line to separate the pattern into two pieces.
      Photobucket


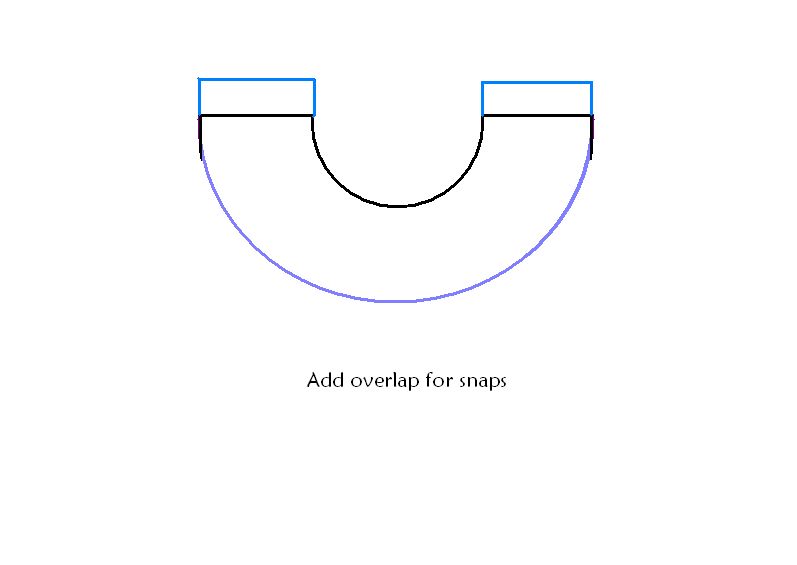
      Bring the pattern together again by overlapping the pieces, shortening the overall armhole to the desired length.  Use the straight center line to align the pattern pieces correctly.  Tape the pattern together into the new configuration.

      Photobucket


      You'll note that the armhole curve is now a bit choppy, which is easily adjusted by re-drawing the curve with your french curve (or eyeball it, it'll be fine).  Tape a separate piece of paper behind the pattern if you require a bit extra, draw the corrected curve, and cut it out again.
      Photobucket


      To shorten the overall length of the pattern, choose a point along the side below the armhole and draw another perpendicular line.
      Photobucket


      Cut and separate:
      Photobucket


      And rejoin to form the desired length, once again noting the center straight line and making sure that is all even up.

      Photobucket


      Correct any choppy lines with a ruler.
      Photobucket


      The shoulder is narrowed in the same way.
      Photobucket


      Photobucket


      Photobucket


      Photobucket

      You'll note that above I demonstrated each adjustment individually from the original pattern, but yours, of course, will have alterations as you go which will affect the overall size and look.  Here all the steps are again, this time with the changes intact.


      Photobucket
      The sleeve piece is adjusted in the same manner, cutting perpendicular to the curve and adjusting the width.
      Photobucket


      Photobucket


      To make sure you have the correct length of shoulder curve, use a flexible tape ruler to measure it and compare it to your armhole curves on the front and back pieces (keeping in mind to minus any shoulder seam allowances if they are on the pattern).
      Photobucket


      The french curve is particularly helpful for sleeve curves, however, you can still easily wing it if you do not have one.  
      Photobucket

      The back piece of the pattern can be done in the same way.  This is also a great method for making single adjustment in width or length for your children who do not fit the mold (and whose does?).  To enlarge a pattern the same method applies, except instead of bringing the pieces together, you separate them to the desired size, using another sheet of paper behind to make up the difference.

      I can tackle specific pieces in the comments section if you have questions.  This is a rough outline to adjusting pattern sizes and each specific pattern will have its own quirks.  As always, whenever you make a new pattern, try it out the first time on broadcloth or inexpensive fabric, not the good stuff.  Just, you know, in case :)

      3.25.2011

      Adding pockets to a One Piece Pants Pattern

      I like to use one piece pants patterns for their simplicity and speed.  Birdie Britches are such a pattern for the diapered set, and now I have another one piece (plus waistband -- don't sue me) coming for the diaper-less crew.  Stay tuned for future development on those.

      One issue with the one piece is that, without the side seam, it can be difficult to add sewn-in pockets.  I have been making do with stitching a pocket on top of the pant leg, but for Birdie's pants, being a mature man of almost 3 years now, I'd like something a bit more streamlined and less patchy.

      This is my solution.  The following tutorial is for designing in pockets on any pair of pants, but is specially designed for use with a one piece pattern.  If you are wanting to use this with the Birdie Britches, which does not have a seperate waistband, you can just take it up all the way to the waist like in this pocket tutorial and proceed as usual with a touch more fabric around the waist (no biggie, if you aren't using wool).  Alternatively, a few quick moves with a pair of scissors, adding in a bit of seam allowance, and you can make the waistband a seperate piece there also.  (Remember, this is supposed to be fun.)

      Adding Pockets to a One Piece Pants Pattern

      Photobucket

      Pull out your paper pattern, a couple extra sheets of paper, a pen, a ruler, and a drinking glass or bowl just a little bit wider than junior's hand.

      I chose a rounded shape for the pockets because I like them, and for their ease of sewing.  Place the glass overtop of the area where the pocket is desired and trace the edge directly onto the pattern paper.  To finish the pocket opening shape, draw a couple of lines up from the the circle edges to the waist of the pattern.  Cut out pocket opening.

      Generally, the pocket shape should appear like so:

      Photobucket

      Next step is draw the inside pocket pattern pieces.  Trace the the 'U' pocket shape on a seperate piece of paper.  On the paper, also draw the edge of the waist.  (My pants always have a slope on them, so it's important I draw it exactly, but yours may be more forgiving.)

      Photobucket

      Now on the pocket paper, measure out some distance from the top of the pocket along the waistline.  You are going to need a seam allowance around the pocket opening and another seam allowance around the outside edge of pocket, plus a bit of space in between.  I found 1 1/4" to be a good measure for me, allowing for two 1/4" seams.

      Photobucket

      From the top line I drew out the shape of my pocket.  (My pocket is about 6" long to please Birdie's need to push his hands down as far as he can into his pocket, which can reap havoc on shallow pockets.  You may want yours half the size of mine.)

      For this pocket, I wanted to use the same fabric behind the pocket as the pants, in order to keep them visually unobstrusive, but also wanted to minimize the fabric bulk, so the pocket is constructed partially of shell (pants) fabric and partially from a lightweight broadcloth for the parts that do not show on the outside.

      This means that the top half of the back part of the pocket (the part closest to the legs, without the opening) is half shell and half lining fabrics.  The front part of the inside pocket (inside, with opening) is entirely of lining fabric.

      To draw the inside pocket pieces, mark a dashed line about 2" below the bottom of the pocket opening on already drawn pocket to indicate the divide between shell and lining fabrics.  Trace the top half of the pocket piece without the opening, adding on a seam allowance to the bottom side of the dashed line (to attach the lining fabric portion of the pocket).  This top piece will show on the outside of the pants (as seen through the pocket opening) and be cut from shell fabric. 

      Photobucket

      Trace the bottom half of the back of the pocket piece, and add a seam allowance to the top portion, above the dashed line (where the shell fabric will be sewn on).

      Photobucket

      The front part of the inside of the pocket is your first drawn piece with the pocket opening cut out.  With all your pieces cut out, you will have something that looks like these:

      Photobucket

      Label your pieces with whatever makes sense to you, but also indicate the number of pieces to cut and out of what fabric.

      To assemble the pocket, begin with your pocket pieces for the back in your shell and fabric lining.  Sew them together to create on back pocket piece:

      Photobucket

      Photobucket

      Press the back pocket open and put it to the side.

      Sew on the front inside piece to the pants by aligning the 'U' shapes, right sides together.  Pin in place.

      Photobucket

      Stitch all around the 'U' shape.

      Photobucket

      Cut a few notches out of the curve before flipping the pocket to the wrong side of the pants and pressing flat.  Top stitch around the pocket opening for a nice finish.

      View from the right side of the pants:

      Photobucket

      View of the wrong side of the pants:

      Photobucket

      On the wrong side of the pants, align the back pocket piece over top of the front pocket piece, wrong sides together.  Pin the edges of the pockets together (but do not pin to the pants*).

      Photobucket

      Photobucket

      Sew around the outside of the pocket.

      Photobucket

      Turn the pants right side out and press.

      Photobucket

      Now you can proceed as usual, assembling your pants.  If you find that the top of the pocket wants to slip while sewing the waistband, pin or machine baste the top in place.

      When you are all done, you can put them on your child and completely fail to get a proper picture of them :)

      Photobucket

      Done.

      ===========================================================

      * While I did say do not pin the pocket to the pants, you actually can for a nice effect.  Finish the edges of the pocket and then before sewing the edges together, pin the whole lot to the pants.  Then sew the pocket directly to the pants.  You can use contrasting stitching for an interesting look, which would look extra nice with a top stitched faux fly.

      Here is a pair I did just that, except the thread is quite well hidden.  You may have to zoom in to get a good look:

      Photobucket

      Just an idea ;)

      1.12.2010

      snack backpack

      The girl child needed a new bag to take snacks in - her regular one now holds 10 pounds of safety gear, such as a helmet and wrist guards, we force her to wear whenever she wants to ride one of her wheelie things.


      I made Smootch a modified version of my toddler backpack, using a zipper from some vinyl packaging a bedspread came in, extra wide single fold bias tape, and some rainbow stripey strapping I found in a thrift store (it was totally a steal too, only a $1.50 and I have some 40 yards left). The backpack fabric is a Free Store find, a Holly Hobbie curtain I've been holding onto for months, waiting for the right project.


      To make the backpack, I used the back piece from the original back pack pattern, cut 2, and fused them to medium weight interfacing.

      The side strap is two pieces of strapping laid side by side. I put the zipper in,


      and then, because the strapping was being so accommodating, sewed together the straps with a zigzag stitch.


      The single fold bias tape was sewn to the edges of the strapping, and then to the front and back of the pack. A little loop at the top made from the bias tape ensures that the back pack will hang on a hook nice and flat.


      ****************************************************

      This is a free tutorial and I encourage you to use the information in any way you need to (check the disclaimer at the bottom of the page). If it works for you, please consider supporting my etsy shop by purchasing a Little Print Design pattern or toss a dollar or two in my paypal to show appreciation and to encourage me to offer up even more quality patterns and tutorials.


      Thank you!
      Questions about the Donation? FAQ here.

      10.26.2009

      sewing a yoke

      I've just put up the newest post editor for blogger and its image editing is throwing me through a loop.  Hopefully I can get through this with the illustrations in the right place.  Bear with me.

      Last post was about creating a yoke by modiifying a bodice sloper or pattern.  Assembling the yoke is slightly more involved.  The instructions here are for front and back yoke pieces and corresponding linings.

      Depending on how your yoke is closed will affect the yoke assembly.  I am going to assume that you are using a yoke with snaps on one shoulder, but if you have a back closure with buttons or zipper, you can just stitch together the front and back yoke pieces at the shoulder, skip the shoulder snap info, and then jump back in where the yoke and the lining are joined together.

      Begin by stitching the front to back at the shoulders, if your design calls for it, of the yoke and the yoke lining.


      Stitch at the seam allowance all the way round the yoke lining.  This is to be a guide when sewing the yoke to the lining. 

      Clip along the curve by making a small vertical cut from the raw edge to almost where the seam allowance is to facilitate a smooth curve when sewn.  Put aside the lining for now.   

      Attach the bodice front and back to the yoke piece in the appropriate postions.  Continue the stitching around the arc from the one bodice piece around across any attached shoulders to the other bodice piece.  This stitching will serve as a guide to pressing the curved edge.

      Align the yoke with the lining, right sides together, and stitch together around the center arc, around any ends intended for closures and around the outside of the outside arc edge, stopping when the bodice is attached.  Clip curves.

      Turn the yoke right sides out and press seams.  Use the stitching as a guide on the lining and the yoke to turn under and press any portions not attached to the bodice pieces.

      Pin together the yoke and lining and top stitch all around the edges.  Attach snap or button closures on shoulder.

      I hope that was reasonably clear.  Questions are welcome, of course :)

      *****************************************************
      This is a free tutorial and I encourage you to use the information in any way you need to (check the disclaimer at the bottom of the page). If it works for you, please consider supporting my etsy shop by purchasing a Little Print Design pattern or toss a dollar or two in my paypal to show appreciation and to encourage me to offer up even more quality patterns and tutorials.


      Thank you!
      Questions about the Donation? FAQ here.

      10.25.2009

      easiest way to create a yoke

      Yokes are great for adding drama to a dress, especially when there are so many fantastic fabrics to play with. Creating a yoke from a sloper or an existing basic bodice pattern is simple and quick. Here is one of the fastest, easiest way to make yourself a yoke dress pattern.

      Before you begin, a couple of quick notes. The instructions and illustrations show just the front bodice but if you desire your yoke to continue around back just repeat the steps for the back bodice piece. If you are chosing to modify a commercial pattern that includes seam allowances, remember about those seam allowances where appropriate once your yoke is created (I'll talk more about this down further.)

      Begin with your bodice sloper or commercial pattern bodice piece. Trace the sloper or pattern piece onto a piece of paper (you may only have a half bodice intended to be laid out on a fold - that's cool, just work with it as it is and cut out the yoke on a fold when it is time). Pull out a ruler (and french curve if you have) and measure the width of the shoulder. From several different points measure out from the neckline, marking the same distance as the width of the shoulder. When you connect the dots, you should have a yoke drawn around the neck.
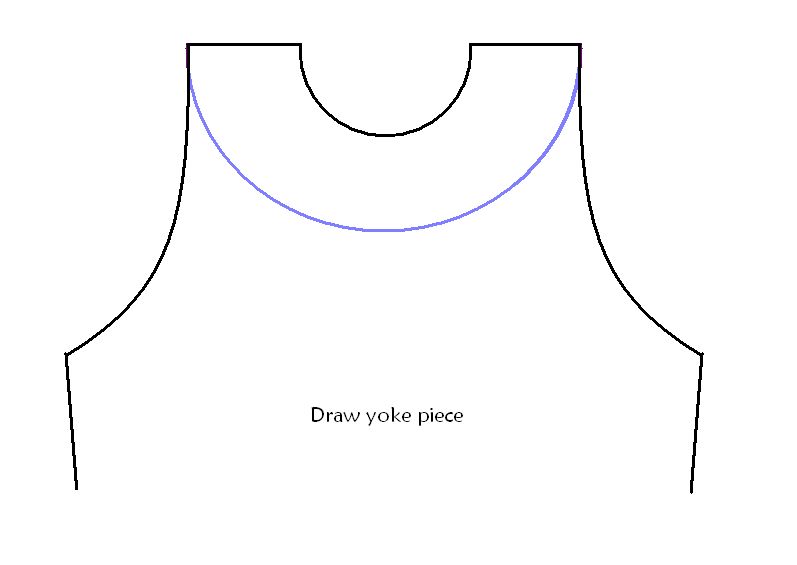
      Cut along the line to seperate the yoke from the bodice.

      If you are using a commerical pattern with seam allowances included, either redraw the pieces on another piece of paper ADDING a seam allowance to the yoke and bodice portion just cut (blue line in illustrations) or make a note of it on your already existing bodice and yoke.
      With a yoked bodice it's easy to eliminate the zippers or buttons in the front or back of a dress by by adding an overlap for snaps or buttons on the shoulders.
      And that is that.
      Make a practice version first with inexpensive fabric before you cut into the good stuff. You may want to make some modifications to the style once you've got your basic shape.
      Sewing the yoke can be a bit tricky, depending on how your closures work. I will have come back again tomorrow and share my method of sewing yokes. Any questions you have I can also address next post. Until then :)

      **************************************************

      Find out how to sew a yoke here.


      *************************************************
      This is a free tutorial and I encourage you to use the information in any way you need to (check the disclaimer at the bottom of the page). If it works for you, please consider supporting my etsy shop by purchasing a Little Print Design pattern or toss a dollar or two in my paypal to show appreciation and to encourage me to offer up even more quality patterns and tutorials.


      Thank you!
      Questions about the Donation? FAQ here.