Pages

2.23.2010

modifying the Lace Up Dress for a larger child

Today`s post is about modifying the Lace Up Dress bodice to fit a larger child. (Take a look to the right at the sidebar if you are not familiar with the pattern. It`s over there in taupe, with a yellow background, which was the kitchen wall in my beautiful blue house. I miss my colourful walls! Ahem, off topic :)

The pattern is intended to fit preschoolers, but it is easy to modify the bodice to fit up a size or two. Once you begin getting into sizes 9 and up, I recommend adding darts from the waist up for a better fit (see here for a discussion on children`s sizes). The instructions below are for modifying without darts, so suitable up to a size 8 or so.

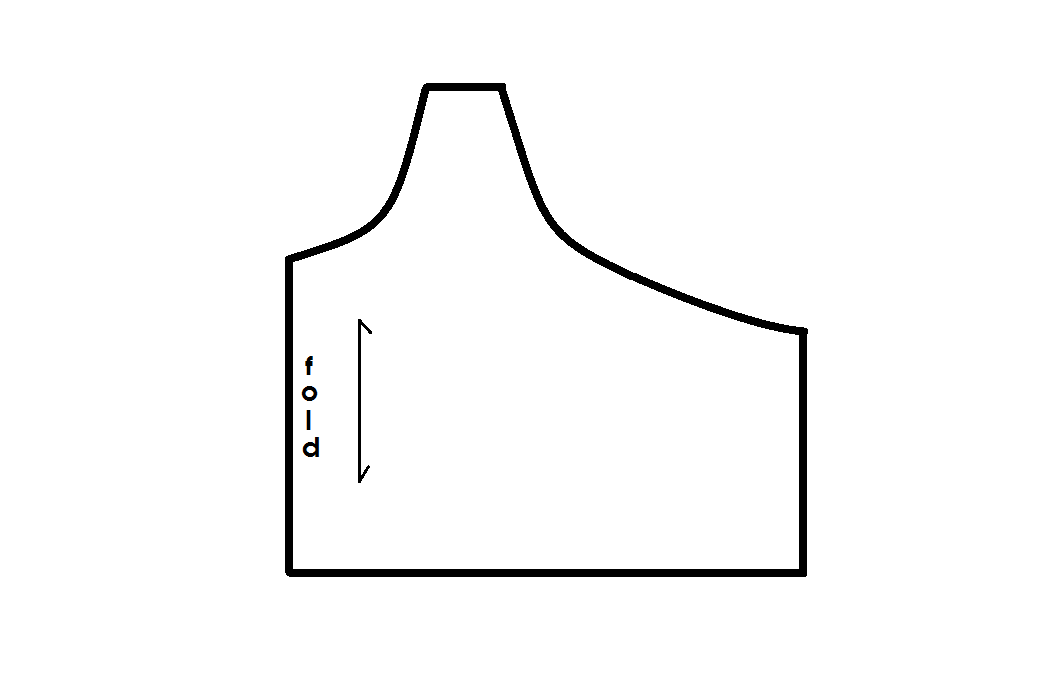
The largest pattern piece I have provided in the pattern is for a 23 inch chest and just over 9 inches for the front center length.
Measure the intended child`s chest to find out how far you need to expand. Then measure up their middle front from their natural waist line up to just between the breast bones (the little hollow at the base of their neck) for their front center length. With those two measurements you know how much wider and longer your pattern needs to be to fit that child.

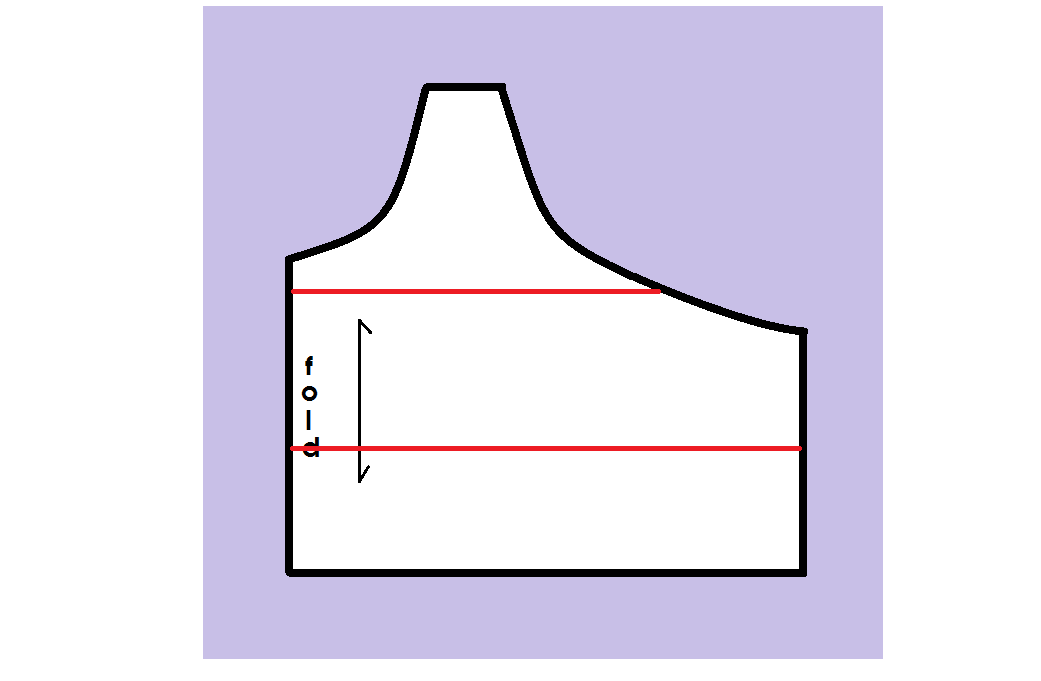
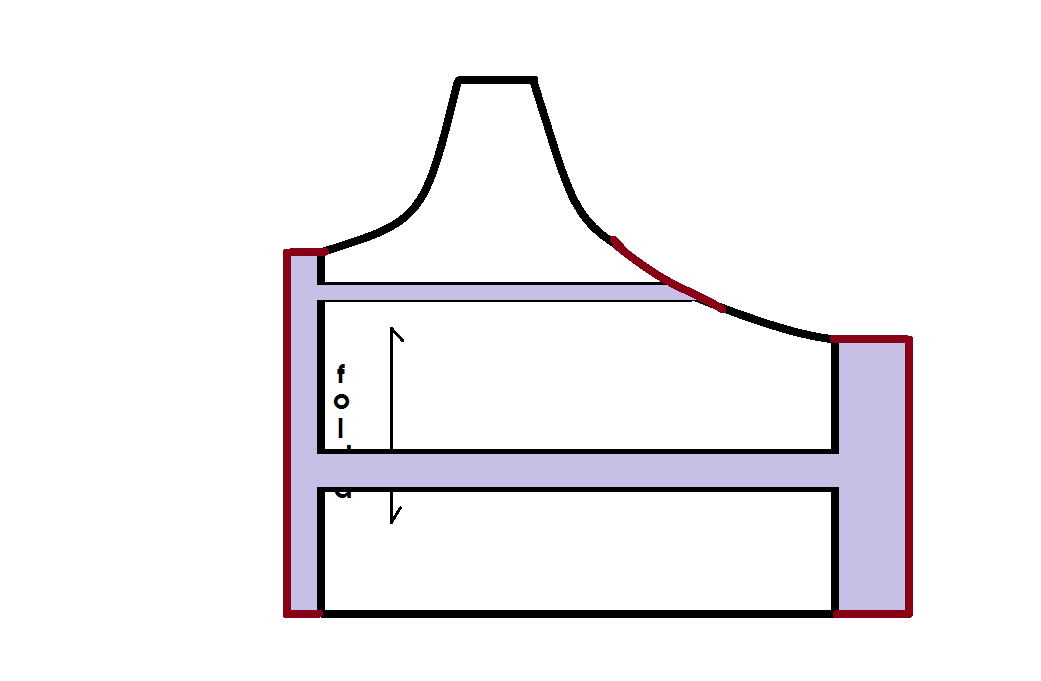
Begin by making two straight lines across the original pattern piece as shown in the diagram below:

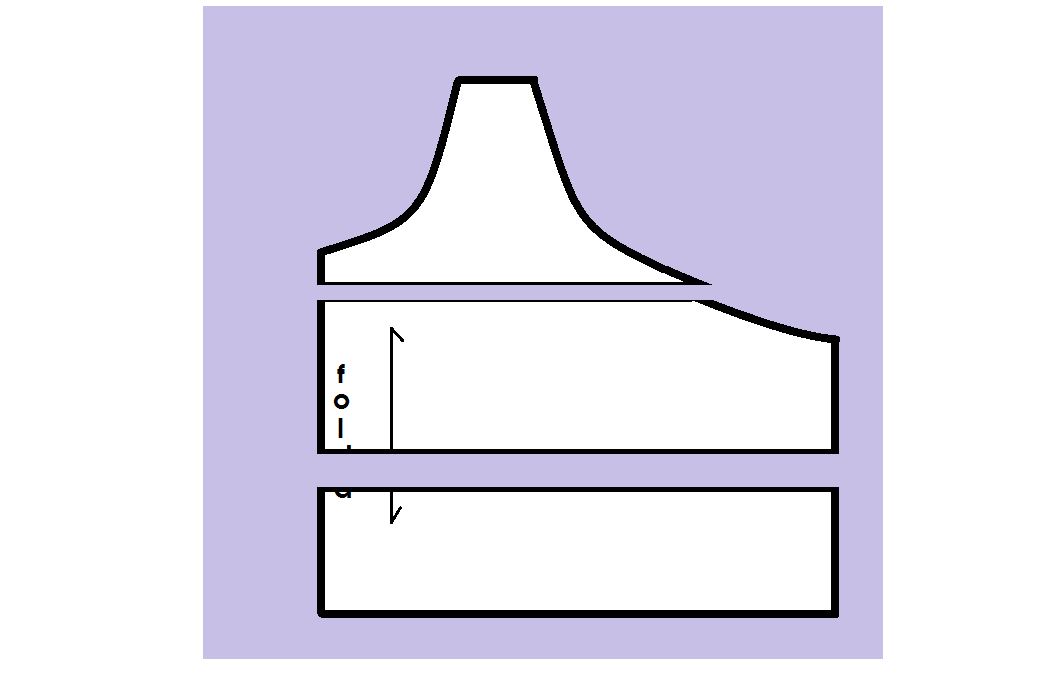
Cut along those lines and position the pattern on a piece of paper. Separate the pieces to create the extra length needed for your particular pattern. Tape the pieces in place to the paper underneath.

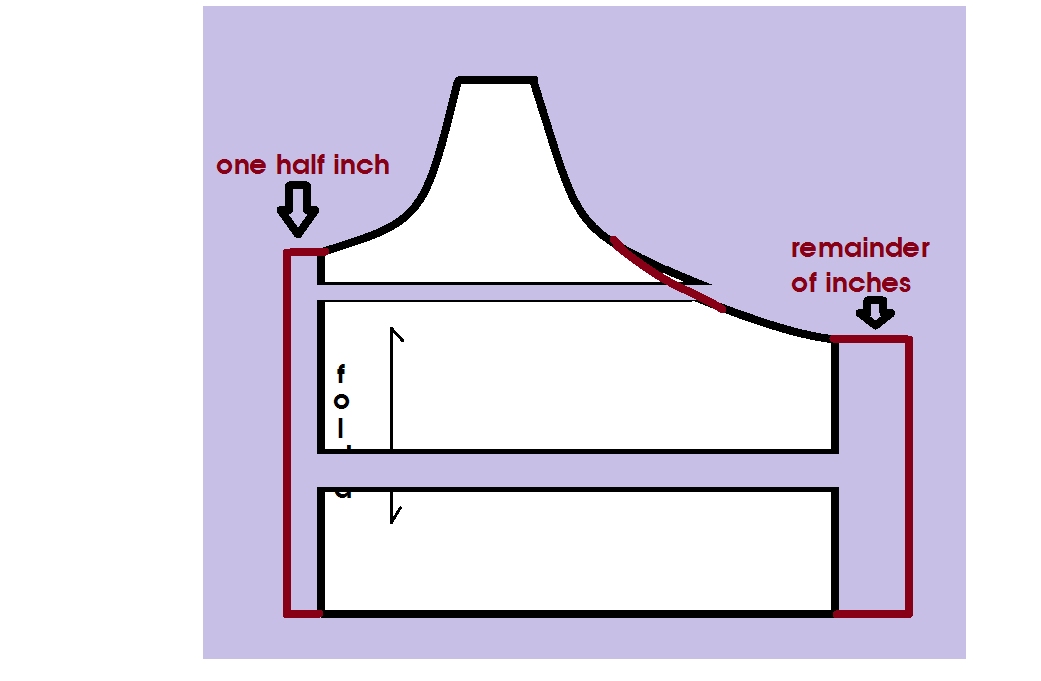
To add width, take a ruler and pencil and add a half inch to the middle front of the pattern (okay, not exact, but it will work just fine for the size 8 and under set) and then the remainder of the extra needed inches on the back portion.

Before you are done, redraw the armhole curve into a smooth arc (use a french curve if you have one, otherwise just eyeball it.)

Cut the modified piece free from the additional paper and you have yourself a bodice that will fit your larger child.
Assemble the garment according to the instructions. For the skirt, double the waist measurement for the width and just determine how long you would like the skirt to be for the length. The older children really stretch in the legs, so it might, unless you want to change the skirt into an A-line, be better to pick the hem up above their knees to avoid the skirt from being too restrictive (it would also be fairly cute with a pair of capris).

I hope that helps anyone interested enlarging the Lace Up Dress up a size or two :)

(There has been a lot of talk lately of turning this into an adult pattern and this summer I would like to look into that. My hold up is that I have a terror of darts, seeing as my own form is so far off of the `normal`measurements used in pattern making, and I have little tolerance for modifying patterns for myself, body issues and all. But, it`s time to stretch myself out of my comfort areas and go for it. It helps that I recently read that pattern making for children is actually more difficult than for adults because of children`s disproportionate growth. We shall see... )

2.22.2010

Weekend crafts


Smootch no longer needs me to ask, "Would you like to do a craft?" She tells me when it is time. (As in, "Mom. Turn off the computer. It's craft time.")

Smootch no longer looks to me for what to make. She tells herself what to make. (You can tell because her body will suddenly go still during play and her eyes glaze over, as a slow smile spreads across her face as inspiration blooms.)

Smootch no longer asks me what she has to work with. She already knows what is there. (She pulls the entire craft cupboard apart at least once a week looking for that elusive single wobbly eyeball sticker she saw a few months ago that she knows is there.)


I am no longer Smootch's guide. I am her personal staff. (She tells me her vision and I run the machines.)

I am no longer Smootch's model. I'm not even on the page most of the time. (It's too busy with cats, rainbows, roller skates, and random letters.)

I am no longer constant. She doesn't need my help or encouragement. (She' doesn't even need me in the room most of the time.)


I am constantly amazed. What is going to be shaped into existence by these tiny, creative fingers? (I have no idea. But I'm looking forward to it.)

2.19.2010

name game pattern giveaway


Alright, you lovely people, I need some help again.

As I've blogged before, I'm a not as clever as I'd like to be. The slim fit, hipster trouser pattern is moving into the final stages, but there's a small hitch. Since ya'll were incredibly helpful with naming what is now the Birdie Britches pattern, I thought maybe you'd enjoy another challenge.

The trouser pattern is a one piece (plus pocket), easy and quick unisex style, designed for the tall and thin preschooler, who like to wear their pants down on their hips. Like my girl. I can't tell you how much it drives me wild to have her push all of her pants and skirts way down past her natural waist line to rest them on her hips. Apparently I'm not the only one with waistband aversion. Others have written to say how their preschoolers push the waistband down, but then end up walking around with an unfortunate amount of exposure on the backside. These trousers have been designed with a high back so that the band-on-hip comfort requirement is met for the child as well as the hide-the-crack parental desire.


Now they are all done, ready for the tall and slim children 3-6 years old. All they need now is a name. For my own reference, I have been calling them 'Smootchie Specials', because their design in based on Smootchie's not exactly off the rack physique. However, my daughter's nickname, as innocent and sweet it was when I started using it during her first few days of life, has some other cultural references that really do not relate to my kid. Calling them Smootchie Specials makes it sound like it was smuggled across borders in a single engine airplane. But what should they be called?

If you would like to the play the name game, please leave a suggestion (comment) on this post. On Sunday evening (February 21st) I will go through and award any suggestion I use with a free pdf pattern (your choice) from my shop or you can have a copy of this trouser pattern if you can hold on a week for me to bring it all together.

I will also make a random number draw with all entries (one per a customer, thank you) for another chance to win a free pdf pattern.

Good luck, have fun :)


*****************************************

Hey there! I am extending the contest deadline by 24 hours because it's Sunday night and I am way too wiped out to handle it all :D So the draw and name decision will happen Monday, February 22 about 9ish pacific time. Cheers!

*****************************************

I'm back!

I have found myself a random draw winner - Jade, I have emailed you already!

I also have two winners for the name suggestion, Andrea and Kathryn. Andrea, I have sent you a message, but Kathryn who-thinks-of-Mr-Dress-Up (I loooooove Mr Dress Up!) could you please send me an email at vegbee@littleprintdesigns.com so we can set you up with a free pdf pattern?

Ah, now the true name of the pattern formally with the working title of Smootchie Specials:

(dum dum dum dum dum dummmmm)

will be revealed next week....

I will say that the name is not actually mentioned in the comments, although it was heavily inspired by Andrea and Kathryn's suggestions.

And I will also say that it was incredibly fun to read all the suggestions and I have a page full of notes I jotted down as I read through them all. You guys are funny and smart and good to me. Thank you.

2.18.2010

thready issues


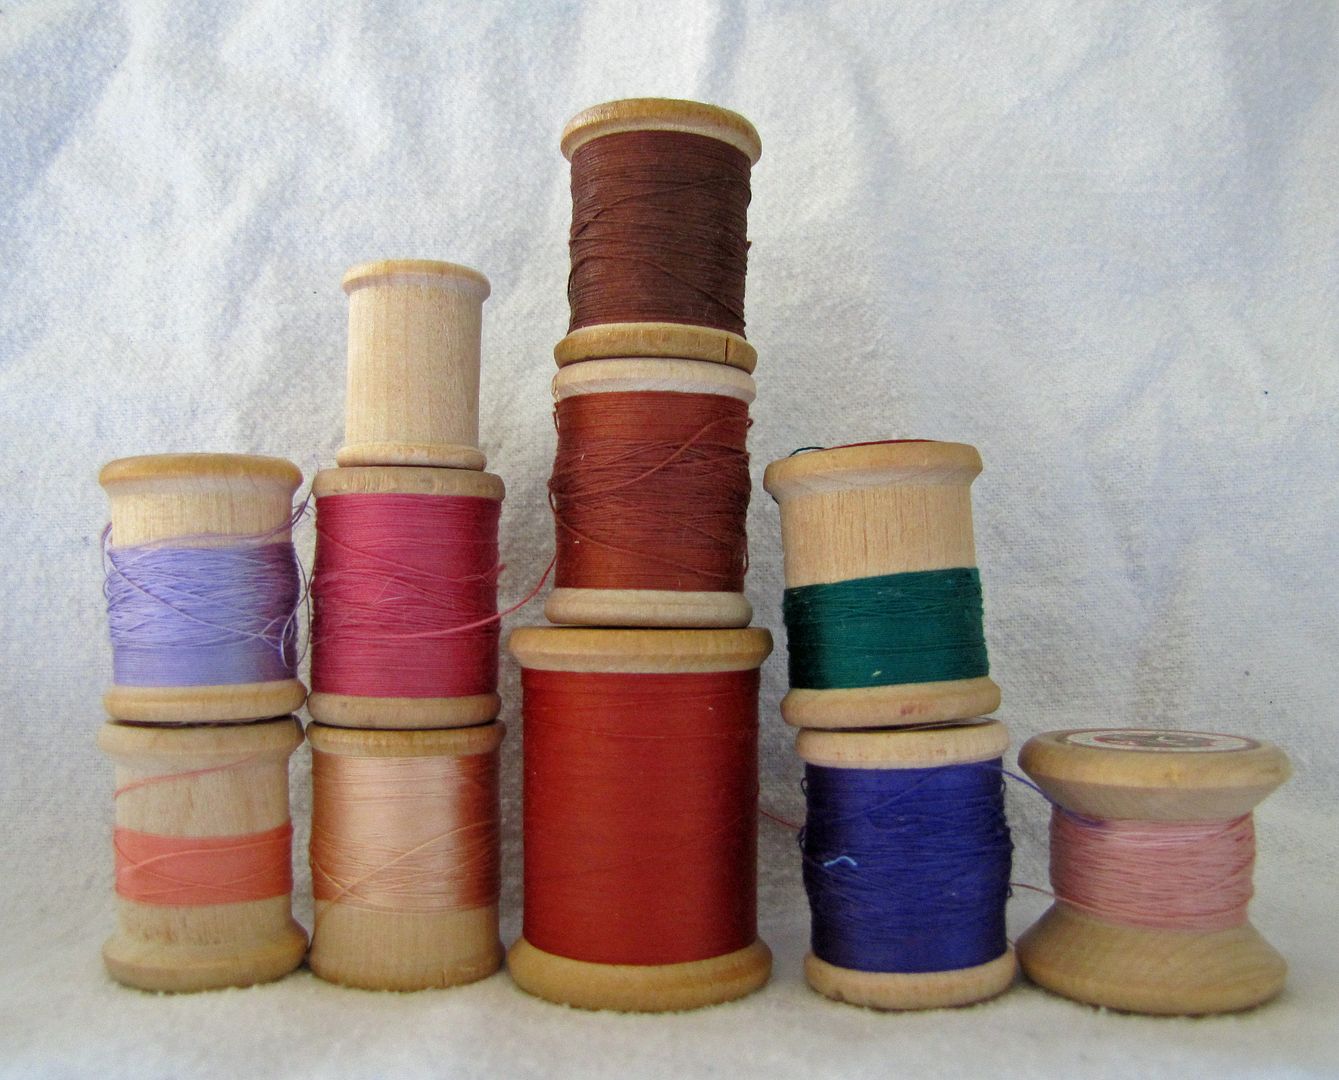
Something I haven't thought about often is my thread. I typically use 'all purpose' Gutermann thread because that is the most commonly available and I've been told that it is a quality brand. As I understand it, 'all-purpose' is polyester thread wrapped in cotton. Pure cotton thread has no stretch at all, and the polyester content allows for more give, all the better for sewing with a wide variety of fabrics, particularly knit.

Now I live in a semi-rural area and my source for notions has been a small department store rather than a large fabric outlet. Since they did not carry my usual brand, I picked up Coats' all purpose. Initially, I was a little weary of putting it in my machine; I have received dire warnings in the past about using cheap thread, everything from the fluff from the thread will clog the machine in places I will never get at to having continuously snapping thread that will create a headache so painful I'll be tempted to slit my jugular with my rotary blade. So, the new thread scared me a bit. Is Coats a quality thread company? I have no idea. It just looks like thread to me.

But sewing those first few seams with the new thread changed my life. Well, my sewing life anyway. Those seams, they were beautiful.

Before that moment, I was thinking that it was time to take my machine in for maintenance again, since my stitches were getting pretty wonky. In fact, I've never really been satisfied with my machine's stitching, particularly in comparsion with the industrial machines I briefly have had the chance to play with. My machine has sewn okay, but the evenness and and tension just isn't as pretty as it could be, even straight out of the repair shop.

My stitching, using Coats' thread, was perfect. It was pretty. There was no indication that my machine needed a service. It's a joy to use. I never thought that I would get passionate about thread in this way, being as I think of it as the most boring part of the process of sewing, but it appears to be much more than had assumed.

Have I been using the wrong kind of thread for years? Should I be matching thread to my machine in the same way as I consider the right thread for the fabric? Is Coats just a way better brand and I should be irritated that the major outlets only supply Gutermann?

I'm really interested to hear other people's experiences with the interplay between thread and machine. Perhaps there are some bonafide experts out there who could enlighten us all?


2.17.2010

measured up

Does the sizing of children's clothes confuse anyone else?

One of the mistakes I made when I first started out sewing is thinking that the size I would buy in ready to wear corresponded to the size on a pattern envelope. Then I would measure my daughter, and have her sizes come up completely different. When in confusion, I used to go with the what I believed her 'size', according to the tags in her shirts, was, and ignore my measurements. I don't know why really, maybe because I lacked confidence and the knowledge that sizes on envelopes are completely irrelevant. Measurements matter, sizes do not.

Another problem I had was not understanding exactly what was the difference between a pattern meant for a toddler versus a preschooler. Both came in size 2 and were roughly the same measurements, but differently proportioned. Actually, one was a 2T, but I didn't know what that meant either. I know some of you are laughing pretty hard that I couldn't think my way through what 'T' represented, but my first experience at clothing children was my own, and they don't really put any of this information in any of the thousands of pregnancy and baby's first year books I read.

(Baby books like to talk about scented candles and having sex after the baby is born - things I've been doing for years already, thank you. Where was the real info like how to juggle a car seat, diaper bag, and a screaming, hungry baby with a leaking diaper while checking her into the emergency room at the hospital? Hm? Anyway.)

Perhaps my basic ignorance set myself a steep learning curve on sizing, but it wasn't until I started putting together my own patterns that I started to get a clue on how it works. Of course, I started making my own pattern because commercial patterns did not fit well, which was mostly because I kept choosing the wrong size, which was because I didn't understand how the sizing worked, which is because I did not grasp that small children grow weird. Which is that they don't just get bigger, like one of those slimy grow sponges shaped like dinosaurs you place into water, but grow fast in one area while another part of their body hardly gets bigger at all.

I have a vivid memory of my college introductory psychology text book with the baby to adult illustrated anatomical chart burned into my head. It's there because a few months after I began sewing I was going through my old text books, trying to slim down my collection and steal back some shelf space, and flipping through my intro texts I came across the second on human growth. Seeing the monstrous baby with the bobble head slowly have it's body change from bean shape to Chippendale calender-esque man turned on my dusty mental light bulb. Ah! The whole size 2 vs size 2T makes sense because toddlers are shaped different than preschoolers. It's so simple. Why couldn't I work this out? I actually blame baby brain, and the fact that I was thinking about what grain-wise and bias tape and what does a 11/60 sharp needle mean to me really, instead of the what looked to be the simple stuff, like wrapping a tape measure around my daughter's chest.

I kind of want to laugh at myself, for being so woefully ignorant, but trying to puzzle out children's sizes is not just my problem. I have encountered on more than one occasion, a grandmother standing in the children's department at the shops, scratching her head, trying to figure out whether she should get the 2T or the 2, because it's really damn confusing when trying to buy an outfit for a 2 1/2 year old child. And if I have troubles and grandmas who actually know everything have problems, then I bet there are a few more out there in blog land too.

This is a breakdown of children's sizing, as I understand it, for both sewing patterns and ready to wear. (Keep in mind it's a bit fuzzy, because every pattern maker and every garment manufacturer does their own thing. It's a only a guideline, at least until they nail down this cloning thing and future generations all grow predictably.)

Baby sizes are for children who do not yet walk, range from 0 to 18 months.

Toddler sizes are walking children with bubble tummies, rounded tiny shoulders, short little necks that are hard to get into to nuffle, and hips that still are turned out, giving them a slightly bow legged walk. You know you have a toddler if they say the word 'no' more than ten thousand times a day. Their sizes include 24 months, 2T to 4T.

Children (preschoolers) have about the same sized chests as toddlers, but their shoulders are wider, their bellies flatted out, and their legs growing like crazy. Their sizes are 3 to 6, and 6x (the 'x' is just a bigger size than the 6, but they don't call it a 7 in order to avoid confusion with the next group. Totally clear, right?)

Boys and Girls (school age) sizes are differentiated by sex because this is the age when bodies begin to grow differently, depending on your chromosomes. Their ranges are 7 to 14. If you are using a 'boys' pattern for a girl (or vice versa), you may have to make some modifications for a better fit. As school age kids grow, the standardization falls apart because the kids are all growing and maturing hormonally at different rates. That is why you have a 4'5" kid in grade five next to a 5'11" kid. They try to give us a whole bunch different 'body types' to help out (like slim or husky, or junior, etc), but pattern tissue fitting is your best bet here for any individual child. Or sew with knit - knit fits everyone.

Juniors (high school) is almost adult sized, except they aren't. The boys are a bit slimmer and shorter than men, and the girls are all perky and small waisted in comparison (at least in theory). Their range is 1-13 ish, but in stores go quite a bit higher. Never confuse adult sizing with juniors. It will make a grown woman with a skirt that jammed at the knees cry.

I hope this helps out a few of you who are just venturing out. I wish someone had told me years ago, especially when buying patterns for your 1 to 3 year old range. And, when in doubt, pay attention to the measurements you have and modify the pattern. Let the size numbers go hang. There really is no normal size.

2.16.2010

Sewing what children will actually wear

Sewing a garment for a little child is a big job. Even for the really small ones. There is this whole mental process and series of acquisitions that happens before a single stitch is ever sewn. What item to make, what pattern or style to use, will it fit (where's the bloody tape measure?), what fabric, is there matching thread, is the zipper going to be the right size, which needle, trace the pattern, cut the pattern, do the applique, fix the serger that always dethreads itself right when you need it. Some of this prep work is creative and some is mere housekeeping details and accounting, but almost all of it is forgotten about and not accounted for when presenting the final project by everyone except the person who did it all.

Sewing, as done by most of us, is basically non-essential to life maintenance, and therefore a gift that we present to our most cherished. A gift that takes skill, creativity, a cultivated attitude of calm (do not get flustered and cut wrong, do not hit machines), time and money. It takes energy. We stitch in pieces of ourselves, our thoughts and adoration, into every tiny pair of pants and sun dress.


So, when your sweet little angel sticks her tongue out at your precious gift of love and whines, 'But I don't wanna wear this, it's scratchy, it's ugly, and I hate it!' and you have to dig even deeper into your cache of emotional and spiritual resources to stop yourself from wringing her ungrateful little neck, it is time to go far away from the child in question and reflect upon the entire sewing process.

Sewing for children is different then sewing for adults. There is style, of course, and the fact that their bodies won't stay the same shape or size for five minutes, but most of all it's because children are not, in actual fact, very nice. Instead, they are honest. They lack diplomacy and empathy. They believe, because you get to stay up late and have the keys to the ice cream lock up, that you are all powerful and knowing and everything is easy for you. Not only is your life all parties and cookies, but you make them do things they do not want to do ALL the time, and NEVER let them do anything fun.

They have no idea that you make them pants because you love them. They think that you are trying to torture them.

There are many things I've sewn for my children that they love. Today, for instance, Smootch is wearing a skirt I made for her when she was only two. She's worn the skirt every week for three years now. It's getting fairly faded and ragged, but the whole 'my mama made this with love' thing is going pretty well for this particular item.

But I've put a lot of effort into some items that she completely hates and refuses to wear. No, she doesn't actually doesn't stick her tongue out it, at least when I'm looking, but if I put it on her, it's all scratching and wiggling and whining until I finally let her take it off again.

Even Birdie, not yet two years old, has some items that I've made that he loves, just loves, and shows off to other toddlers, and others that he'll throw across the room when I pull it out of the drawer and try to hide under the beds.

So, what makes any particular item something that a kid will wear or something that will be plotting to line the cat basket with the very first time they see it. It seems so random sometimes. Items that the child in question has even helped choose the style and fabric for, all in their favorite colour with sparkles, are rejected, while the ugliest, grease stained brown dress with the lining half hanging off pulled off, dug out from the free box at the thrift store, is all the little mite will wear for two weeks straight. What the...?

Over the years I've made a study of decoding the mystery of children's tastes. With every handmade outgrown and never worn, with every rejection and suspicious total destruction on the first wearing, I've dedicated more thought to the details of wearability vs. neglected garment squished into the very back of the drawer. Given that I actually make patterns for children's clothes, I may be losing some credibility here by admitting my kids don't love everything I make them, but my success rate has increased significantly over the years. I don't know what every child will like, but I've learned a lot about what not to make for mine.


Here are a few things I've noted:

The most very basic is do not use scratchy materials. Do NOT use scratchy materials. Kids never sacrifice comfort for style. I've lined beautiful dresses with inexpensive poly-blend materials and had Smootch refuse to wear it (or only with an undershirt, that completely ruined the look of the dress). Now I line with soft cotton or flannel. Yes, flannel - it's the inside, make comfort the priority and don't worry about how odd it is.

Stitch down all seams that may poke out or scratch. You can top-stitch some down, like the shoulder seams on raglan shirts, or do a bit of blind hem stitching on the insides. Avoid using wooly nylon thread on inside seams too.

Colour is important. Like most kids, my children like brights and disdain pale or muted. They will go for garnish and tacky every time. Sparkles, glitter, dangly bits of plastic, these all increase likeability. I've noticed that that the colour, be it pink or orange or whatever is the favorite this week, only needs to be somewhere, but need not be overwhelming. The edge done in pink lace or an orange bird applique is usually enough to tip the balance in favor of the garment.

Study what the older kids wear. They want to be like and wear what their older siblings or cousins or school mates are wearing. My toddler wants to dress like my preschooler and she wants to dress like a tween and the tweens want to be like the high school kids. Usually it's enough to borrow a few elements from the older set - colours, shape, embellishments - and use them to modify age appropriate styles.

Every once in awhile it's time to go through the children's clothes and wean out what is too small or unloved. This has been a great time to get Smootch involved and glean a bit of knowledge. I have her sort through her clothes into keep, go, and have mama modify or reconstruct. Then we talk about why she chose to keep some clothes and not others. Sometimes it's really easy to detect a pattern, like when the stay pile is all pink and the go pile all gray. I've learned to check my ego at the door when we do this and not argue her choices with her. I may not let her have the final say on everything, but I value and learn from her honesty.

When I make most of the decisions on what my kids wear it's one thing. When I actually make most of it too, it becomes this potentially treacherous place of hurt feelings, resentment, and guilt. I want my kids to enjoy what they wear and how their bodies feel in their clothes. I do not want them to feel like they have to wear something just because I made it, even with love. Finding that balance between what I do and what they like is a part of the sewing process. That is creative work.

One of my proudest moments last week is overhearing Smootch telling her school mates how her mama makes the best dresses ever. When Smootch tells somebody that what she is wearing is handmade, she says it in the same way as she would say, pay close attention because this is special. She likes books with illustrations done in fabric (and then photographed) because they are 'handmade'. Handmade is a word to describe something wonderful. I used to worry that my pride in this kind of talk was about my ego and that I was brainwashing her, which will ultimately led her to rebel against my pushy, sewing mama ways. But now I think that the time I've spent listening to what she wants and learning about her highly idiosyncratic preferences has paid off. She actually, sometimes, truly feels that invisible part of the garment where I've stitched in my love and adulation.

As long as I don't make it scratchy or brown. And add some sparkles. Maybe a heart and pink lace. A pocket or four. Just not brown. Ever.

2.15.2010

XL t-shirt to maternity tee

Before anyone sends me some congratulations or any grandparents phone me up, I did not create this tutorial for myself. I am not pregnant. Okay.

This idea did come about by a reader, who actually is pregnant, that requested a way to reconstruct a man’s extra large t-shirt into a fitted maternity shirt. The idea is to keep the voluptuousness of the xl trunk, but bring in the shoulders and sleeves to fit properly and comfortably. There is nothing worse than feeling all bloated and huge with the belly, and then throwing on a gianormous men’s cut t-shirt that makes you look like a retired linebacker with a beer gut. Or at least that was my experience :D

You can also use this tutorial to convert any large men's t-shirt into a fitted women’s tee by adjusting the sides to fit a non-pregger shape.


I really, really wish I could have materialized a medium sized pregnant woman out of thin air to model this shirt for you. No Woman, Man, or Child in this household was going to pull this one off, though. You’ll have to just trust me when I say that it would look great and fit perfectly on a model, about 6 or 7 months pregnant, glowing from an abundance of fresh vegetables, folic acid, and slurpees.

Begin with a regular t-shirt from your closet that fit well before your belly grew out of it. We are looking for a style that fits your shoulders and arms well. Next, locate a xl men’s t-shirt or larger, depending on your own size (try to go up at least 2 sizes) or, as I used here, a polo shirt. When choosing a shirt, think about softness and breathability; cheap, stiff t-shirts are horrible in the summer heat. If this is your first reconstruction, you may want to go with the freebie charity run shirt, though, before you cut into the husband's prime stock of band tees.


Fold the larger shirt in half, inside out, aligning the side seams. Turn your guide shirt inside out also and tuck in the sleeve to expose the shape of the arm seam. Lay the guide shirt down on top of the folded large shirt, positioning the center line of the guide shirt over the folded edge of the larger shirt and aligning the under arm seam on a horizontal plane.


What you are looking for is to line up the underarm seams in order to give yourself enough room on top to recut the arms and shoulders, without losing the belly space. (If you are not able to get enough room to recut the arm and shoulder, consider finding a larger shirt to reconstruct.)

Take your scissors and cut the larger shirt in the same shape of the guide shirt around the shoulders and armholes. Make sure to include a seam allowance. (Do not overthink the arm shape, just cut the best approximation that you can - this will not be a perfectly tailored t-shirt, but it will fit just fine.)

Cut under the arm down the side seam, but depart from tracking the guide shirt shape a inch or two under the arm and angle your scissors to create an A-line shape, reaching out as far as you can. The more belly room the better.


Open up the folded larger shirt and separate the front and back halves. We are going to do some tweaking to improve the fit and neckline.

Refold just the BACK portion of the larger shirt and cut your A-line in slightly. This is to reflect the fact that your back is not growing outward at the same rate as your front (though, granted, it is getting larger too. If your shirt is going to be very long or have a pear shape, skip this step; you may need the extra space to accommodate expanding hips and, sorry to be indelicate, butt.)


For the FRONT half of the larger shirt, the neckline needs to be adjusted. When you cut out the shirt originally, you could only cut the back neck shape. Now you can play with the front of the neckline.

Fold the Front of the shirt in half once again. It will help if you make a small mark on the shoulder to indicate how wide the shoulders should be. Use the back piece for reference and a piece of chalk to indicate exactly where the neck begins.

The front of your guide shirt will give you the best shape to trace. As it was, the front of my guide shirt happens to plunge low enough for me to take out the button placket on my polo shirt.


The last bit to cut before we head to the machine is the sleeve. Again, do not stress the sleeve shape, this is knit, and it will forgive you. We are going to cut from the finished edge back, adjusting the length to fit under the new armhole (measure it if you are not too sure). What you are looking to do is to cut down a lazy, pulled out 'S' shape from the shoulder down, the same length and width as the guide shirt.


The lazy 'S' shape, is going to give your sleeve some extra room for the shoulder ball and allow the sides to come down and curl around to accommodate your arm.

Ready to sew? Good. (Don't forget to put a ball point needle in your machine for sewing knit material. If you have any more questions about sewing knits, look over here.)

Begin by stitching the front and back together at the shoulders:


Next comes the sleeve. Secure the middle of the sleeve to the shoulder seam and pin outwards. The whole sleeve shape is symmetrical, so if you have any overhang, it will be the same on both sides. We'll just cut off any extra :)


Then, match up the finished edges of the sleeves, the underarm seams, and bottom hems. Stitch closed the sides.


When I sew my the sides closed after a hem has been put on the bottom or sleeve, I like to sew the seam allowance down on the openings, so they do not poke up and show when you wear your t-shirt. I think it's just a bit of aesthetics, but some people who are sensitive to tags or and such appreciate having the edges sewn down too.


The neckline is the only bit left to tackle. How you finish your neck is really up to you, but I find the simplest and cleanest thing to do is a ribbed neck. (It took all my willpower not to add some big, pleated faux front on this shirt, but I know that the material is simply too flimsy to hold it up. Restraint and simplicity is usually the better choice with tees. Well, sometimes anyway.)

First up, measure you neckline to know how much ribbing to cut (ribbing has more stretch and must be cut in a smaller length than your neckline - playing with it will help you determine what your best fit will be).


The ribbing is prepared by being sewn into a loop and folded in half width-wise, wrong sides together. The neckline and the ribbing are each divided into quarters, marked with pins.


Pin the ribbing to the shirt, raw edges aligned and right sides together, matching up the quarter marker pins. Stretch the ribbing out as you sew. Stitch down the seam allowance to the shirt for a nice, clean finish. Any pulls in the material around the stitching can be steamed with your iron to shrink back into shape.


Done!

Now, bear with me through my sad (freaky?) attempt to build up a bit of a body under my shirt with 2 apples and a square pillow.


I hope the picture isn`t too upsetting :D You get the idea: lady shaped shoulders and arms, and ample room for gestation.

****************************

This is a free tutorial and I encourage you to use the information in any way you need to (check the disclaimer at the bottom of the page). If it works for you, please consider supporting my etsy shop by purchasing a Little Print Design pattern or toss a dollar or two in my paypal to show appreciation and to encourage me to offer up even more quality patterns and tutorials.


Thank you!
Questions about the Donation? FAQ here.