Pages
Showing posts with label other people's patterns. Show all posts
7.27.2014
study
I am enjoying the process of doll making more than ever.
Every once in awhile I get a chance to work for a few hours solid, without interruptions from the children or chores. That is when I can pay attention to the work and it is its most satisfying.
I can notice small details and take time to appreciate them. I can study how my own hands have aged and are starting to look like the hands that cared for me when I was young. That feels... right somehow.
The work becomes a bit of play, when I can adjust details, positions, and fuss over it all. With no one around to ask the opinion of, a little bit more of me goes into it.
The pattern for this doll is the Miranda doll from Jan Horrox's Introduction to Making Cloth Dolls. The arms have been modified, due to necessity more than desire.
It's probably the most realistic form I've made thus far. The creepy factor, inherent in all doll making, was especially strong.
There is another style of joints I want to try before I send Horrox's book back to the interlibrary loan people. For those who enjoy the recommendations, I would recommend the book for the three patterns she provides. I didn't try out any of Horrox's style techniques, the hair, face paint and clothes, but if you would like to try her style, she has all the details for you.
I am looking for realistic figure doll patterns if anyone has a recommendation for me. I like to try them out, see how they work and what doesn't work. It's my doll making education.
9.27.2010
the dark side of handmade
Meet Train Boy and Flower Girl. They are handmade.

Handmade is these dolls, sewn frantically during the time when I was supposed to be packing up my sewing things to move in just a few days, while my two year old boy sat on my lap attempting to 'help' by sticking straight pins into the fabric as I raced it through the machine, causing my arm to jiggle every 1.5 seconds so that every seam appears to have been sewn by someone suffering whole body tics.
(Handmade is a run on sentence, trying to capture every since nuance of a situation, telling a whole story, even if you have to pause for breath three times while saying it.)

Handmade is using what is available, which here means a dozen squares pulled from the neatly piled stacks, cut and organized, for quilts that I am never going to make. My regular fabric was already packed and since both children frequently like to go through the patchwork squares to pick out their favorite fabrics it was easy to justify the raid. But still, despite their earlier pawings, when it came time to decide what colour the body should be, there is a half an hour pause for angst ridden decision making, finally ending when I agree to do a two fabric body, to allow for a skirt that matches Smootch's tiered green one that she still wears three and a half years past it's construction (yes, it's getting pretty short).
The faces are drawn in with Sharpie, an aesthetically revolting concept, but insisted upon by Birdie who couldn't wait for a stitched face to be done in that mystical time I call 'later' (he's old enough now to not fall for that one anymore). Faceless dolls are highly disturbing to Birdie. So we do what we can right now.

Handmade is following through, even when we know it's not perfect. As a result of my frenzied pace, and the fact that instead of enlarging the lovely pattern provided by Emily Martin of The Black Apple as it was intended but Smootch insisting her doll be exactly the size it was on the paper when it printed, these dolls, are badly constructed. Really terrible. When I actually had a moment to truly look at what I was sewing, note that the leg on Train Boy didn't make it all the way into the body seam, the oddly textured head from my poor hand sewn ladder stitches to close the top, the over stuffed arms and under stuffed body, my only thought was, 'Crap! And I'm supposed to be a professional!'

Handmade is realizing that beauty is in the eye of the beholder. It is recognizing the substance in the object. My kids love these dolls. Birdie doesn't care that Train Boy's arms are upside down (omg, bad, right?!), because he likes that the hair is orange, just like he chose to match his own (don't try to figure out toddler logic). And there are trains on the body, a fabric brought to us by a dear friend, who picked it up at a garage sale because she knows how much Birdie adores them. Plus the legs are of the same fabric as his idolized sister's doll, a small connection to his hero, but real enough to make him feel close to her all the same. And he sat on mama's lap during it's creation, choosing fabrics, helping with his own two hands (pinning - ouch!), and giving the doll life by insisting it have eyes, mouth, and, donotforgetmama, nose.
For Smootch, who loves dolls and has been asking for a pioneer-esque rag doll for a month and a half now, well, turns out she was right about the smallish size of the dolls. They are exactly the right size to haul around by their legs or heads. They make great companions, big enough for play, small enough to fit in a pocket (if you don't mind eyes peeking out to see the world). Thank you, mama, for finally making me a doll!
Handmade is love materialized. Smootch has the articulation and acumen to tell me straight out that if she had to draw a picture of 'love' that she would have to draw a picture of an imperfectly sewn doll, made from patchwork squares intended for a quilt that will never be made, on a Sunday morning when there were other things we were supposed to be doing.
Handmade says we are here, now, and we love each other.

Today, as I finally packed up the sewing machine, I fought my urge to redeem myself with another go to make a properly sewn doll. Maybe one where the arms point the right way. But, knowing that my children are as happy with the badly sewn ones, it wasn't too hard to put my redemption on pause while I tend to other things. Next week or next month, maybe I'll get another shot at these Black Apple dolls. Or maybe we will be on to something new that I will get a chance to screw up with my clumsy hands while Birdie sticks pins into them.
I can only hope.
Handmade is these dolls, sewn frantically during the time when I was supposed to be packing up my sewing things to move in just a few days, while my two year old boy sat on my lap attempting to 'help' by sticking straight pins into the fabric as I raced it through the machine, causing my arm to jiggle every 1.5 seconds so that every seam appears to have been sewn by someone suffering whole body tics.
(Handmade is a run on sentence, trying to capture every since nuance of a situation, telling a whole story, even if you have to pause for breath three times while saying it.)
Handmade is using what is available, which here means a dozen squares pulled from the neatly piled stacks, cut and organized, for quilts that I am never going to make. My regular fabric was already packed and since both children frequently like to go through the patchwork squares to pick out their favorite fabrics it was easy to justify the raid. But still, despite their earlier pawings, when it came time to decide what colour the body should be, there is a half an hour pause for angst ridden decision making, finally ending when I agree to do a two fabric body, to allow for a skirt that matches Smootch's tiered green one that she still wears three and a half years past it's construction (yes, it's getting pretty short).
The faces are drawn in with Sharpie, an aesthetically revolting concept, but insisted upon by Birdie who couldn't wait for a stitched face to be done in that mystical time I call 'later' (he's old enough now to not fall for that one anymore). Faceless dolls are highly disturbing to Birdie. So we do what we can right now.
Handmade is following through, even when we know it's not perfect. As a result of my frenzied pace, and the fact that instead of enlarging the lovely pattern provided by Emily Martin of The Black Apple as it was intended but Smootch insisting her doll be exactly the size it was on the paper when it printed, these dolls, are badly constructed. Really terrible. When I actually had a moment to truly look at what I was sewing, note that the leg on Train Boy didn't make it all the way into the body seam, the oddly textured head from my poor hand sewn ladder stitches to close the top, the over stuffed arms and under stuffed body, my only thought was, 'Crap! And I'm supposed to be a professional!'
Handmade is realizing that beauty is in the eye of the beholder. It is recognizing the substance in the object. My kids love these dolls. Birdie doesn't care that Train Boy's arms are upside down (omg, bad, right?!), because he likes that the hair is orange, just like he chose to match his own (don't try to figure out toddler logic). And there are trains on the body, a fabric brought to us by a dear friend, who picked it up at a garage sale because she knows how much Birdie adores them. Plus the legs are of the same fabric as his idolized sister's doll, a small connection to his hero, but real enough to make him feel close to her all the same. And he sat on mama's lap during it's creation, choosing fabrics, helping with his own two hands (pinning - ouch!), and giving the doll life by insisting it have eyes, mouth, and, donotforgetmama, nose.
For Smootch, who loves dolls and has been asking for a pioneer-esque rag doll for a month and a half now, well, turns out she was right about the smallish size of the dolls. They are exactly the right size to haul around by their legs or heads. They make great companions, big enough for play, small enough to fit in a pocket (if you don't mind eyes peeking out to see the world). Thank you, mama, for finally making me a doll!
Handmade is love materialized. Smootch has the articulation and acumen to tell me straight out that if she had to draw a picture of 'love' that she would have to draw a picture of an imperfectly sewn doll, made from patchwork squares intended for a quilt that will never be made, on a Sunday morning when there were other things we were supposed to be doing.
Handmade says we are here, now, and we love each other.
Today, as I finally packed up the sewing machine, I fought my urge to redeem myself with another go to make a properly sewn doll. Maybe one where the arms point the right way. But, knowing that my children are as happy with the badly sewn ones, it wasn't too hard to put my redemption on pause while I tend to other things. Next week or next month, maybe I'll get another shot at these Black Apple dolls. Or maybe we will be on to something new that I will get a chance to screw up with my clumsy hands while Birdie sticks pins into them.
I can only hope.
1.01.2010
peasant blouse
Happy New Year all!
I have no tutorial for you! It's true. But, perhaps inspired by the calender change, I've done something a bit odd and actually made something for myself. This is genuinely a once a year event, so I like to share it.
Of course, when I saw this tutorial on Whip Up's Best of 2009 Refashion (right underneath my sleevy pants tutorial :D) I had to give it a go. It was just so beautifully simple.
Here is my version:

(That is, as The Man pointed out, my 'looking at the kids with amusement and disapproval with something they are doing' expression. Which is only right, since Smootch took the picture while precariously perched on a plastic lawn chair. So, now you know how it looks to be my kid.)
I did sew on single fold bias tape to help fold back the neck and to prevent bunching. The sleeves are just a elastic sewn on underneath.
Hope everyone is enjoying the last bit of holiday and are bracing themselves for January. I should have a little pattern giveaway ready for Monday, if you feel like stopping by then :)
I have no tutorial for you! It's true. But, perhaps inspired by the calender change, I've done something a bit odd and actually made something for myself. This is genuinely a once a year event, so I like to share it.
Of course, when I saw this tutorial on Whip Up's Best of 2009 Refashion (right underneath my sleevy pants tutorial :D) I had to give it a go. It was just so beautifully simple.
Here is my version:

(That is, as The Man pointed out, my 'looking at the kids with amusement and disapproval with something they are doing' expression. Which is only right, since Smootch took the picture while precariously perched on a plastic lawn chair. So, now you know how it looks to be my kid.)
I did sew on single fold bias tape to help fold back the neck and to prevent bunching. The sleeves are just a elastic sewn on underneath.
Hope everyone is enjoying the last bit of holiday and are bracing themselves for January. I should have a little pattern giveaway ready for Monday, if you feel like stopping by then :)
11.30.2009
Do your ears hang low? toque
Onwards with my never ending quest to keep my kids warm. Moving from a cold and dry fall in Alberta to a windy and wet fall on Vancouver Island means some adjustment to our regular outdoor clothes. I'm finding the biggest problem with nearly constant rain is that you need two of everything; one to wear while the other one dries out.
Birdie is just beginning to like his new bonnet, and I like it because I can tie the thing on and know that he won't suddenly whip it off and toss it into a puddle (experience is the harshest teacher). It's not rain proof, though, and we found ourselves needing something dry to cover his mostly bald noggin yesterday.
The toque is my old stand-by, my favorite, and, I'm starting to believe, just as versatile design-wise as t-shirts. Plus, very quick to make, which is usually one of the prime determining factors of what to sew for kids. Another is what's on hand material-wise. The toque wins there too.
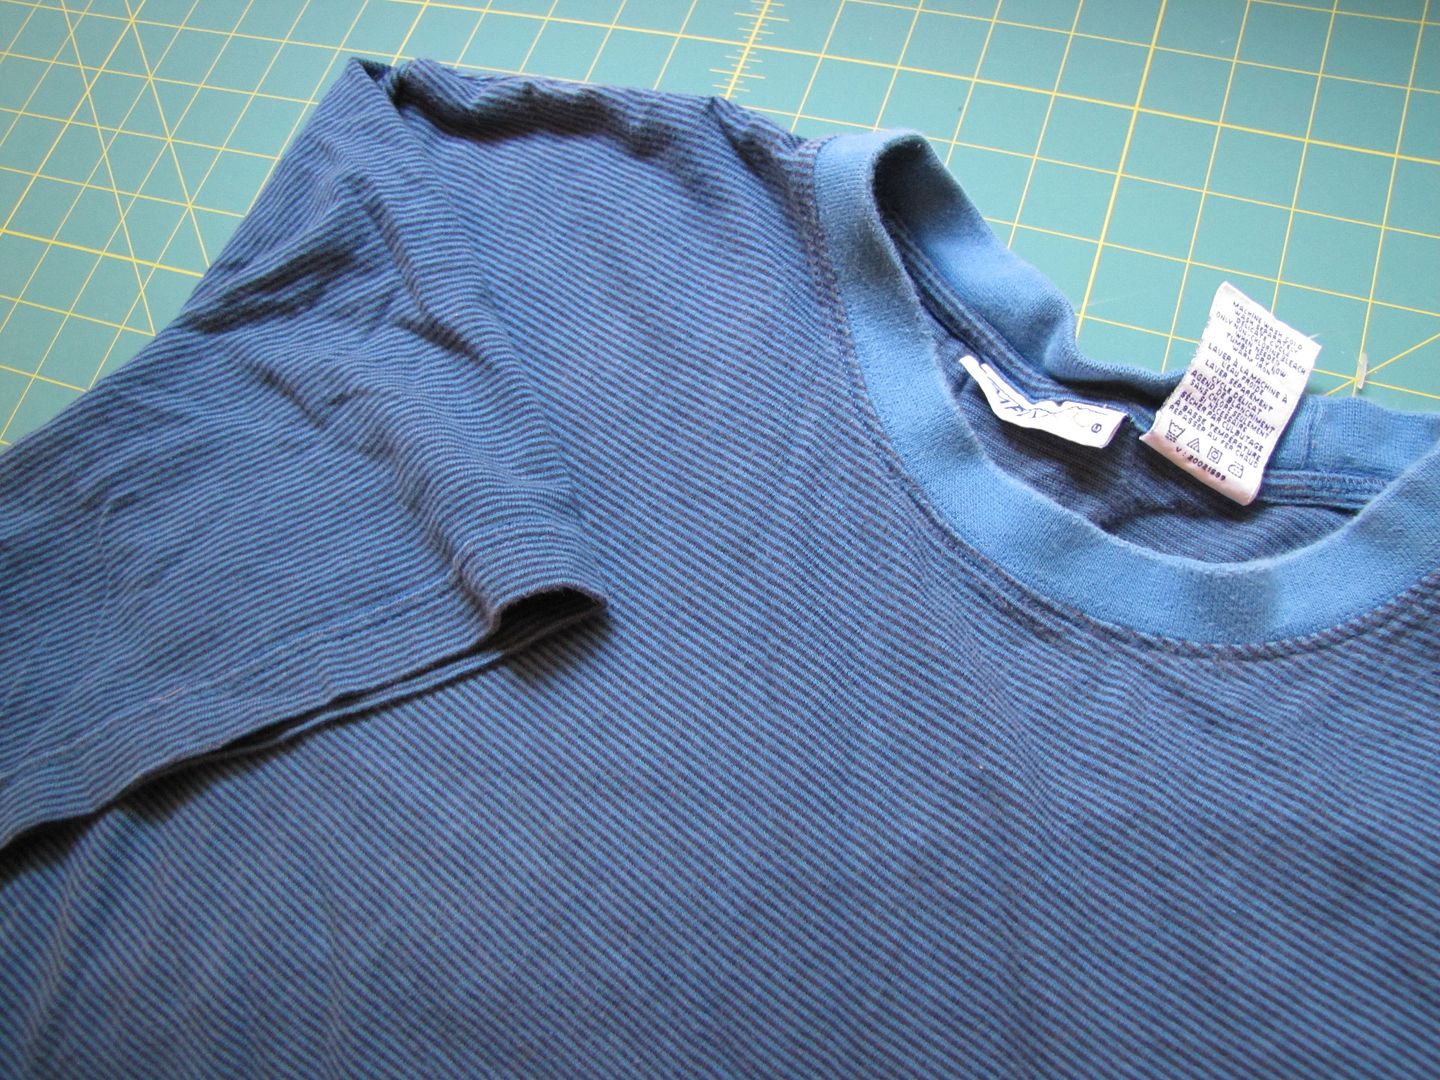
I sacked my bin of clothes for repurposing and came up with an xl adult t-shirt and bits of the sweater I used for Birdie's other hat. I decided to make the fastest and most forgiving style I could think of, basically having to race Birdie to the end of his nap so we could go out right afterwards. And I won the race (mwah ha ha!) AND even managed to take pictures of the process for you.
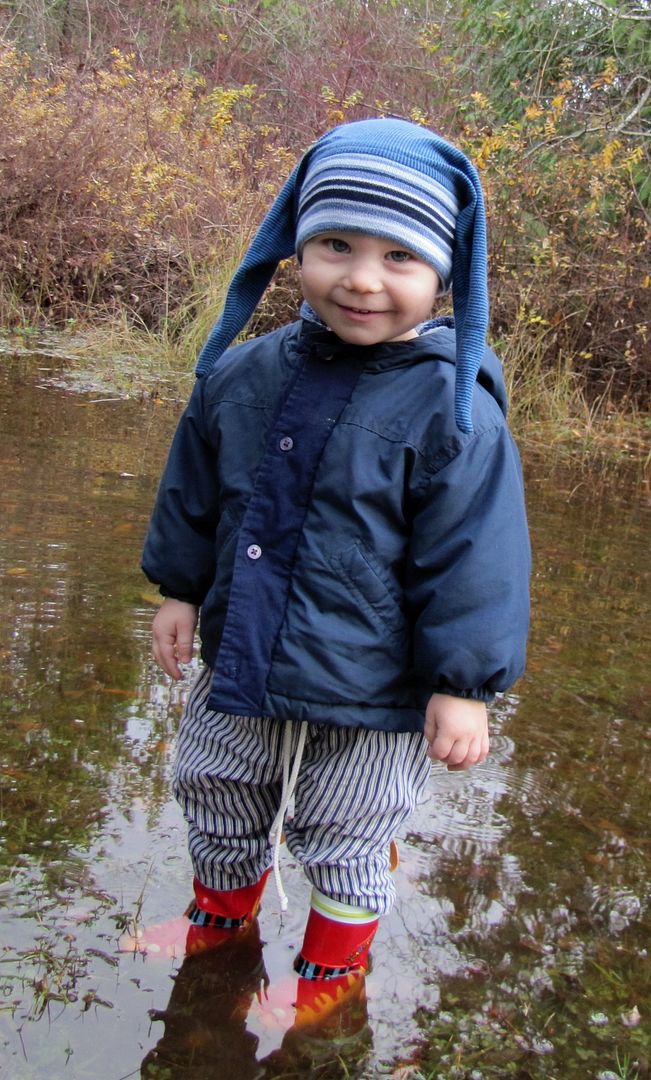
Looking sort of Mother Teresa-ish, here is Birdie's long earred toque (or puppy dog look if you are trying to sell it to a toddler):

And here is Birdie hooting like an owl with ketchup on his face. (It happens. Alot.) He also happens to be wearing his new toque in the knotted position (or the Great Horned Owl look, if you are trying to sell it to an older sister who has a fanatical obsession with them. Don't ask, I don't know why either.)

To make your own long earred toque:
Start with:
head circumference measurement
an adult t-shirt (the longer the better) or some knit fabric
a bit of sweater material or ribbing

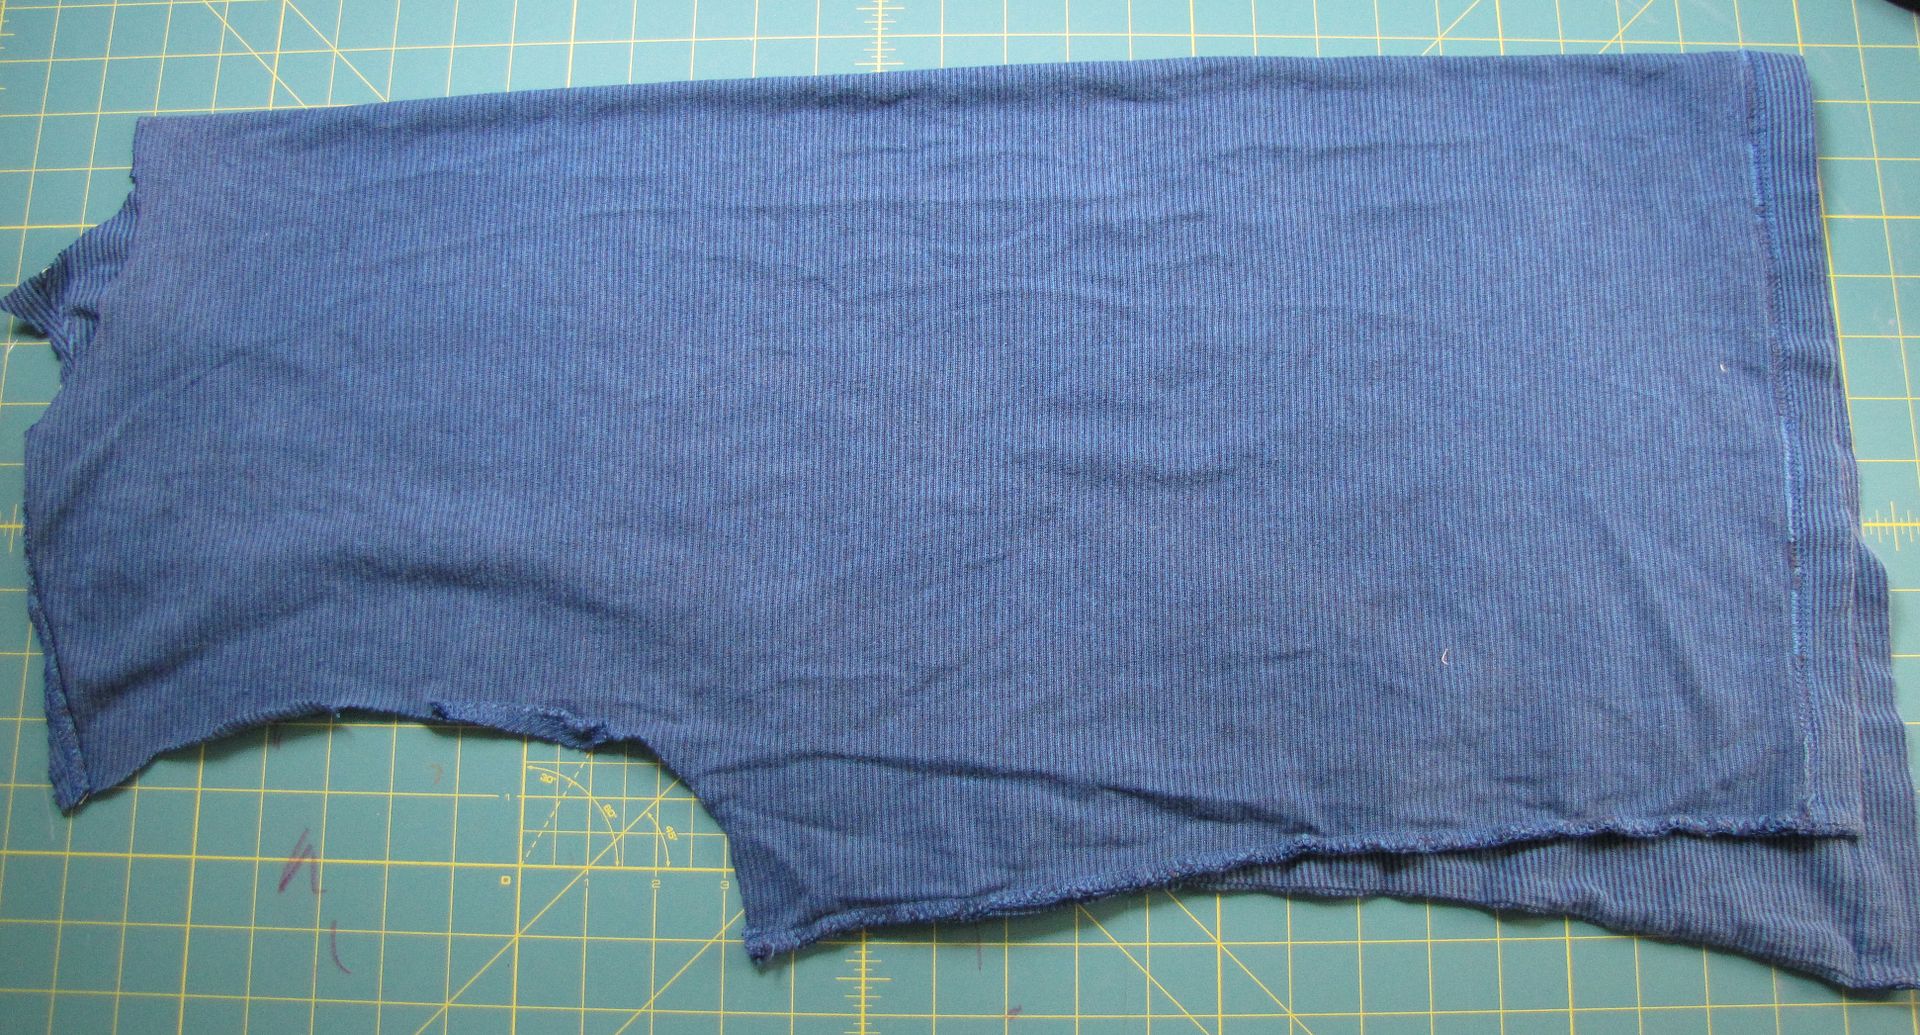
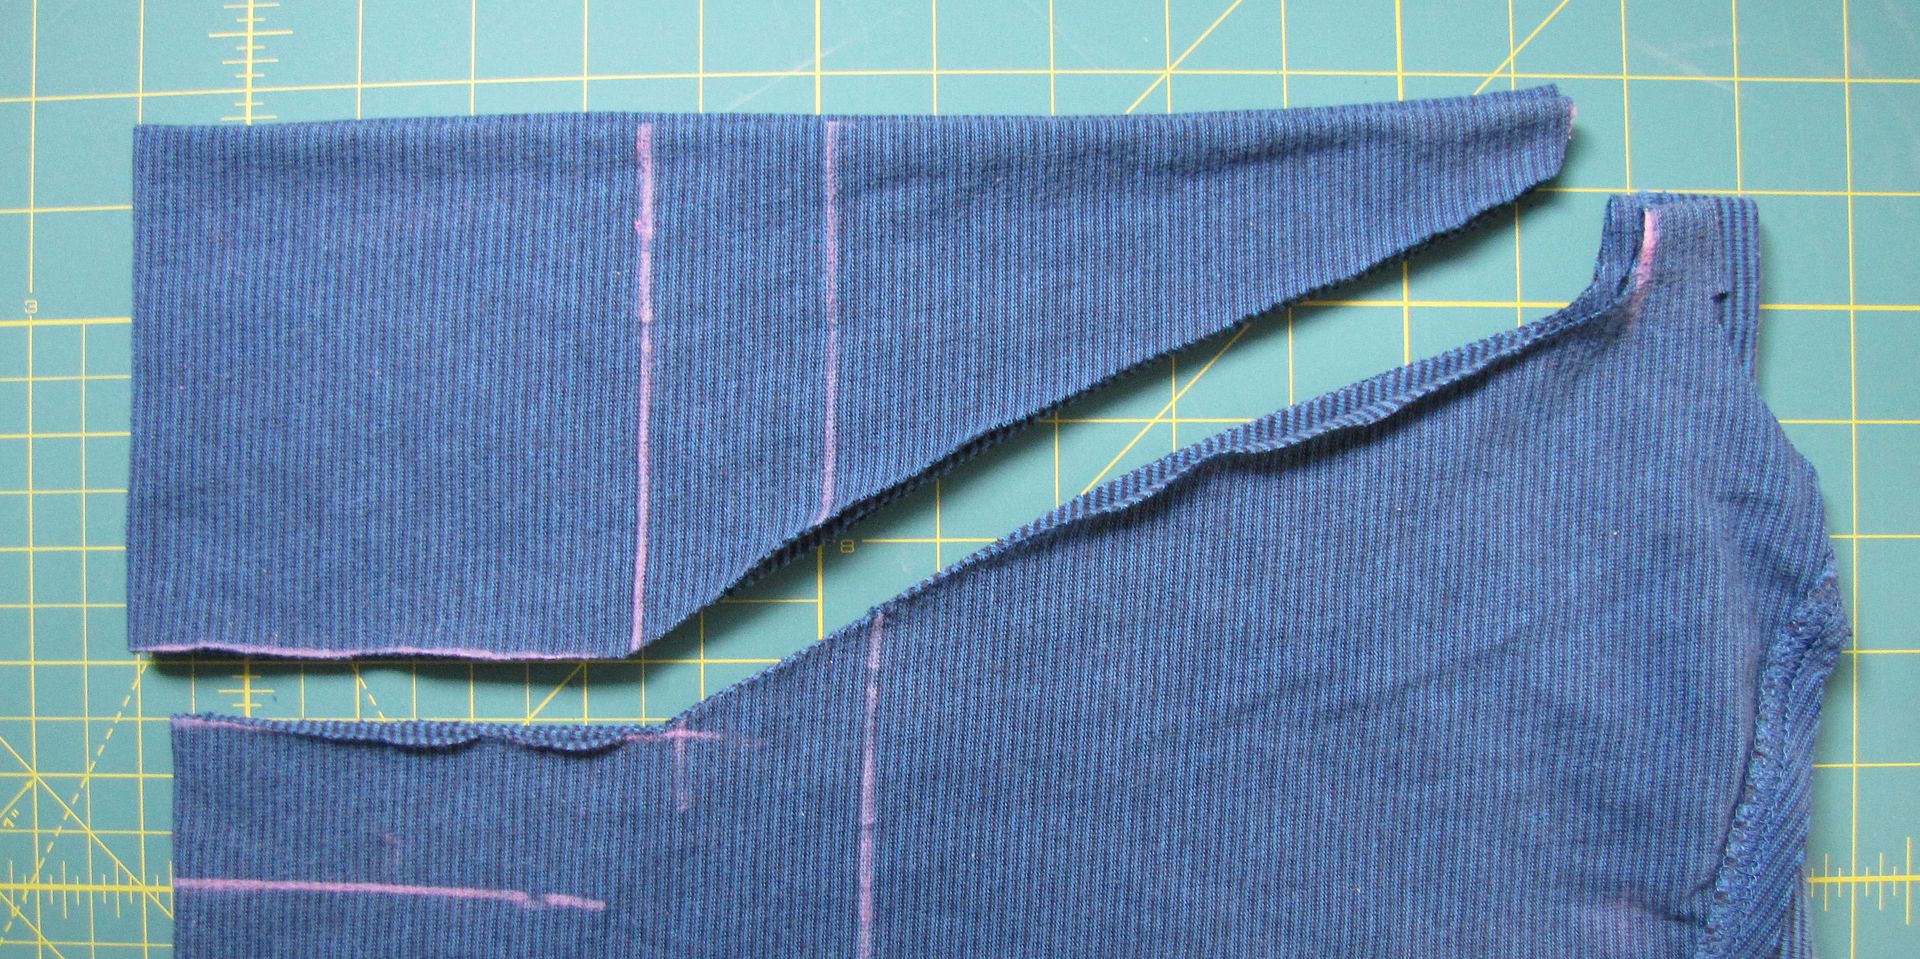
The ears of the toque are made with just one piece of t-shirt fabric. Prepare the t-shirt by separating either the front or back of the shirt from the sleeves and neck ribbing.
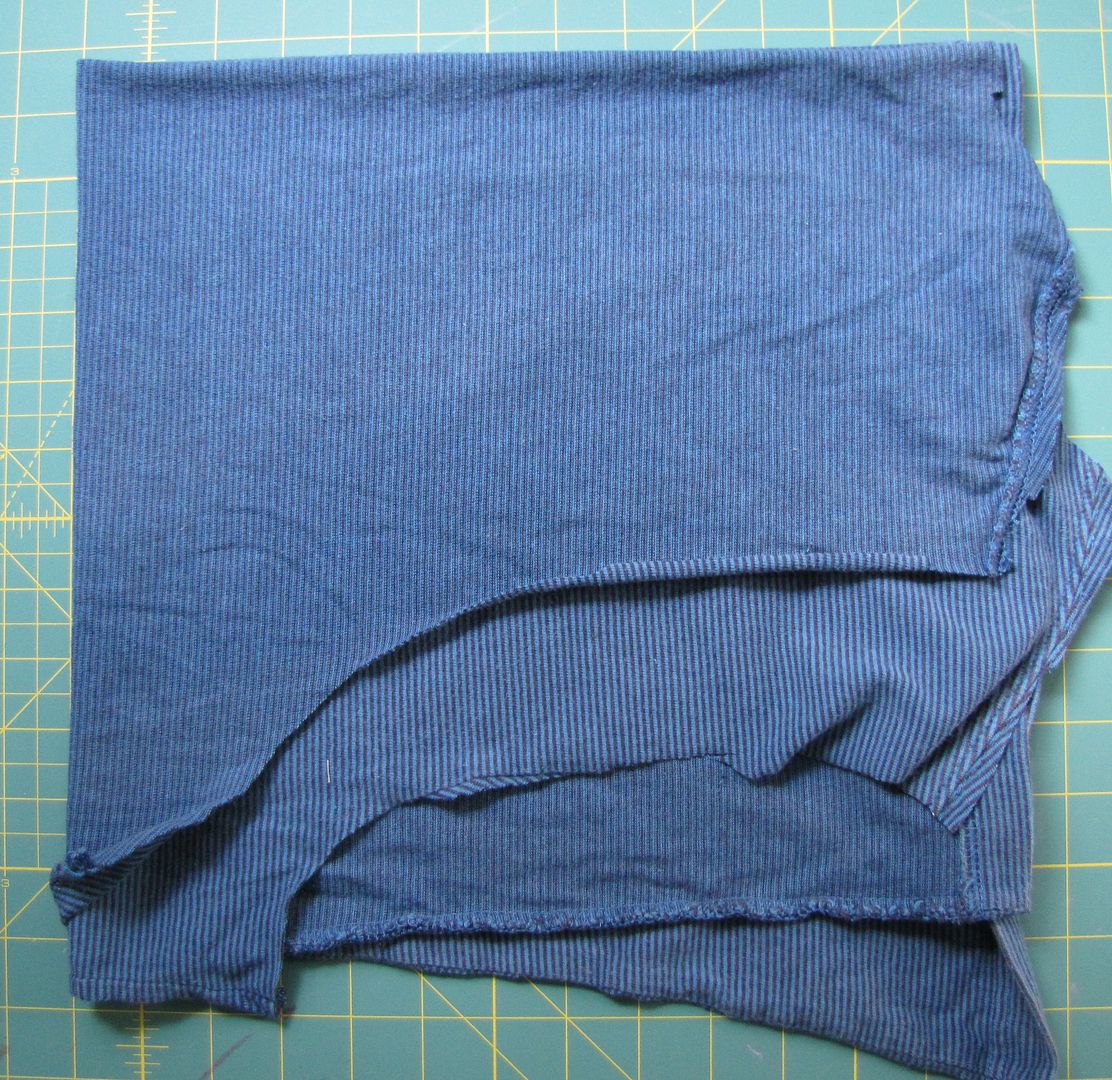
Fold the shirt piece in half length-wise, wrong side out.

Then, fold the shirt in half again, aligning the folded edge.

Alright, (not scary) math time. Take your head circumference (in inches) and minus 2". Then, divide that number by 4. Then add a seam allowance.
Example: my 19 month old boy's head is 18".
18"-2 = 16"
16"/4 = 4"
4"+1/2" = 4 1/2"
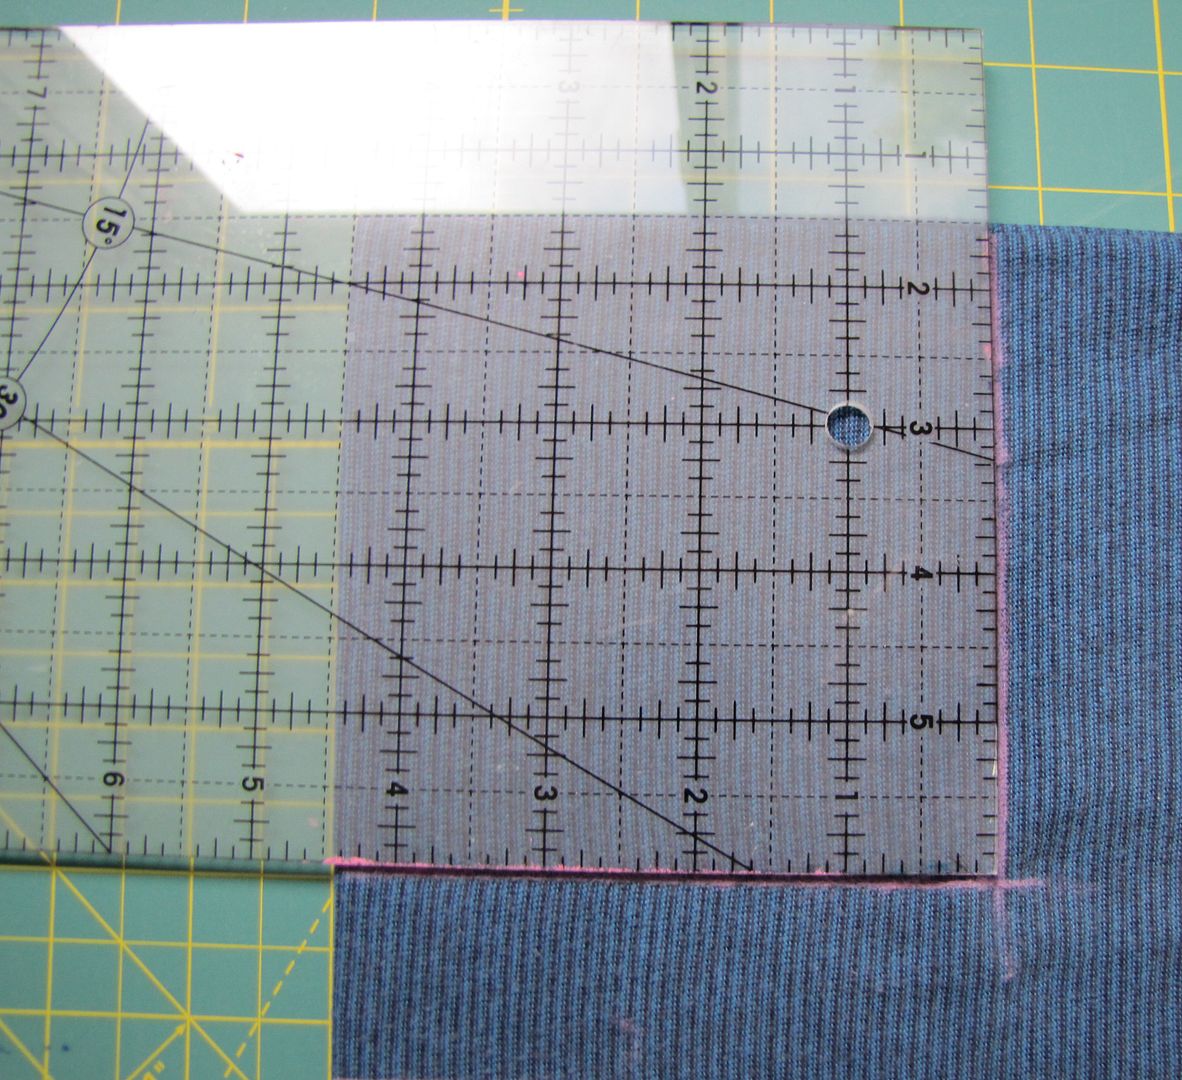
That final number (4 1/2" in example) is used to mark out a square on the corner where the folded edges meet on your t-shirt fabric.

Cut from the shorter folded edge out along your chalked line and then angle up away from your cut to meet the further part of your fabric, as shown in the illustration below (ignore those extra lines - the measure twice, cut once rule is finally beginning to sink in for me.)

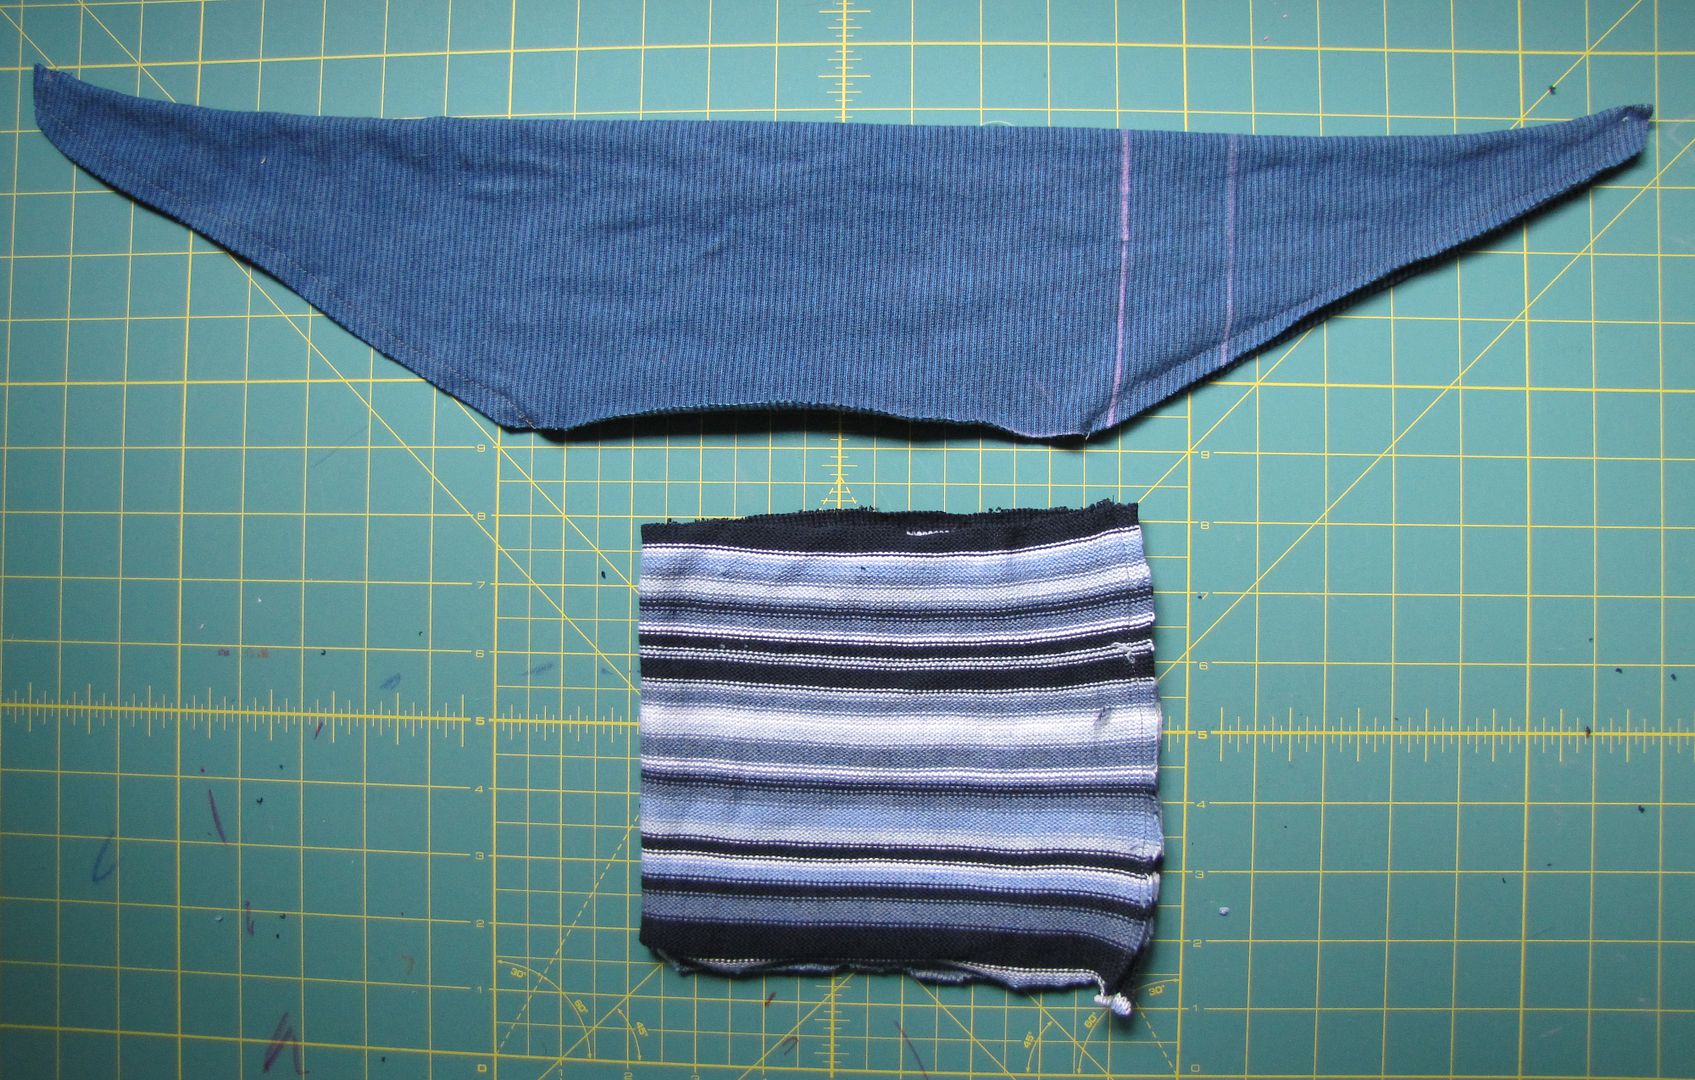
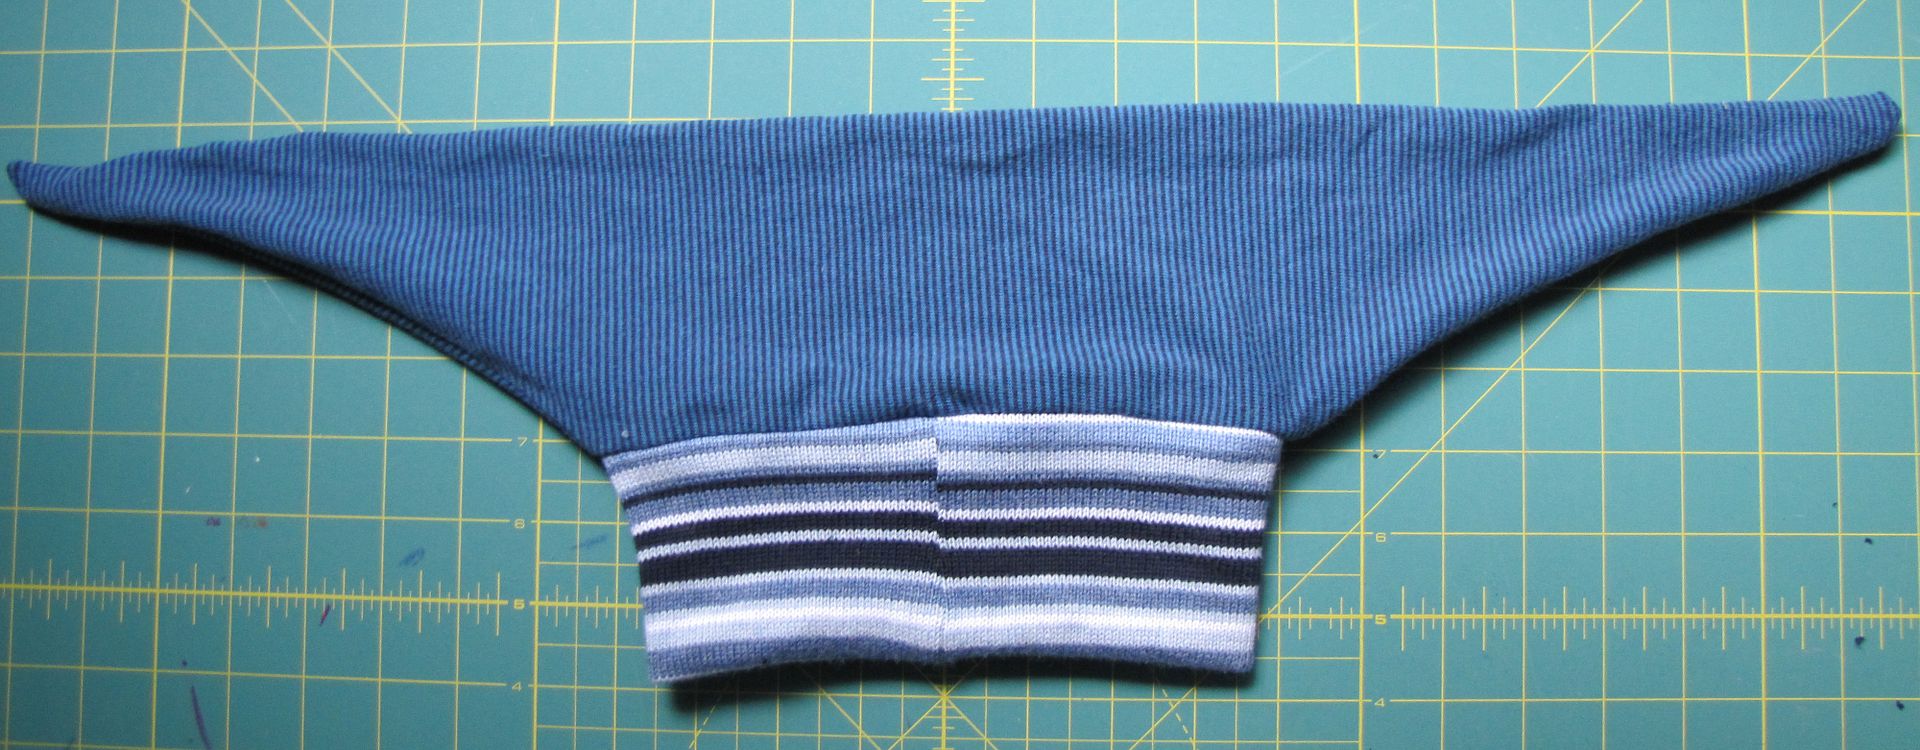
Unfold the cut fabric lengthwise for an anvil shape. The wings of the anvil will be your ears and the bottom flat bit the head opening.

Sew the ears closed on their bottom edges, leaving the very bottom of the anvil open (the bit between the pins in the above photo).
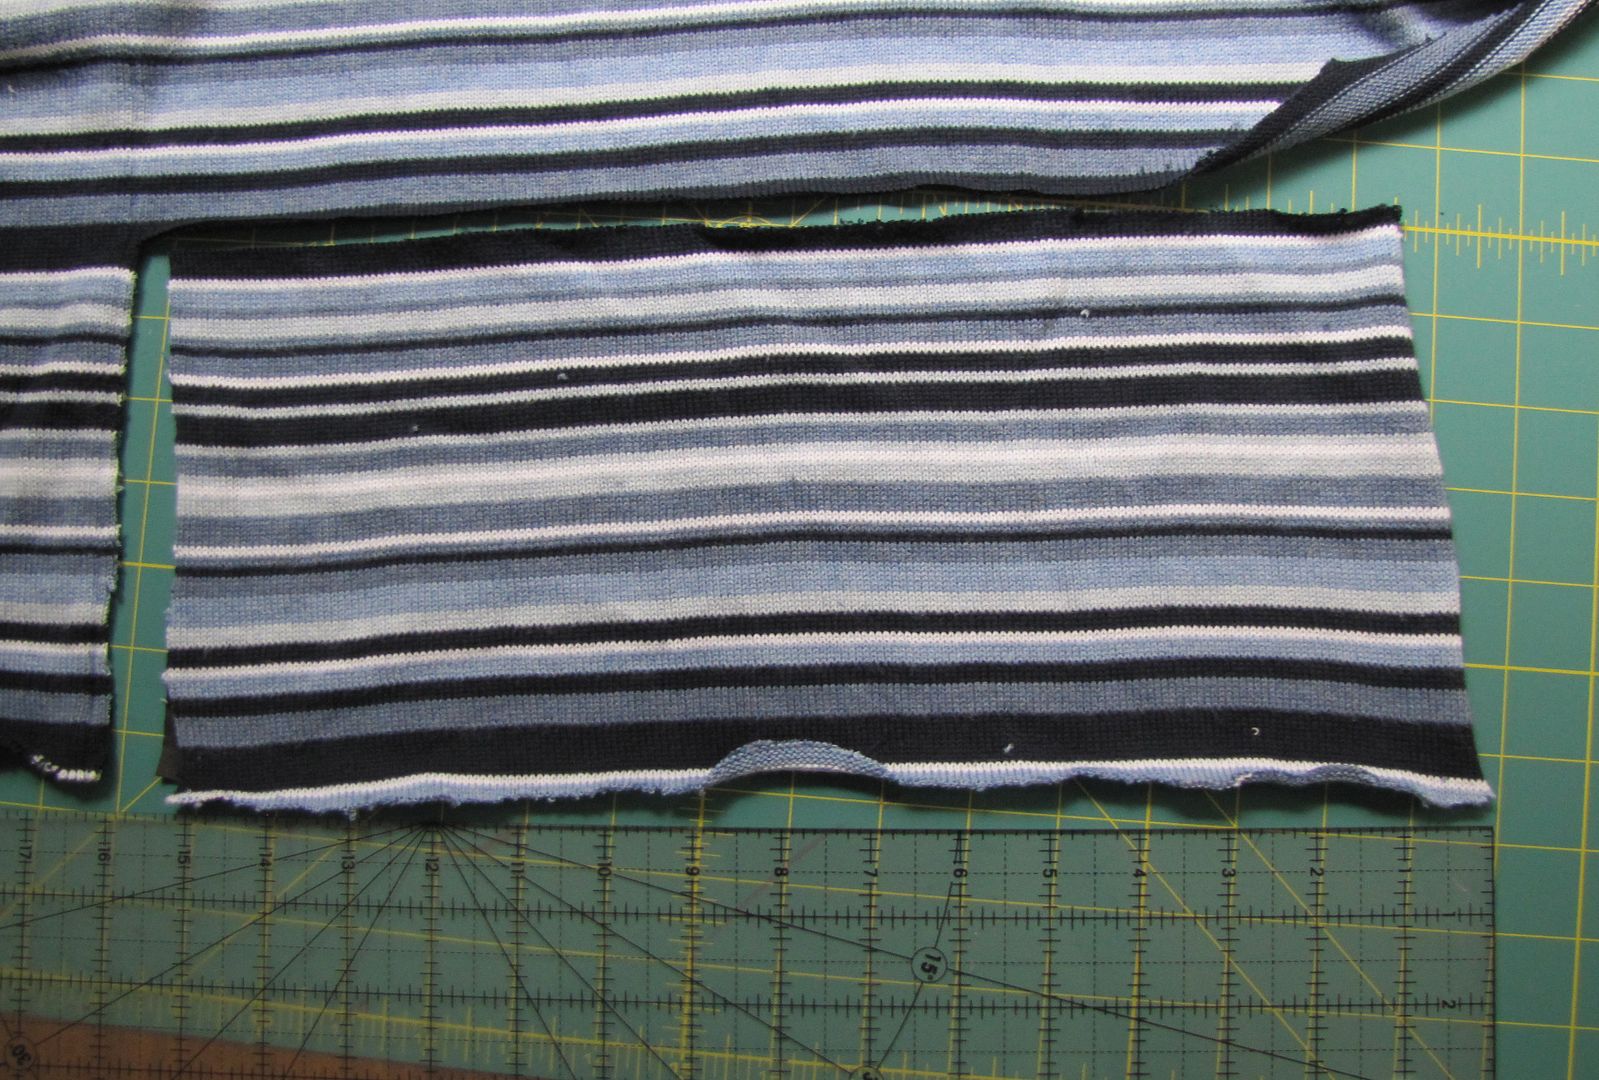
Cut a piece of sweater or ribbing to cover the forehead approximately 6 1/2" wide and as long as is a comfortable stretch for your knit piece, which can be determined by holding the sweater/ribbing up to your head opening of the anvil and stretch it out a bit. Generally, you will want to cut it a bit smaller than the opening, keeping in mind that the opening is doubled over. In other words, make sure you account for the whole circumference, not just half.
My sweater piece was 6 1/2" by 15".

Fold the sweater piece over length-wise, right sides together, and stitch end closed to form a loop.

Fold the loop in half width-wise, right side out. This hides the side seam inside, forming a band for the forehead.

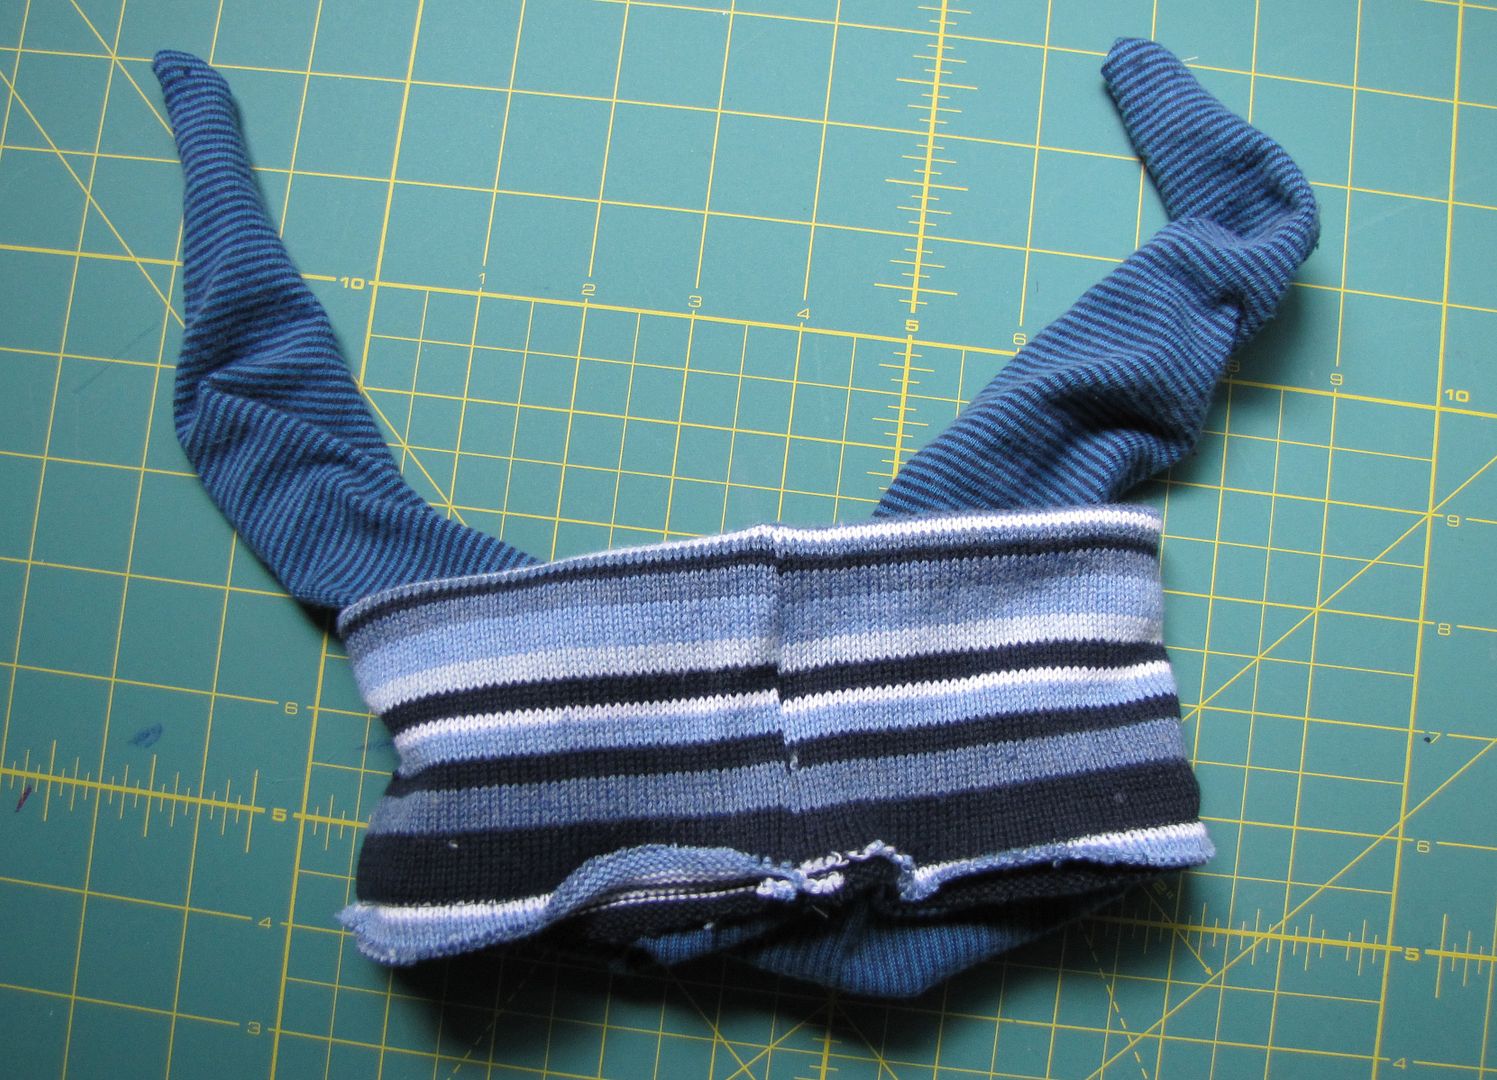
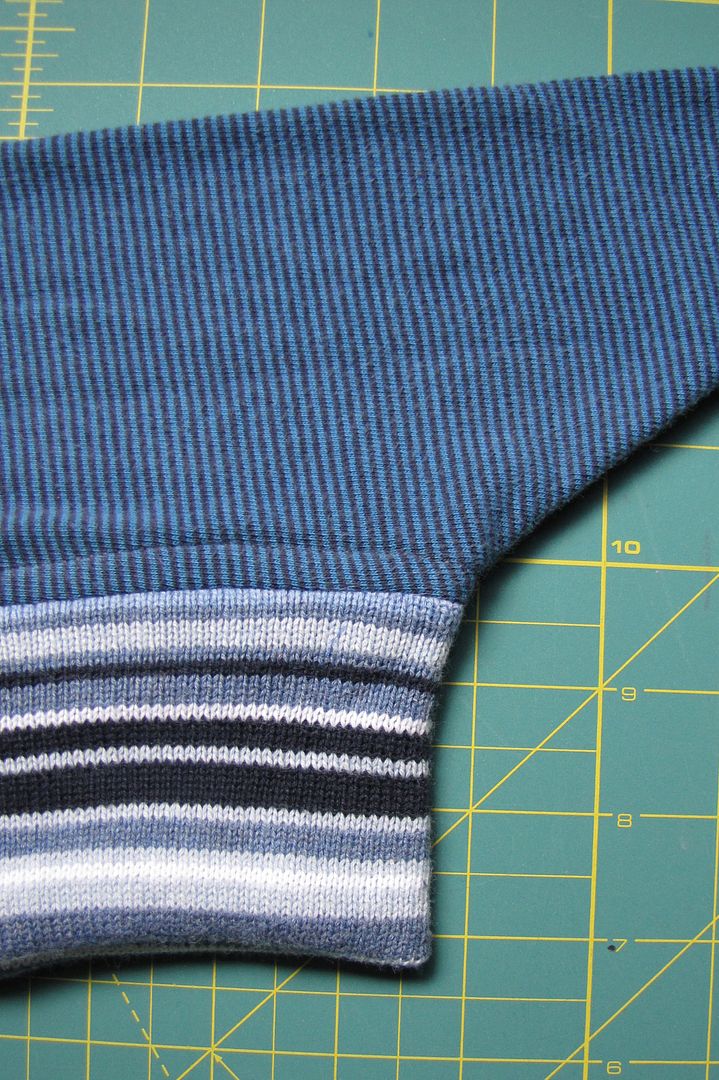
Turn the ears right side out. Align the raw edges of the band with the head opening of the ears, right sides together (or right side of the ears to whatever side of the band). Evenly pin the band to the ears and sew together. With knit fabrics, stretch them slightly as you sew to avoid puckers. Use the steam from from your iron on the seam, by hovering over or gently pressing down with the steam on, to tighten up the fabric afterwards.

Turn the band right side out.

Top stitch the seam allowance to the ear portion around the band. Use iron steam to press fabric back into shape.

Apply hat to head and head outdoors.

Don't forget to sing and dance :)
Do Your Ears Hang Low?
Do They Wobble to and Fro?
Can You Tie Them in a Knot?
Can You Tie Them in a Bow?
Can You Throw Them Over Your Shoulder Like a Continental Soldier?
Do your ears hang low?

******************************************
This is a free tutorial and I encourage you to use the information in any way you need to (check the disclaimer at the bottom of the page). If it works for you, please consider supporting my etsy shop by purchasing a Little Print Design pattern or toss a dollar or two in my paypal to show appreciation and to encourage me to offer up even more quality patterns and tutorials.
Thank you!
Questions about the Donation? FAQ here.
Birdie is just beginning to like his new bonnet, and I like it because I can tie the thing on and know that he won't suddenly whip it off and toss it into a puddle (experience is the harshest teacher). It's not rain proof, though, and we found ourselves needing something dry to cover his mostly bald noggin yesterday.
The toque is my old stand-by, my favorite, and, I'm starting to believe, just as versatile design-wise as t-shirts. Plus, very quick to make, which is usually one of the prime determining factors of what to sew for kids. Another is what's on hand material-wise. The toque wins there too.
I sacked my bin of clothes for repurposing and came up with an xl adult t-shirt and bits of the sweater I used for Birdie's other hat. I decided to make the fastest and most forgiving style I could think of, basically having to race Birdie to the end of his nap so we could go out right afterwards. And I won the race (mwah ha ha!) AND even managed to take pictures of the process for you.
Looking sort of Mother Teresa-ish, here is Birdie's long earred toque (or puppy dog look if you are trying to sell it to a toddler):

And here is Birdie hooting like an owl with ketchup on his face. (It happens. Alot.) He also happens to be wearing his new toque in the knotted position (or the Great Horned Owl look, if you are trying to sell it to an older sister who has a fanatical obsession with them. Don't ask, I don't know why either.)

To make your own long earred toque:
Start with:
head circumference measurement
an adult t-shirt (the longer the better) or some knit fabric
a bit of sweater material or ribbing
The ears of the toque are made with just one piece of t-shirt fabric. Prepare the t-shirt by separating either the front or back of the shirt from the sleeves and neck ribbing.
Fold the shirt piece in half length-wise, wrong side out.
Then, fold the shirt in half again, aligning the folded edge.
Alright, (not scary) math time. Take your head circumference (in inches) and minus 2". Then, divide that number by 4. Then add a seam allowance.
Example: my 19 month old boy's head is 18".
18"-2 = 16"
16"/4 = 4"
4"+1/2" = 4 1/2"
That final number (4 1/2" in example) is used to mark out a square on the corner where the folded edges meet on your t-shirt fabric.
Cut from the shorter folded edge out along your chalked line and then angle up away from your cut to meet the further part of your fabric, as shown in the illustration below (ignore those extra lines - the measure twice, cut once rule is finally beginning to sink in for me.)
Unfold the cut fabric lengthwise for an anvil shape. The wings of the anvil will be your ears and the bottom flat bit the head opening.
Sew the ears closed on their bottom edges, leaving the very bottom of the anvil open (the bit between the pins in the above photo).
Cut a piece of sweater or ribbing to cover the forehead approximately 6 1/2" wide and as long as is a comfortable stretch for your knit piece, which can be determined by holding the sweater/ribbing up to your head opening of the anvil and stretch it out a bit. Generally, you will want to cut it a bit smaller than the opening, keeping in mind that the opening is doubled over. In other words, make sure you account for the whole circumference, not just half.
My sweater piece was 6 1/2" by 15".
Fold the sweater piece over length-wise, right sides together, and stitch end closed to form a loop.
Fold the loop in half width-wise, right side out. This hides the side seam inside, forming a band for the forehead.
Turn the ears right side out. Align the raw edges of the band with the head opening of the ears, right sides together (or right side of the ears to whatever side of the band). Evenly pin the band to the ears and sew together. With knit fabrics, stretch them slightly as you sew to avoid puckers. Use the steam from from your iron on the seam, by hovering over or gently pressing down with the steam on, to tighten up the fabric afterwards.
Turn the band right side out.
Top stitch the seam allowance to the ear portion around the band. Use iron steam to press fabric back into shape.
Apply hat to head and head outdoors.

Don't forget to sing and dance :)
Do Your Ears Hang Low?
Do They Wobble to and Fro?
Can You Tie Them in a Knot?
Can You Tie Them in a Bow?
Can You Throw Them Over Your Shoulder Like a Continental Soldier?
Do your ears hang low?
******************************************
This is a free tutorial and I encourage you to use the information in any way you need to (check the disclaimer at the bottom of the page). If it works for you, please consider supporting my etsy shop by purchasing a Little Print Design pattern or toss a dollar or two in my paypal to show appreciation and to encourage me to offer up even more quality patterns and tutorials.
Thank you!
Questions about the Donation? FAQ here.
11.25.2009
helmet hats
I have internet! It took a week and a half longer than expected, produced some bitterness with our internet and phone provider with whom communicating with was as productive as trying to sew with a hammer, but wasn't all bad as it also presented some extra time to put together a few much needed winter items and do a bit of scheming too.
First up: I'm getting many questions on the trouser pattern. I am definitely making that available in the new year in infant and toddler sizes. I've got a sweetly rough little top and vest to go along with it and I will bundle all the patterns together, plus some extra stuff too. More on that as time goes on.
And now, a bit of sewing with other people's patterns. The latest issue of Ottobre found it's way to my mail box (with no less than three address change stickers), which is funny, because I keep canceling my subscription and they keep sending it anyway. With a bill attached.
But, the issue was here and the bonnet on the front cover caught my eye. Here is Smootch with my first try (in which I completely forgot to do the second dart and blamed Ottobre for making a wonky pattern that turned out to be all my fault. Ahem.) The shell is suiting and the lining and ties are made from a recycled tee shirt.

Does it make you think racing too? I'm wishing we had a set of goggles and long scarf for her. And that she was flying a biplane, instead of a Neon.

Zooooooommmm!
My next go I thought I'd make it a bit smaller for Birdie, though that was probably not so wise as his head is only a 1/2" smaller than Smootch's, and he's catching up fast. I also added a brim, reasoning that it will direct some rain away from his eyes. The shell and ties are from a recycled sweater and the lining is a recycled fleece pajama top.

Birdie was initially pretty hostile to the bonnet. Which isn't surprising - I can't keep a hat on the kid for anything. But ties help, and he's grown to almost like his hat. Well, if not like, he associates it with going outside and will fetch it if he wants to go out (reminiscent of a dog presenting a leash to its master when it's time for a walk. Maybe I should be rethinking my parenting techniques?)

That hat will do for now anyway. Next time I will be looking for something with more forehead coverage. I may be tragically Canadian, but I don't think anything beats a decent toque.
Today is the day the new Fair Weather Jackets come back from the printers. You have no idea how excited I am. Mostly about justifying watching a few movies while I do endless amounts of folding and collating the patterns. I've been experiencing some nostalgic feeling for Revenge of the Nerds and Weird Science lately, most likely brought on by reading back issues of Make: magazine from our new library. I'm also excited because I get to do a giveaway here on the blog of the new pattern. So come back Friday and we'll get that going ;)
First up: I'm getting many questions on the trouser pattern. I am definitely making that available in the new year in infant and toddler sizes. I've got a sweetly rough little top and vest to go along with it and I will bundle all the patterns together, plus some extra stuff too. More on that as time goes on.
And now, a bit of sewing with other people's patterns. The latest issue of Ottobre found it's way to my mail box (with no less than three address change stickers), which is funny, because I keep canceling my subscription and they keep sending it anyway. With a bill attached.
But, the issue was here and the bonnet on the front cover caught my eye. Here is Smootch with my first try (in which I completely forgot to do the second dart and blamed Ottobre for making a wonky pattern that turned out to be all my fault. Ahem.) The shell is suiting and the lining and ties are made from a recycled tee shirt.

Does it make you think racing too? I'm wishing we had a set of goggles and long scarf for her. And that she was flying a biplane, instead of a Neon.

Zooooooommmm!
My next go I thought I'd make it a bit smaller for Birdie, though that was probably not so wise as his head is only a 1/2" smaller than Smootch's, and he's catching up fast. I also added a brim, reasoning that it will direct some rain away from his eyes. The shell and ties are from a recycled sweater and the lining is a recycled fleece pajama top.

Birdie was initially pretty hostile to the bonnet. Which isn't surprising - I can't keep a hat on the kid for anything. But ties help, and he's grown to almost like his hat. Well, if not like, he associates it with going outside and will fetch it if he wants to go out (reminiscent of a dog presenting a leash to its master when it's time for a walk. Maybe I should be rethinking my parenting techniques?)

That hat will do for now anyway. Next time I will be looking for something with more forehead coverage. I may be tragically Canadian, but I don't think anything beats a decent toque.
Today is the day the new Fair Weather Jackets come back from the printers. You have no idea how excited I am. Mostly about justifying watching a few movies while I do endless amounts of folding and collating the patterns. I've been experiencing some nostalgic feeling for Revenge of the Nerds and Weird Science lately, most likely brought on by reading back issues of Make: magazine from our new library. I'm also excited because I get to do a giveaway here on the blog of the new pattern. So come back Friday and we'll get that going ;)
Subscribe to:
Posts (Atom)