Pages

Showing posts with label reconstructions. Show all posts

7.23.2015

dump bike v.4.5

 photo 7e92562e-91b0-48e5-b95b-d8f6f7b77d80.jpg

Actually, I don't know if this is version four, or maybe five, six?  But anyway, it's a new bike made from parts of old bikes.  A Frankenstein's monster of a bicycle.  Not too bad, hey?

One of the fun things about The Man is that he refuses to buy stuff.  Food is okay, and paying for education and experiences is good, but stuff?  Not so much.  But that doesn't mean we don't have a lot of stuff.  Ho no.  We got things.  I'm not sure if we have a lot of things, in the grand scheme of modern consumer culture, or even compared to my neighbor, since we live in a smallish home (644 square feet) and it always seems cluttered to me no matter how many times I donate to the thrift stores, but we make stuff (clothes, shelves, children), people give us things (a trampoline, play set), The Man forages stuff here and there (dumps, dumpsters, back alleys, etc.) and sometimes we even buy things (high end educational materials, because I'm a fool).  I once found a small coffee mug in a bush alongside a sidewalk that I have developed an attachment to. There is always stuff, you hardly need to put any effort into getting it.

Still, buying stuff sucks.  It's especially difficult for The Man.  I think his general rule is that if he can find it at the dump, or has even ever seen it at the dump one time ever, then we shouldn't buy it.  You can see how this could encompass a fairly extensive list of items.  What doesn't hit the dump eventually?

One item we both agree to not buy, though, is a new bicycle.  I've seen times when last year's bikes have littered the dump in snarled bunches in numbers to even rival the gulls.  I can see this is a combination of factors, such as kids growing rapidly and no one particularly wanting to ride a hand me down bike. My first person observations of the neighbor kids suggest that a new bike every spring is a status symbol that lasts about two weeks until the bike is unequivocally destroyed in some sort of ramp jumping adventure. Then it's acceptable to ride a second hand bike, preferably one that belongs to a kid who is both smaller and poorly supervised.

I also suspect that while bikes overall have throughout the years become quite advanced in design and materials, the average children's bike bought from your department store is badly assembled by a team of inexperienced kids hired over spring break and outfitted with cut rate brakes and accessories.  They're resource heavy crap generally.    

We've had one store bought bicycle ever, the one boy child received from his grandparents as a birthday gift one year, and all of the others have been given to us or found at the dump.  Of course, when a bicycle comes into our life as a found object, it isn't pretty nor intact.  But typically the frames are good and maybe one wheel, and with a bit of Frankensteining (this is a legitimate verb in my house so you'll have to go with it) of a couple of specimens, you've got yourself something greater than the sum of its parts.  It also helps to have somebody on hand who possesses a bit of technical knowledge and - this part is is really important - and has some time to mess around with it all.  Lucky for us, The Man likes hiding in his garage and  having a couple bikes to tinker with provides acceptable cover.

A functioning bike is all the childs have required thus far.  They aren't immune to yearning for block status symbols, but they tend towards lording over their friends their yard and its various trimmings.  The line was drawn, though, last year when Girl child received a hand me down bike from a friend that was in disrepair but, worse, pink.  Girl child considers it a matter of pride to loath pink.  She's got her tween dignity, you know?  Can't be seen on a pink bike.

So The Man went a little further than just making workable.  He also made pretty.  I wish I had before pictures from the bikes the various parts were purloined from, including the pink monstrocity, but this is the result of some gathering, some tinkering, some painting, and $13 worth of new materials.  Yes, we splurged on this one.

And then girl child rode out her shiny new prize (black and blue is very acceptable) and gathered up all the envy from the neighbor kids.  Hopefully, she didn't draw too much attention from some of the bigger bike-manglers, otherwise this might be a short lived adventure in having a nice thing.  A nice thing made from old crappy things.  Incredibly satisfying to say that. 

 photo b37f58df-b2a2-4073-81d6-a68d61c486c7.jpg

12.22.2014

button down t-shirt reconstruction

Funny enough, I am not a big fan of the t-shirt reconstruction.  At least for me.  For the childs, when girl child was small enough, I loved to make dresses out of our old t-shirts and now I still combine old t-shirts them in all sorts of ways and I've made dozens of pairs of pajama pants from used jersey (here is one pattern).  Oh, and shopping bags (cut off arms, sew closed bottom, viola!)  

For myself, though, as a matronly woman of almost forty (did I mention I'm going to level up an entire decade this year?) and someone who sews professionally, the average tee reconstruction feels... young.  Yes, that's the word.

Go ahead and label me a t-shirt reconstruction snob if you like.

But as old as I am, I do have a few too many t-shirts (because that's all I wear), especially roller derby shirts, and I have decided to make a big pile of them and not stop sewing until I have somehow transformed them into wearable our usable in some way.  As inspiration, I was sifting through our local library's sewing section and I came across a book called Tease: 50 Inspired T-Shirt Transformations and scored this little idea from it that I though maybe I could actually pull off.

 photo a43bf4e9-ae43-49f3-b84b-9008a8e01120.jpg

It is one one fitted t-shirt:

 photo 581896a4-9764-4dbd-beb5-cd4115cdc7fa.jpg

Plus one button down shirt:

 photo 29c9de6b-e254-4e7f-a8e7-959fac1dbdd3.jpg

The collar and front placket were cut off carefully, leaving about an inch of material for sewing onto the t-shirt, then pinned onto the t-shirt in the appropriate place.  (I saved the rest of the button down shirt for other projects - I may just add a crocheted collar cuff to it and call it a sweater shirt.)

The collar and placket were sewn directly on top of the tee - no fancy stuff here.  The raw edge of the placket was cut down close to the seam and allowed to fray.

 photo b2b22b73-dd7d-42a3-b40e-94756f7cdb0d.jpg

 photo 44f459ae-9b94-471d-b3fd-9fb7bc9dcd30.jpg

Apparently I didn't do so well with the matronly-woman look, as girl child immediately asked to have me help her make one of her own.  Yet another derby t-shirt rescued from the bottom of the drawer for improvement.  

 photo 5cdd3f89-5a2a-4d77-ba82-171ed8c56207.jpg

Girl child's placket took a wander off to the side.

 photo 8a5797a3-0098-4680-9739-16bd957ac19f.jpg

Now we're all dress up and ready for... well, I don't know.  Sewing?  I have another half dozen or so shirts that I plan to take down over the next few days.  Wish me luck!

*********************************

ps, I just found another t-shirt to dress project I did... more derby, of course!  I must have dozens of these little projects all around me.  Just as an update, girl child and I are both still skating derby.  It'll be my fifth season this coming year and girl child is hoping to be bouting by summertime. 

7.19.2014

upcycled shirt to apron

A new apron for girl child who sorely needed one.  She has been using the one I made for her when she was just three years old for all these years.  Since she'll be ten in just a month and a bit, something that actually covers her clothes seemed long overdue.

 photo 7d1d8128-5ace-4ee6-ad6b-91c951fbe5a4.jpg

This apron was reconstructed from a button down men's shirt I thrifted.  The applique spells out 'courage', something I think we can all use when we bake or craft.

 photo a094aff2-6bae-414f-a8eb-98ca4eb90ceb.jpg

For this one, an extra large pocket was requested for holding... stuff.  What exactly girl child failed to specify, except for a scissor sleeve for hanging onto when she crafts.  The pocket is stitched into two compartments, one about the right shape for a pair of scissors.

You'll have to excuse my atrocious bow tying; one art that has always eluded me.

 photo f4664d8b-c983-4462-b765-1277ccb9cdaa.jpg

For the top pattern I traced out one of girl child's tank top's neckline and arm opening, extending the arm opening down to wrap around the back and attach at the waist.  The bottom of the apron is the bottom portion of the back of the shirt.  I kept the bottom hem and hemmed in where I cut the side seams.  A slight gather brought the whole thing to size.

 photo 85e5cab8-726f-49bc-a7d0-eeb24b06c9a9.jpg

And then there was a mile of ruffle from black broadcloth to make for the bottom edge of the apron.

 photo cb0efc66-c3d2-4e8c-a8b4-fcc1588c7ae2.jpg

And there we have it, girl child ready for any mess she can throw at herself. 

 photo d66c7fd0-5aaa-4be2-8486-0df3b0e95056.jpg

2.15.2010

XL t-shirt to maternity tee

Before anyone sends me some congratulations or any grandparents phone me up, I did not create this tutorial for myself. I am not pregnant. Okay.

This idea did come about by a reader, who actually is pregnant, that requested a way to reconstruct a man’s extra large t-shirt into a fitted maternity shirt. The idea is to keep the voluptuousness of the xl trunk, but bring in the shoulders and sleeves to fit properly and comfortably. There is nothing worse than feeling all bloated and huge with the belly, and then throwing on a gianormous men’s cut t-shirt that makes you look like a retired linebacker with a beer gut. Or at least that was my experience :D

You can also use this tutorial to convert any large men's t-shirt into a fitted women’s tee by adjusting the sides to fit a non-pregger shape.


I really, really wish I could have materialized a medium sized pregnant woman out of thin air to model this shirt for you. No Woman, Man, or Child in this household was going to pull this one off, though. You’ll have to just trust me when I say that it would look great and fit perfectly on a model, about 6 or 7 months pregnant, glowing from an abundance of fresh vegetables, folic acid, and slurpees.

Begin with a regular t-shirt from your closet that fit well before your belly grew out of it. We are looking for a style that fits your shoulders and arms well. Next, locate a xl men’s t-shirt or larger, depending on your own size (try to go up at least 2 sizes) or, as I used here, a polo shirt. When choosing a shirt, think about softness and breathability; cheap, stiff t-shirts are horrible in the summer heat. If this is your first reconstruction, you may want to go with the freebie charity run shirt, though, before you cut into the husband's prime stock of band tees.


Fold the larger shirt in half, inside out, aligning the side seams. Turn your guide shirt inside out also and tuck in the sleeve to expose the shape of the arm seam. Lay the guide shirt down on top of the folded large shirt, positioning the center line of the guide shirt over the folded edge of the larger shirt and aligning the under arm seam on a horizontal plane.


What you are looking for is to line up the underarm seams in order to give yourself enough room on top to recut the arms and shoulders, without losing the belly space. (If you are not able to get enough room to recut the arm and shoulder, consider finding a larger shirt to reconstruct.)

Take your scissors and cut the larger shirt in the same shape of the guide shirt around the shoulders and armholes. Make sure to include a seam allowance. (Do not overthink the arm shape, just cut the best approximation that you can - this will not be a perfectly tailored t-shirt, but it will fit just fine.)

Cut under the arm down the side seam, but depart from tracking the guide shirt shape a inch or two under the arm and angle your scissors to create an A-line shape, reaching out as far as you can. The more belly room the better.


Open up the folded larger shirt and separate the front and back halves. We are going to do some tweaking to improve the fit and neckline.

Refold just the BACK portion of the larger shirt and cut your A-line in slightly. This is to reflect the fact that your back is not growing outward at the same rate as your front (though, granted, it is getting larger too. If your shirt is going to be very long or have a pear shape, skip this step; you may need the extra space to accommodate expanding hips and, sorry to be indelicate, butt.)


For the FRONT half of the larger shirt, the neckline needs to be adjusted. When you cut out the shirt originally, you could only cut the back neck shape. Now you can play with the front of the neckline.

Fold the Front of the shirt in half once again. It will help if you make a small mark on the shoulder to indicate how wide the shoulders should be. Use the back piece for reference and a piece of chalk to indicate exactly where the neck begins.

The front of your guide shirt will give you the best shape to trace. As it was, the front of my guide shirt happens to plunge low enough for me to take out the button placket on my polo shirt.


The last bit to cut before we head to the machine is the sleeve. Again, do not stress the sleeve shape, this is knit, and it will forgive you. We are going to cut from the finished edge back, adjusting the length to fit under the new armhole (measure it if you are not too sure). What you are looking to do is to cut down a lazy, pulled out 'S' shape from the shoulder down, the same length and width as the guide shirt.


The lazy 'S' shape, is going to give your sleeve some extra room for the shoulder ball and allow the sides to come down and curl around to accommodate your arm.

Ready to sew? Good. (Don't forget to put a ball point needle in your machine for sewing knit material. If you have any more questions about sewing knits, look over here.)

Begin by stitching the front and back together at the shoulders:


Next comes the sleeve. Secure the middle of the sleeve to the shoulder seam and pin outwards. The whole sleeve shape is symmetrical, so if you have any overhang, it will be the same on both sides. We'll just cut off any extra :)


Then, match up the finished edges of the sleeves, the underarm seams, and bottom hems. Stitch closed the sides.


When I sew my the sides closed after a hem has been put on the bottom or sleeve, I like to sew the seam allowance down on the openings, so they do not poke up and show when you wear your t-shirt. I think it's just a bit of aesthetics, but some people who are sensitive to tags or and such appreciate having the edges sewn down too.


The neckline is the only bit left to tackle. How you finish your neck is really up to you, but I find the simplest and cleanest thing to do is a ribbed neck. (It took all my willpower not to add some big, pleated faux front on this shirt, but I know that the material is simply too flimsy to hold it up. Restraint and simplicity is usually the better choice with tees. Well, sometimes anyway.)

First up, measure you neckline to know how much ribbing to cut (ribbing has more stretch and must be cut in a smaller length than your neckline - playing with it will help you determine what your best fit will be).


The ribbing is prepared by being sewn into a loop and folded in half width-wise, wrong sides together. The neckline and the ribbing are each divided into quarters, marked with pins.


Pin the ribbing to the shirt, raw edges aligned and right sides together, matching up the quarter marker pins. Stretch the ribbing out as you sew. Stitch down the seam allowance to the shirt for a nice, clean finish. Any pulls in the material around the stitching can be steamed with your iron to shrink back into shape.


Done!

Now, bear with me through my sad (freaky?) attempt to build up a bit of a body under my shirt with 2 apples and a square pillow.


I hope the picture isn`t too upsetting :D You get the idea: lady shaped shoulders and arms, and ample room for gestation.

****************************

This is a free tutorial and I encourage you to use the information in any way you need to (check the disclaimer at the bottom of the page). If it works for you, please consider supporting my etsy shop by purchasing a Little Print Design pattern or toss a dollar or two in my paypal to show appreciation and to encourage me to offer up even more quality patterns and tutorials.


Thank you!
Questions about the Donation? FAQ here.

1.26.2010

vinyl water-resistant book bag

I made this little water resistant bag to carry Smootch's library books way back in December, when, after two months of rain, it was beginning to look like it might not actually let up for the whole winter. Guess what? It's still raining! I feel smug with my most uncharacteristic preparation for the elements. Smug, but wet.


(Hey, look, the pic from the banner! Can you tell I've had this tutorial planned for awhile now?)

The bag is of the simplest construction, to minimize the number of potential water-leaking seams, made from a repurposed vinyl packaging, double-fold bias tape, fabric and an Eric Carle inspired applique to keep with the whole wet theme. The fish actually sits behind a vinyl panel, so it looks nicely shiny and water-esque.

The original vinyl packaging came to us wrapped around a dress up surgeon's outfit.


There are three plastic snaps securing the flap to the bag, very handy. The vinyl bag also has a big hole the bottom where a hanger to hold the dress-up outfit on the shelf, otherwise I might have been able to use this for storage. Though, in truth, I've got all the storage I need, and still more vinyl packaging.

If you do not have the exact same type of packaging as I did, you can cut out the pieces from any vinyl packaging and add snaps or velcro of your own to keep the bag secure.

The bag is constructed from two pieces of vinyl, with corresponding fabric pieces. I began by securing my flap into bag-ready position and used a sharpie to outline my bag. For sizing, I grabbed one of Smootch's larger picture books then added an inch of all sides.


Essentially I ended up with two rectangles:
back piece: 11" wide by 15" long
front piece: 11" wide by 11.5" long

Then two rectangles of fabric of the same dimensions were cut. Keep in mind that the back fabric will be seen in the front as it comes down with the flap when choosing your fabrics.


The strap is a fabric strip 24" by 2.75". Prep the strap by stitching the long edges together, right sides together to form a tube. Turn the tub right side out and press flat.

The next step is to embellish the fabric front piece. To keep the snaps functional, the front fabric lies behind the vinyl panel while the back fabric is on top of the vinyl panel. I chose a fish applique to create a oceanic illusion, with the fish swimming inside of the bag. The Eric Carle theme came about because an Eric Carle book just happened to be right in front of me when I was thinking about it. Plus, Eric Carle's work lends itself brilliantly to applique work, being all textured and patterned mosaics. I loved making this applique and want to mine children's books for more inspirations.


With the applique done, the actual bag construction goes more or less easily, depending on your comfort level with bias tape. If you hate bias tape, this is your project! I can't imagine an easier way to gaining some mastery over the bias tape than this straight seamed, oh so friendly to sew, grippy vinyl bag.

First, before the bias tape comes out, machine baste the fabric panels to the vinyl (try using paper clips to 'pin' the fabric to the vinyl):

Stitch the right side to the vinyl on the front (so that the applique shows through the vinyl). (Also clean out any little fluffs or strings before you start, otherwise you'll be looking at them forever and if you're like me, it will drive you nuts.)

Stitch the wrong side of the back fabric to the back vinyl piece.


Bring out the strap and stitch it to the fabric side of the back piece, right where your panel will bend (11.5" from the bottom edge).


Now, time for the bias tape! When I use bias tape, I usually sew it on with two seams. First I open up the tape, and machine baste the raw edge to the fabric, right sides together. Then the tape is folded up and top stitched into position.

The top edges of both panels are the first to be covered. Cut two pieces of double fold bias tape each 11" long. Stitch to the tops of the panels.


The next step is to align the bottom edges of the front and back panels (fabric front side to vinyl back side) and cover the bottom edge with 11" worth of bias tape.


The very last step is to cover the side edges. Cut two 16" long pieces of bias tape. The extra length is for tucking the ends of the tape in inside to neatly finish the top and bottom edges.


And you're done! One easy little book bag that laughs in the face of rain and snow.


*********************************

This is a free tutorial and I encourage you to use the information in any way you need to (check the disclaimer at the bottom of the page). If it works for you, please consider supporting my etsy shop by purchasing a Little Print Design pattern or toss a dollar or two in my paypal to show appreciation and to encourage me to offer up even more quality patterns and tutorials.


Thank you!
Questions about the Donation? FAQ here.

1.13.2010

Smootch in the Driver's Seat

I have had a number of opportunities to craft with various children over the years. Even more fun, I have been able to observe hundreds of different adults helping children with crafts. I've noticed that kids all seem to have their own personal set point where the help from an adult turns into interference. With one child, they want you hold their hand through the whole process and another will throw a wobbler if you even so much look at their craft supplies. And some children are very, very nice, and will silently let a pushy or uninformed adult slowly take over their project, turning it into a perfect replica of the 'example' provided by whoever is running the show. (If this is you, I suggest you read over here.)

Smootch has never been one to let anyone hijack her creativity. When we crafting together and I move beyond pure instruction ("This is how you open the glitter container") and into what she considers her artistic domain ("This is where you put the glitter"), she is quick to let me know I've crossed that line again. Usually she's fairly straightforward and polite when she says, "Okay, mom, this is my project. Yours is over there and it's lonely. Why don't you go play with it?"

I consider my kids great teachers in the art of humility and letting go. And Smootch, she's a Master. Here is my big lesson this week:


This modified and embellished t-shirt is one hundred percent pure Smootch. I did get to make cuts and tie knots, but my role was much like a puppet with Smootch pulling my strings.

Smootch has been wanting to embellish her own t-shirts for awhile. I'm guessing, by the definitiveness of her design here, she's had some ideas in mind for some time. I guess this will teach me for letting her watch old Jem and The Hollograms episodes.

To facilitate her t-shirt alterations, I gave her a small budget to spend in the craft store. She walked out with some fabric glue, glitter, a couple of metallic stick-on embellishments, and the string of pink dangly things you see in the pictures.

I had no idea she was going to glitter up a freaky face and then cut the tee to make it look like she should be riding some guy's shoulders at a Twisted Sister concert.


People, she loves this shirt. And I've agreed to let her wear it to school (with a shirt on underneath). Because that's the kind of zen mom I am.


Plus I also really like to see the looks on the other parents' faces :)

11.10.2009

jacket placket-ish

For me, sewing is all about making things that are needed, recycling materials, and saving our family time and money. It's a fairly utilitarian view, but it is satisfying for me (and it doesn't hurt that I occasionally define 'things we need' as a monster coat or any dress-up clothes).

Still, straight out mending is the pits. Especially replacing zippers. Especially, especially zippers on winter coats. It's mending hell squared.

But how could you not replace a broken zipper on a perfectly good (expensive) jacket? When you know that the alternative is the landfill because no one else is going to fix it either. We crafty types are the last hope to extend the lives of good clothes that just need a bit of mending. In my mind, this justifies a bit of zipper-replacement discomfort.

Or does it? There is nothing quite like a dreaded chore to get the ol' mind ticking away. Knowing that Birdie Boy's hand-me-down jacket needs the zipper fixed NOW has been on mind for a week, but having no zipper to replace the old one with, plus a healthy dose of procrastination (laziness), has made this bit of mending positively loom.

Which was why I was tickled pink when an alternative solution to the broken zipper dilemma presented itself. In fact, it was not only a good way to duck having to replace the zipper, it was actually more environmentally friendly as there is no need for a new zipper and recycles part of an endlessly usable man's button down shirt. All in all, this is cheaper, faster, greener and doesn't require a drink to steady my nerves before I begin.

Ahhhh! I love getting out of mending!

With that huge build up, you all are going to be disappointed at this simple little fix. Here is Birdie Boy (with a stick, as always), with his jacket closed up snug:


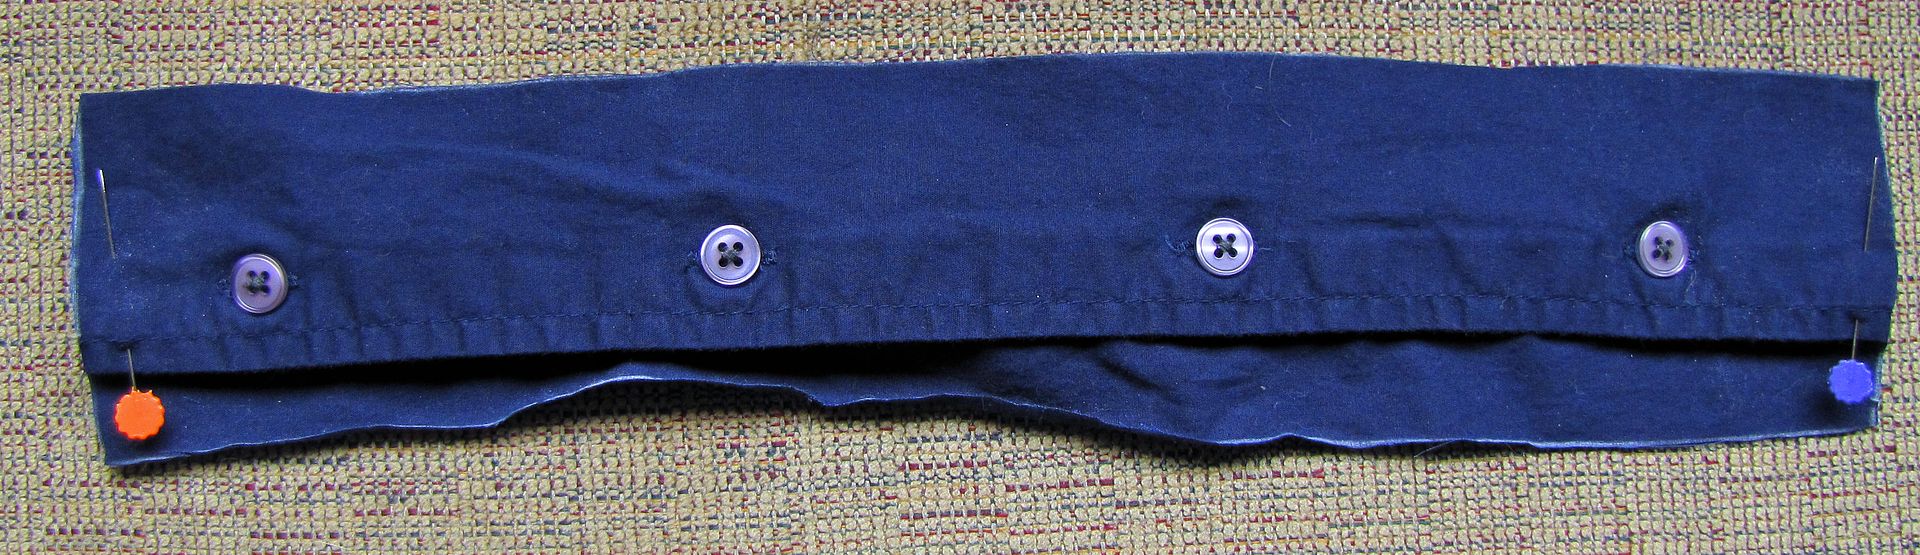
Covering a broken zipper with a front placket
(or, what to do when you can't face replacing a zipper)

First, locate a button down shirt in a coordinating or contrasting material.


My shirt here, in addition to being a good-enough matching shade of blue, had already had it's arms removed to make sleevy pants, making it a good candidate for this project. I can see how some fun could be had, turning a boring jacket into something fantabulous with coordinating colours and patterns or contrasting top stitching.

Measure the length of the broken closure and determine an appropriate width for a placket. I chose 3" for my width.


Add 1" to the length measurement for 1/2" on top and bottom for a hem (add more if you require for a double fold hem).

Add 1/2" to the width for a 1/4" seam allowance on the sides.

With your shirt buttoned up and pressed if necessary, use your ruler and tailor's chalk to outline your placket. Keep in mind button placement as it will on the jacket - you want a button fairly close to the top, but not so close as to interfere with the presser foot as you hem the top.


Cut out your placket.


Hem the top and bottom edges (separately from each other - thanks Rachel R) with a 1/4" wide double fold. Finish the raw edges of the sides with either a zig-zag stitch (as shown below) or a serger.


With placket still buttoned, lay it down on top of the jacket with the buttons running down the length of the zipper. Fold under one side edge 1/4" to determine where to stitch on the placket. Turn over whole placket, with folded under edge held in place, and pin placket to jacket, right sides together.


Stitch placket side to jacket at 1/4"

Flip placket back over top zipper and orientate the other side in the appropriate place. Fold in other side edge and put in a couple pins to mark the correct place.


Undo the buttons, turn unsewn side back with right sides together, and pin the placket in place. Stitch side edge to jacket at 1/4".


If you are feeling up to it, top stitch the side edges to the jacket (which I didn't because I was feeling good-enoughness at this point, also see above comments on laziness).

And there it is, one once-again snuggly warm jacket.


I estimate that this bit of repair saved me $2.00 for a zipper, 20 minutes of seam ripping, 40 minutes of sewing in the zipper (including 20 minutes of breaks for deep breathing and centering), and half a bottle of wine (or $5, as I usually get what's on sale). Oh, and the whole cost of a new (previously loved) jacket.

****************************************************

This is a free tutorial and I encourage you to use the information in any way you need to (check the disclaimer at the bottom of the page). If it works for you, please consider supporting my etsy shop by purchasing a Little Print Design pattern or toss a dollar or two in my paypal to show appreciation and to encourage me to offer up even more quality patterns and tutorials.


Thank you!
Questions about the Donation? FAQ here.