So many of us are beginners to the whole sewing thing. Often we have a terrible experience sometime as a child in trying to learn to sew (mine? Home economics, grade seven) and only as adults with our own children have we developed the motivation and courage to try again. Surprisingly, despite some frustrations, it has turned out to be fun and immensely satisfying to see our children live their lives clothed in something we have made with our own loving hands. And because we are smart and creative, following the tutorials and patterns becomes limiting after a time. We want to be able to translate what we see in our minds into reality.
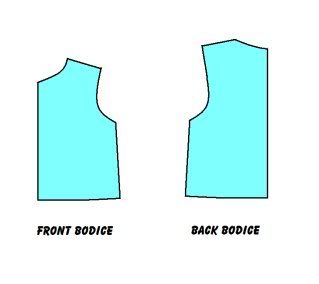
I'd like to do some posting on drafting patterns for children's garments. To get you started, I’m going to show you how to adjust a pattern to allow for two common designs – pin tucks and gathers. For this, a sloper is our best friend. A sloper is just a basic pattern shape, bodice, skirt, pants, etc, without any adornment. When you design your garment on paper (versus design by draping), you begin with a basic shape and then modify it with your design elements.
Finding your slopers:
If you are making clothing for your own children and friends, then a block pattern, or sloper, is easy and inexpensive to come upon. The easiest is using a basic commercial pattern that fits your child well from which you can modify to suit your designs. Another way is to take an existing garment from you child’s closet and creating yourself a sloper from that. Whatever you use, there should be no tucks, ruffles, or gathers. Just a plain garment to make a plain pattern piece.
If you are planning to make clothes to sell or patterns to sell, obviously using a commercial pattern for slopers would be unethical. There are slopers for sale over the internet (
I've always thought these looked good but I haven't tried them) and you can always make your own by using a draping method (you’ll have to look that one up – I’m not versed in it). Or you could use the long convoluted process of trial and error, as I did. I started with an idea of what a bodice piece should look like, drew it out, held it up to my child, and snipped, added paper here, cut it down there, and so on. I know there are professionals out there who would gasp in horror and want to slap me for being such a silly person, but I learnt more than I would have if I had just purchased a set of slopers, and my patterns fit my kid really well.
ETA: I forgot to mention that slopers do not include a seam allowance. If you are using a commerical pattern as a pattern block, trim off the seam allowances before you begin, otherwise things could end up pretty wonky (technical term). Add the seam allowance to your finished paper design/pattern or as you cut your fabric.
Once you have your slopers and you have the basic understanding of how to assemble a garment from those slopers, the fun begins. With some paper, pens, a ruler, and tape you are off and running.
Adding a gather
Trace and cut out your sloper pieces from additonal paper (indicated in blue here). For my example, I used a bodice sloper, traced out twice with the second one flipped around to form an entire bodice piece. Both pieces are then placed on a piece of paper. Sliding the slopers apart in the middle, while keeping the two bottom edges together, is how the extra fabric to gather is added to the pattern.
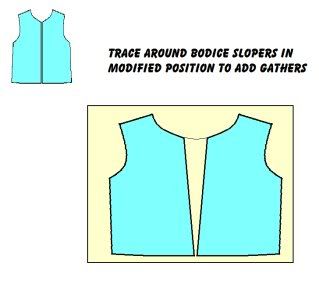
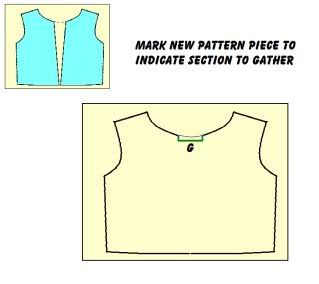
A trace around both pieces, drawing in a natural line across the gap, gives you your new modified pattern piece with gathers. Add lines or arrows on the new pattern piece to indicate where the gathered section is will save on frustration later (trust me, I know all too well).
This processes works with any pattern piece. If you are adding a gather to the top of a sleeve (a puff), then cut a traced sloper straight down from the top of the sleeve and slide apart the top. A
french curve ruler or curve square will help out to draw natural, smootch curves.
Adding pin tucks
The above picture is pin tucks lined with a serged edge. Pin tucks are just a folded over bit of material, stitched in place. To add pin tucks to a bodice, use your ruler to draw straight sections on a traced sloper where you would like the pin tucks to go. Cut along these lines.
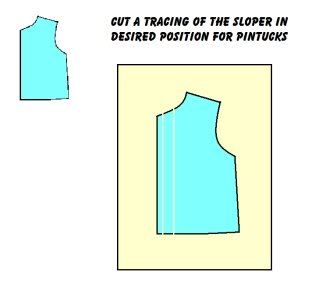
Place your cut pieces on additional paper and evenly spread apart the cut sections, using the bottom edge as a guide for proper alignment.
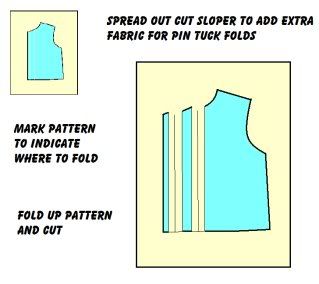
The spread out bit will be the folded over section of the pin tuck. If you would like a 1/4" wide pin tuck, then create a 1/2" gap. Tape the pattern pieces in place.
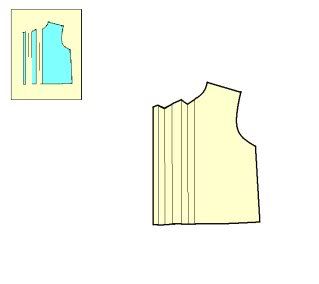
In the middle of the gap, draw a vertical line to indicate the fold line. You can now trace around the whole of the pattern pieces, including the gaps, but I suggest actuallying folding up the pin tucks on the paper first, the same as the fabric would be folded, before cutting out the bodice. This will give you the natural shape of the pattern piece, with all the lovely dips and peaks of a pattern with pin tucks that create a smooth finish.
If there are particular design elements you are interested in, please email me at vegbee[at]littleprintdesigns.com.
As always, questions and comments welcome!
*********************************************************
This is a free tutorial and I encourage you to use the information in any way you need to (check the disclaimer at the bottom of the page). If it works for you, please consider supporting my
etsy shop by purchasing a Little Print Design pattern or toss a dollar or two in my paypal to show appreciation and to encourage me to offer up even more quality patterns and tutorials.
Thank you!
Questions about the Donation?
FAQ here.
*************************************************************
This is a free tutorial and I encourage you to use the information in any way you need to (check the disclaimer at the bottom of the page). If it works for you, please consider supporting my
etsy shop by purchasing a Little Print Design pattern or toss a dollar or two in my paypal to show appreciation and to encourage me to offer up even more quality patterns and tutorials.
Thank you!
Questions about the Donation?
FAQ here.


 (Or don't add seam allowances if you already have them.)