I'd like to do some posting on drafting patterns for children's garments. To get you started, I’m going to show you how to adjust a pattern to allow for two common designs – pin tucks and gathers. For this, a sloper is our best friend. A sloper is just a basic pattern shape, bodice, skirt, pants, etc, without any adornment. When you design your garment on paper (versus design by draping), you begin with a basic shape and then modify it with your design elements.
Finding your slopers:
If you are making clothing for your own children and friends, then a block pattern, or sloper, is easy and inexpensive to come upon. The easiest is using a basic commercial pattern that fits your child well from which you can modify to suit your designs. Another way is to take an existing garment from you child’s closet and creating yourself a sloper from that. Whatever you use, there should be no tucks, ruffles, or gathers. Just a plain garment to make a plain pattern piece.
If you are planning to make clothes to sell or patterns to sell, obviously using a commercial pattern for slopers would be unethical. There are slopers for sale over the internet (I've always thought these looked good but I haven't tried them) and you can always make your own by using a draping method (you’ll have to look that one up – I’m not versed in it). Or you could use the long convoluted process of trial and error, as I did. I started with an idea of what a bodice piece should look like, drew it out, held it up to my child, and snipped, added paper here, cut it down there, and so on. I know there are professionals out there who would gasp in horror and want to slap me for being such a silly person, but I learnt more than I would have if I had just purchased a set of slopers, and my patterns fit my kid really well.
ETA: I forgot to mention that slopers do not include a seam allowance. If you are using a commerical pattern as a pattern block, trim off the seam allowances before you begin, otherwise things could end up pretty wonky (technical term). Add the seam allowance to your finished paper design/pattern or as you cut your fabric.
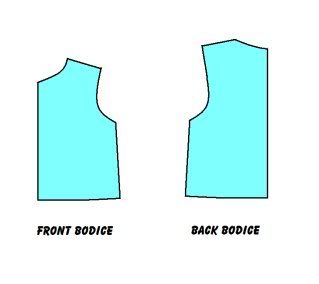
Once you have your slopers and you have the basic understanding of how to assemble a garment from those slopers, the fun begins. With some paper, pens, a ruler, and tape you are off and running.
Adding a gather
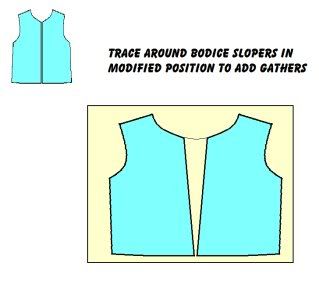
Trace and cut out your sloper pieces from additonal paper (indicated in blue here). For my example, I used a bodice sloper, traced out twice with the second one flipped around to form an entire bodice piece. Both pieces are then placed on a piece of paper. Sliding the slopers apart in the middle, while keeping the two bottom edges together, is how the extra fabric to gather is added to the pattern.
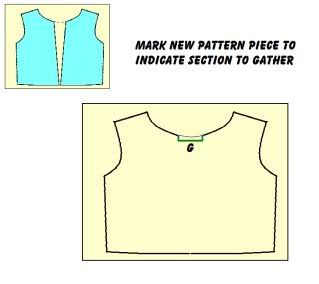
A trace around both pieces, drawing in a natural line across the gap, gives you your new modified pattern piece with gathers. Add lines or arrows on the new pattern piece to indicate where the gathered section is will save on frustration later (trust me, I know all too well).
 This processes works with any pattern piece. If you are adding a gather to the top of a sleeve (a puff), then cut a traced sloper straight down from the top of the sleeve and slide apart the top. A french curve ruler or curve square will help out to draw natural, smootch curves.
Adding pin tucks
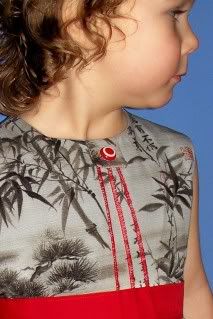
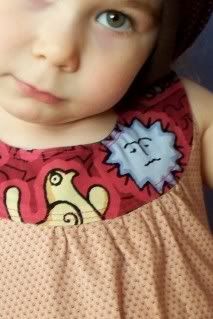
The above picture is pin tucks lined with a serged edge. Pin tucks are just a folded over bit of material, stitched in place. To add pin tucks to a bodice, use your ruler to draw straight sections on a traced sloper where you would like the pin tucks to go. Cut along these lines.
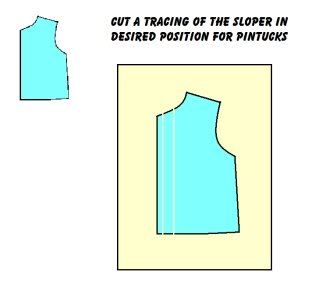
Place your cut pieces on additional paper and evenly spread apart the cut sections, using the bottom edge as a guide for proper alignment.
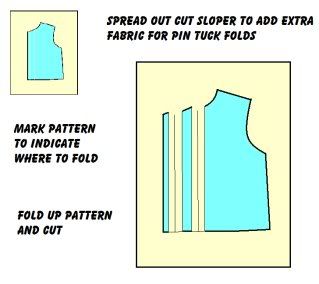 The spread out bit will be the folded over section of the pin tuck. If you would like a 1/4" wide pin tuck, then create a 1/2" gap. Tape the pattern pieces in place.
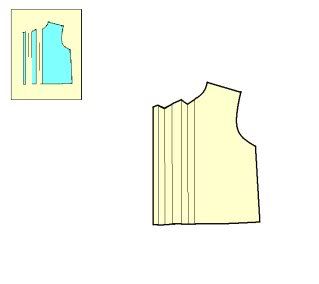
In the middle of the gap, draw a vertical line to indicate the fold line. You can now trace around the whole of the pattern pieces, including the gaps, but I suggest actuallying folding up the pin tucks on the paper first, the same as the fabric would be folded, before cutting out the bodice. This will give you the natural shape of the pattern piece, with all the lovely dips and peaks of a pattern with pin tucks that create a smooth finish.
 If there are particular design elements you are interested in, please email me at vegbee[at]littleprintdesigns.com.
As always, questions and comments welcome!
*********************************************************
This is a free tutorial and I encourage you to use the information in any way you need to (check the disclaimer at the bottom of the page). If it works for you, please consider supporting my etsy shop by purchasing a Little Print Design pattern or toss a dollar or two in my paypal to show appreciation and to encourage me to offer up even more quality patterns and tutorials.
Thank you!
Questions about the Donation? FAQ here.
*************************************************************
This is a free tutorial and I encourage you to use the information in any way you need to (check the disclaimer at the bottom of the page). If it works for you, please consider supporting my etsy shop by purchasing a Little Print Design pattern or toss a dollar or two in my paypal to show appreciation and to encourage me to offer up even more quality patterns and tutorials.
Thank you!
Questions about the Donation? FAQ here.

Thank you so much. You have been a sewing inspiration to me. I've always wanted to sew for myself but commercial patterns don't fit. Period. Your piece about slopers has helped me understand the process in simplest terms. Now, I can take the information I have learned on your site and apply it to information that I learned from another site and make a sloper for myself...that fits...well. Be Blessed.
ReplyDeleteWow!! You put alot of work into this tute!! I am terribly impressed. I have no patience for writing these things out. Nice!
ReplyDeleteOh, wow! Thanks so much - I've wondered about the gathers-adding recently. Can't wait to read more - will ask about design if I think of anything!
ReplyDeleteWonderful and clear - thank you. I've anted to try adding a gather for a while now and you have just made it SO much easier for me.
ReplyDeleteThank you, thank you! That is wonderful! Did you use trial and error to find additional sizes for your printed patterns?
ReplyDeleteNow I may finally have the information to brave a gather. And I love the prints you use on the one in the picture! You have helped me understand why the dresses I made not long ago, did not come together too well at the top, even if I traced them from other garments.
ReplyDeleteThank you for the information and inspiration!
And if you can tell me how you get your daughter to pose for you so nicely, and not do like mine and put her face away, it would be an added bonus!
Thanks!!!
this is so incredibly helpful, you have no idea. thanks so much!! I'm one of those sewers you mention in the post, trying sewing again after a not-so-positive first experience, my child being the inspiration. I'm really just starting... had no idea what slopers were, but you post was really well written and straightforward.... very motivating!
ReplyDeleteThe perfect tutorial and just the right time!
ReplyDeleteThank you so much. I am putting this to use tonight!
~Amy
Brilliant! I've wanted to do a drafrting post, too, but I don't know the terminology here. We call a sloper a "basic block" (I think they're equivalent) so I am thrilled to find out it's other names. Thank you!
ReplyDeleteSorry for the typo - I meant "drafting", not "drafrting". Oops.
ReplyDeleteAwesome tutorial!!! I posted a link on Craft Gossip Sewing Blog:
ReplyDeletehttp://sewing.craftgossip.com/tutorial-adding-pintucks-and-gathers-to-childrens-clothes-patterns/2009/05/05/
--Anne
Thank you for sharing, this tutorial is great! From now on we know how to modify the not so "me" or "my daughter" style found in pattern books.
ReplyDeleteThanks for all the help as usual. Very understandable.
ReplyDeleteThis is exactly the kind of post I love reading. I know so little about pattern drafting, but really want to learn more.
ReplyDeletewonderful post (found through a tweet)! i love to make my own patterns for my dtr - not so much for my 3 sons... they just don't care! but my 10y/o dtr is sewing on her own and i'm leaving this up for her to see later today :) i did want to mention something i use: have you heard of "Lutterloh" or the golden rule patterns? i think they are something you would really enjoy. ck ebay for older versions (they are pricey, but worth it!) thanks again, for your post
ReplyDeleteWow, this is such wonderful, non-intimidating instruction. Thanks so much for being so generous and sharing this! I'll be linking.
ReplyDeletemy first disasterous sewing project was a stuffed deer. Furry, intricate, difficult, and in the end completely unloveable. What was the home ec teacher thinking?
ReplyDeleteThis was a perfectly timed tute for me. I've recently been thinking about the elements I love in kids clothes, and what the standard store bought stuff is lacking.
Thank you all for the wonderful feedback!
ReplyDeleteLB3K, I have a formula I use for resizing patterns. Generally I cut the original size apart and expand it out. Did that make sense?
asajane, I do absolutely nothing to make her pose for me (oh, well, except promise her candy ;D) Smootch does her own thing in front of the camera mostly and it seems to work for both of us.
LiEr, darfrting is my new favorite phrase :D Some days I really, really wish I had co-workers.
casserole, thanks! Hey, you guys should get a button so I can put it on my sidebar! :)
Rebecca, I have checked out Lutterloh pattern making. I was thinking about it for when I begin to dabble in adult patterns. Someday...
Rachel, thanks!
Cricket, home economics teachers' were really working for the second wave feminist movement, with the mission of turning girls off of anything to do with cooking, sewing, or cleaning. The beehive hairdos and pumps were a disquise. There were anti-domestic subliminal messages in the banner on the wall that said, 'a place for everything and everything in it's place.' Or so I've heard.
I just found this site and am in awe! Your little girl is a priceless model, love her expressions! Can't wait to jump in and sew some of the things I found here. Any chance there will be more boy patterns?
ReplyDeleteFABULOUS!! I've just started making clothing for my daughters - mostly sleeveless dresses, as I've got an unnatural fear of making sleeves. (It dates back to a badly made prom dress. *shudder*) Thanks for the 'tute!
ReplyDeletePS I found a book at the library called "How to Make Your Own Sewing Patterns" that has a lot of good ideas and ways to change a basic pattern (it is for adults, but the basic ideas can be used for kids, too). It is from 1973, but since the 70's are back in style, it totally works!!! Thanks again for the great info!
ReplyDeleteWhat a wonderful tutorial!! :) I have been doing some sewing myself, but not so much in the clothes dept. I just re-did a baby bed for my youngest to use with her dolls. Its on the blog if you felt like peeking! :)
ReplyDeleteKristin
http://reclaimingthehome.typepad.com
Great info! Thanks for the explanations and the detailed photos! :)
ReplyDeleteoh honey, you ROCK! my sad little brain was struggling to figure these out.....
ReplyDeleteDear Friends,
ReplyDeleteI like the design. if possible email me the draft of your pattern with measurement. i mail id is falgunimehta7786@yahoo.com
Thank u
Reagards,
Falguni Mehta
i just found your site and LOVE it! Such great information, thanks so much for sharing.
ReplyDeleteI was so happy to find this tutorial on adding gathers to slopers. I've been adding the extra out the sides and down the side seams! I always knew there was a better way! I have a question for you...
If you want to add gathers all around the waistline (say under a empire top of a dress). Would you still add it in one spot down the center like you did in the tutorial?
Thank you so much and sorry for the lengthy comment!
i just found your site and LOVE it! Such great information, thanks so much for sharing.
ReplyDeleteI was so happy to find this tutorial on adding gathers to slopers. I've been adding the the extra out the sides and down the side seams! I always knew there was a better way! I have a question for you...
If you want to add gathers all around the waistline (say under a empire top of a dress). Would you still add it to one spot down the center like you did in the tutorial??
Thank you so much and sorry for the lengthy comment!
Sandy, for a larger section that you want to recreate in a gather but keep the overall shape, chose several different spots to split (natural areas will suggest themselves) and evenly seperate them to add the extra space for gathers.
ReplyDeleteAnd I like lengthy comments. thank you!
Thank you for posting this. I didn't know "Slopers" existed until I happened upon your blog. This was very helpful and informative for me.
ReplyDeletehmm. I don't understand why you say that if you want to use a sloper to design clothing for sale, it's unethical. I completely disagree. I went to college for costume design. I can't remember which of the Big Four it was, but one of the companies donated their patterns to every student in the program. They knew that these slopers were going to design students... who would be eventually using that sloper to create designs which would be sold.
ReplyDeleteIn fact, of all of those I've met who went to school for either costume or fashion design, they have began learning pattern drafting by manipulating a sloper. It's quite difficult to learn pattern drafting without first learning to manipulate a sloper.
It's fantastic to know how to create a custom sloper, and certainly something every seamstress should know. However, if you believe that this is "unethical" because it's some how a derivative work to use it to draft other patterns, you are mistaken. There is nothing proprietary about the end product of a finished sloper. If it is done correctly, you will not be able to tell the difference between a pre-made, purchased sloper, one constructed from a pattern, or one drafted from scratch. That's the entire point of a sloper.