Pages

5.28.2009

tie bib

Hello all! Sorry I've neglected you a bit over here. My pc had been humming in a alarming sort of manner until last week, when it unceremoniously (though I can not say without warning) stopped working. Ka-put. Apparently, an intergal part of the machine desperately needed for useful functioning went and melted itself. Thus all things computer related have been a bit patchy as of late.

But, having fired up the old lap top, I can share with you my new favorite bib for me Birdie Boy.


The bib above is a taupe linen with a tie applique. I used the scraps from cutting the bib to make a little collar embellishment. Here's how:

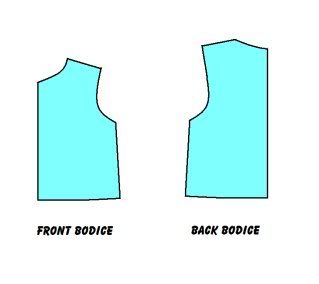
Below is two pictures of pattern pieces for this bib. Hopefully, if all works well, you can right click on the below pictures, you can save them to your computer. Print them each on a full 8x11 piece of paper for the proper sizing. This is the bib pattern and the applique.

Print this:

And this:


Once your two pages are printed, cut out the two bib pattern pieces and tape them together at the dotted lines for a full bib pattern. Position the pattern piece along a folded piece of light or medium weight woven material (pattern piece indicates fold side) and cut one for the top fabric. Cut another bib from a medium or heavy weight material for the back side. Save the little circular scraps from cutting out the necks to make the collar with.

For the applique, cut out the tie pattern on the blue line or trace the tie on to bonding paper. Cut out the tie piece as one on light or medium weight fabric (follow manufacturer's instructions if using bonding paper). Position the tie applique on the top bib and pin or iron (if using bonding paper) in place. Use tailor's chalk to mark on the lines in green onto the applique. Satin or regular stitch around the edge and where indicated by your chalk (green lines on pattern).

To make the collar, cut the circular scraps from cutting the neck in half, along the fold (when unfolded, these scraps look a bit like chickpeas - cut them vertically in half). This will give you two top fabric pieces and two bottom fabric pieces.

Align a top piece and a bottom piece right sides together and stitch as indicated in the illustration above, leaving the long straight side open. Clip curves and turn collar right side out. Press, then top stitch along curve. Repeat for other collar.


Align and pin the raw edges of the collar pieces with the neck of the bib, bottom fabric of the collar against the right side of the bib, as indicated in the below illustration. You will need to curve the bib slightly to align properly.


Machine baste the collar pieces to the bib.


To finish up your bib you can:

a) place the top and bottom bib pieces wrong sides together and roll hem around the edges (or a zig zag stitch if you like frayed edges - really nice if you use denim actually)


b) place the top and bottom bib pieces right sides together and stitch almost all the way around the bib, leaving an unstitched section on the edge.

Clip curves and corners, and turn bib right sides out. Press bib, tucking in the unstitched section naturally. Top stitch all around the edge of the bib, closing the unstitched portion as well.


Last, add a snap, some velcro, or any other clever closing device you fancy.


********************************************************
This is a free tutorial and I encourage you to use the information in any way you need to (check the disclaimer at the bottom of the page). If it works for you, please consider supporting my etsy shop by purchasing a Little Print Design pattern or toss a dollar or two in my paypal to show appreciation and to encourage me to offer up even more quality patterns and tutorials.


Thank you!
Questions about the Donation? FAQ here.

5.15.2009

Revolutions Frock Pattern Giveaway (done done done)

(I'm so excited about this one!)

May 20th is the official release date of the newest Little Print pattern. I'd like to introduce you to the Revolutions Frock.


The Revolutions Frock features a round yoke, waist sash, and long circle skirt, all which pivot around the central axis – your girl.


To enter the giveaway, please leave a comment on this post. I will draw on May 19, at 9:00 pm MST.

In your comment, if you like, I could really use some help. I'd like to know what y'all think of E-patterns, those that arrive in your email in pdf form. I'm thinking of making a few Little Print patterns avaliable this way, but I'm really worried that it will dimish the accessibility of the pattern. Because I like to make it as friendly as possible :) If you have any experience or opinions about E patterns, please, I'd love to hear about it in your comment.

In the meanwhile, I'm going to step away from the computer and get testing the Fair Weather Jacket sizes 5-8 I promised y'all. Good luck everyone, and talk to you tuesday night!


**************************************************************

Thank you thank you thank you all for your generous sharing of wisdom of epatterns! I much appreciate your good humor in allowing me to use you as a focus group :)

Now, I have made the draw and the winner of a hot off the presses Revolutions Frock pattern zine is Angela C.

And for the rest of you commenters, for sharing your wisdom, I would like to offer you 20% off of the Revolutions Frock pattern zine in my etsy shop until May 27th. Just enter in the code 'JUST TUTES' and I will reimburse you through paypal.

Again, thanks all! I've got a tutorial sitting in the hopper (okay, my brain, but it's all ready to emerge into a more substancial reality) and I should be back with it in the next few days.

cheers!

5.12.2009

designing your own: cross top

One of the easiest pattern modifications or designs using pattern blocks or slopers is the kimono or cross top. And it's satisfying - so many cute ideas out there right now, and the cross top is a classic design that compliments beautiful fabric.

It also allows for some fun with contrasting colours :)


For the top I've made here I used jersey knit fabric but the theory works just as well with patterns designed for woven (non stretch) fabrics.

To get going, pull out your slopers or an unadorned commercial pattern that fits your child well. Normally before modifying a pattern I'd suggest removing the seam allowances but for this one it is not necessary. Some tissue, wax, or tracing paper, a pencil, and tape is also needed. If you happen to have a french curve square, it would also be handy, but not necessary.

So, here we are. Slopers:
The front bodice piece is the only piece to be modified for the cross top (sleeves and shoulder seams are not altered and should be sewn as per usual).

Trace out your front bodice twice. Place the two bodices side by side so they form a complete bodice front. Overlap just the top of the bodice pieces about 3/8" (still keep the bottom flush).

The overlap is so there is a slight pull across the chest and the crossed top does not gap open.

Tape the crossed bodices together.

Draw a sloped line from the the neckline, a bit off center, down across to about 1" under the sleeve. If you have a french curve, this is your moment to use it to make the slope as lovely as possible. If not, aim for a gentle curve and it'll be good too.
This little curve is the same as I've done in the photo at the top of this post. I aim for modesty with the girl, though if I was making it for myself I may do a bit of plunging with the curve. I would suggest you play with the paper for a bit and your adult model to find the best line to compliment the bosom ;)

All that is left to do is the cut away the smaller shoulder bit above the curve and your pattern modification is complete.(Or don't add seam allowances if you already have them.)

When sewing your cross top you can secure the two pieces together in the side seam, as I did (I also shortened the under piece of the cross to reduce the bulk). Or, add ties to the sides to keep it closed (nice with the woven material, and with younger children and babies where not having to pull a shirt on over the head is desirable. Or you can add a longer ties on both sides and make it into a wrap tee. Have fun!


**********************************************************
This is a free tutorial and I encourage you to use the information in any way you need to (check the disclaimer at the bottom of the page). If it works for you, please consider supporting my etsy shop by purchasing a Little Print Design pattern or toss a dollar or two in my paypal to show appreciation and to encourage me to offer up even more quality patterns and tutorials.


Thank you!
Questions about the Donation? FAQ here.

5.05.2009

designing your own children's clothes: pin tucks and gathers

So many of us are beginners to the whole sewing thing. Often we have a terrible experience sometime as a child in trying to learn to sew (mine? Home economics, grade seven) and only as adults with our own children have we developed the motivation and courage to try again. Surprisingly, despite some frustrations, it has turned out to be fun and immensely satisfying to see our children live their lives clothed in something we have made with our own loving hands. And because we are smart and creative, following the tutorials and patterns becomes limiting after a time. We want to be able to translate what we see in our minds into reality.

I'd like to do some posting on drafting patterns for children's garments. To get you started, I’m going to show you how to adjust a pattern to allow for two common designs – pin tucks and gathers. For this, a sloper is our best friend. A sloper is just a basic pattern shape, bodice, skirt, pants, etc, without any adornment. When you design your garment on paper (versus design by draping), you begin with a basic shape and then modify it with your design elements.

Finding your slopers:

If you are making clothing for your own children and friends, then a block pattern, or sloper, is easy and inexpensive to come upon. The easiest is using a basic commercial pattern that fits your child well from which you can modify to suit your designs. Another way is to take an existing garment from you child’s closet and creating yourself a sloper from that. Whatever you use, there should be no tucks, ruffles, or gathers. Just a plain garment to make a plain pattern piece.

If you are planning to make clothes to sell or patterns to sell, obviously using a commercial pattern for slopers would be unethical. There are slopers for sale over the internet (I've always thought these looked good but I haven't tried them) and you can always make your own by using a draping method (you’ll have to look that one up – I’m not versed in it). Or you could use the long convoluted process of trial and error, as I did. I started with an idea of what a bodice piece should look like, drew it out, held it up to my child, and snipped, added paper here, cut it down there, and so on. I know there are professionals out there who would gasp in horror and want to slap me for being such a silly person, but I learnt more than I would have if I had just purchased a set of slopers, and my patterns fit my kid really well.

ETA: I forgot to mention that slopers do not include a seam allowance. If you are using a commerical pattern as a pattern block, trim off the seam allowances before you begin, otherwise things could end up pretty wonky (technical term). Add the seam allowance to your finished paper design/pattern or as you cut your fabric.


Once you have your slopers and you have the basic understanding of how to assemble a garment from those slopers, the fun begins. With some paper, pens, a ruler, and tape you are off and running.

Adding a gather

Trace and cut out your sloper pieces from additonal paper (indicated in blue here). For my example, I used a bodice sloper, traced out twice with the second one flipped around to form an entire bodice piece. Both pieces are then placed on a piece of paper. Sliding the slopers apart in the middle, while keeping the two bottom edges together, is how the extra fabric to gather is added to the pattern.
A trace around both pieces, drawing in a natural line across the gap, gives you your new modified pattern piece with gathers. Add lines or arrows on the new pattern piece to indicate where the gathered section is will save on frustration later (trust me, I know all too well).
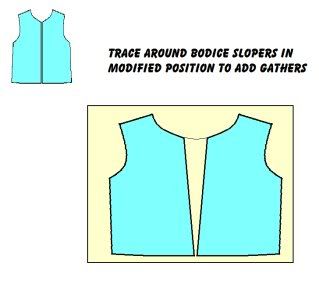
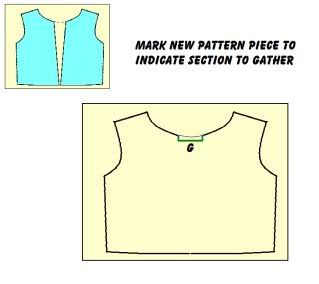
This processes works with any pattern piece. If you are adding a gather to the top of a sleeve (a puff), then cut a traced sloper straight down from the top of the sleeve and slide apart the top. A french curve ruler or curve square will help out to draw natural, smootch curves.

Adding pin tucks


The above picture is pin tucks lined with a serged edge. Pin tucks are just a folded over bit of material, stitched in place. To add pin tucks to a bodice, use your ruler to draw straight sections on a traced sloper where you would like the pin tucks to go. Cut along these lines.

Place your cut pieces on additional paper and evenly spread apart the cut sections, using the bottom edge as a guide for proper alignment. 
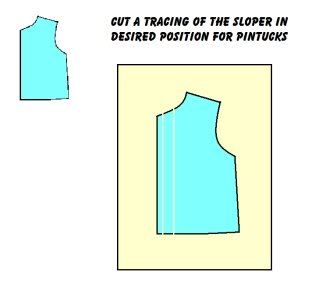
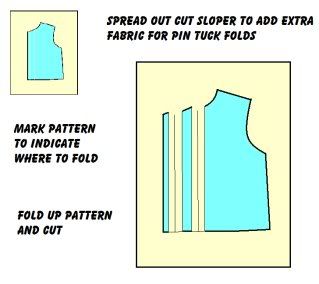
The spread out bit will be the folded over section of the pin tuck. If you would like a 1/4" wide pin tuck, then create a 1/2" gap. Tape the pattern pieces in place.

In the middle of the gap, draw a vertical line to indicate the fold line. You can now trace around the whole of the pattern pieces, including the gaps, but I suggest actuallying folding up the pin tucks on the paper first, the same as the fabric would be folded, before cutting out the bodice. This will give you the natural shape of the pattern piece, with all the lovely dips and peaks of a pattern with pin tucks that create a smooth finish. 
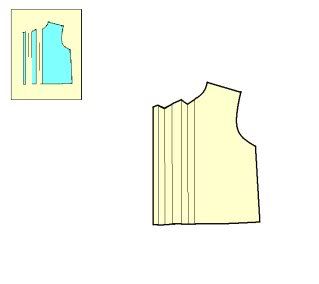
If there are particular design elements you are interested in, please email me at vegbee[at]littleprintdesigns.com.

As always, questions and comments welcome!
*********************************************************
This is a free tutorial and I encourage you to use the information in any way you need to (check the disclaimer at the bottom of the page). If it works for you, please consider supporting my etsy shop by purchasing a Little Print Design pattern or toss a dollar or two in my paypal to show appreciation and to encourage me to offer up even more quality patterns and tutorials.


Thank you!
Questions about the Donation? FAQ here.
*************************************************************
This is a free tutorial and I encourage you to use the information in any way you need to (check the disclaimer at the bottom of the page). If it works for you, please consider supporting my etsy shop by purchasing a Little Print Design pattern or toss a dollar or two in my paypal to show appreciation and to encourage me to offer up even more quality patterns and tutorials.


Thank you!
Questions about the Donation? FAQ here.