I'm always looking for ways of using the volunteer foods that grow each year in my yard. Here's a quick and easy soup I developed to use some of the hoards of chives that fill up one any avaliable patch of dirt in my backyard.
Chive Soup (children's version)*
In a medium size saucepan, add 1 tbsp of oil and saute:
1 lrg clove of garlic
2 carrots, chopped
3 potatoes, cubed
Saute for a couple of minutes, then add:
3 cups vegetable stock
1 cup of chives, chopped
1/4 tsp salt
Simmer until vegetables are cooked.
Add 1/4 cup of milk (soy or rice) and a couple of leaves of kale if you've got them. Use a hand held wand blender to blend the soup until more or less smooth (or carefully scoop most of the soup into a blender to do the deed.)
* For a more exciting (read : adult) taste, add a bit of chilli pepper and extra garlic
Enjoy!

6.30.2009
6.26.2009
wand maker
I'm always fascinated by the wandering and looping path that Smootch's interests take. She usually operates in a sort of creative free association, where one momentary obsession will jump over to a related idea over to focusing on just one aspect and so on. A few weeks ago she found a (too small) wizard's costume at a garage sale. Putting on the costume, Smootch turned into a nasty wizard bearing magic potions that would make people fall in love with goats when they drank them. Of course, every potion was presented in a sweet as agave nectar voice by Smootch in her (too small) wizard regalia, her pointy hat draped with some sort of floral, sweet dress or scarf, disquised as a innocent merchant of refreshing drinks. When the unwitting victim drank, however, the disquise would be whipped off and a truly spine tingling crackle would echo off the walls. With such glee Smootch poisions us with bovidaphilia.
From this dark start, Smootch's interest meandered over to potion making of all sorts. Garden dirt, flower and grass make the outside potions. Oil, flour, sugar, and whatever else she can reach make up the inside potions. Sometimes bits of paper are mixed in with odds from her collage box.
And then. looking through a book about wizards we brought home from the library, Smootch fell in love with the wizard's magic wand. Up until this point wizard gear has been limited to some fairly complex facial expressions, body language and voices - she hunches over, squinches up her face, and speaks with a cackly voice - sort of like a halloween witch with the runs. But now our house if finally wizard free as a more commerical venure has taken hold.
Smootch is now a maker of fine wands for all of your magical needs. Behold!

Wands are amazing fun to make. If you have a wee one interested in become a wand making apprenctice, Smootch has shared her techniques with me:
You get your sticks (we go gathering several times a day now), your pipecleaners, yarn, ribbons, material scraps and anything else you can think of to tie or wrap. Smootch began with twisting pipecleaners together (which is not fun to be accidently hit in the face with, just so's you know) and moved onto using a stick base to wrap, twist and tie onto.
After the wands are made, if they are to be made into gifts or simply for storage, Smootch has devised a packaging for them that doubles as a gift card. A piece of constuctions paper, cut into four pieces, then each piece folded into 2 lengthwise and stapled on the bottom and up one side will give you a small wand sheath, which the recipient's name can be written along with appropriate wizardly writing and symbols. The sheath can also detail wand use instructions or special cautions (like do not use while operating heavy machinery).

I'm waiting to see what direction Smootch's imagination will go off to next, whether it be a somehow related or something completely off the wall. In the meanwhile, as long as this wizard love runs its course, we are staying away from Harry Potter or anything Hogwarts related. Once day she'll have her imagination refertilized with R. K. Rowling's capitivating work, but until then I'd like her to continue create her own wizardly notions uninfluenced.
From this dark start, Smootch's interest meandered over to potion making of all sorts. Garden dirt, flower and grass make the outside potions. Oil, flour, sugar, and whatever else she can reach make up the inside potions. Sometimes bits of paper are mixed in with odds from her collage box.
And then. looking through a book about wizards we brought home from the library, Smootch fell in love with the wizard's magic wand. Up until this point wizard gear has been limited to some fairly complex facial expressions, body language and voices - she hunches over, squinches up her face, and speaks with a cackly voice - sort of like a halloween witch with the runs. But now our house if finally wizard free as a more commerical venure has taken hold.
Smootch is now a maker of fine wands for all of your magical needs. Behold!
Wands are amazing fun to make. If you have a wee one interested in become a wand making apprenctice, Smootch has shared her techniques with me:
You get your sticks (we go gathering several times a day now), your pipecleaners, yarn, ribbons, material scraps and anything else you can think of to tie or wrap. Smootch began with twisting pipecleaners together (which is not fun to be accidently hit in the face with, just so's you know) and moved onto using a stick base to wrap, twist and tie onto.
After the wands are made, if they are to be made into gifts or simply for storage, Smootch has devised a packaging for them that doubles as a gift card. A piece of constuctions paper, cut into four pieces, then each piece folded into 2 lengthwise and stapled on the bottom and up one side will give you a small wand sheath, which the recipient's name can be written along with appropriate wizardly writing and symbols. The sheath can also detail wand use instructions or special cautions (like do not use while operating heavy machinery).

I'm waiting to see what direction Smootch's imagination will go off to next, whether it be a somehow related or something completely off the wall. In the meanwhile, as long as this wizard love runs its course, we are staying away from Harry Potter or anything Hogwarts related. Once day she'll have her imagination refertilized with R. K. Rowling's capitivating work, but until then I'd like her to continue create her own wizardly notions uninfluenced.
6.23.2009
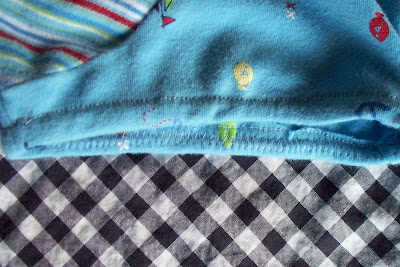
easy peasy underneathy
Hey, have I mentioned that I am making Smootch's underwear from Birdie Boy's outgrown jersy knit baby pants? Baby pants are made to fit over diapers, which also conveniently fits a preschooler's bottom just about right. This method works well with jersey knit pants in size 9 months and bigger for your average size preschooler, and outgrown leggings or tights (in natural materials) also lend themselves well to undie-conversions.
Oh, and it's the easiest, quickest thing to do ever. Much faster then shopping anyway (which is why I started doing this when I realized that part of the reason why Smootch wiggled so much was because her underwear were too tight. O0ps.)
You've got your baby pants. You got your scissors. Now cut off the legs, leaving about 3/4 - 1" for an elastic.

All that needs done is to stabilize the leg seams (no need to gather, they'll be snug enough.) Pull out your clear elastic (or regular elastic not wider than 3/8"). Use a zig-zag stitch to secure the elastic to the raw edge of the wrong side around the leg opening. I usually do not measure out a length but just start sewing from one seam around, pulling the elastic slightly to prevent the jersey knit from stretching out as I sew, and then cutting the sewn elastic free from my roll once I reach all the way around.

To finish, fold under the sewn elastic and top stitch around the leg opening to secure.
************************************************************
This is a free tutorial and I encourage you to use the information in any way you need to (check the disclaimer at the bottom of the page). If it works for you, please consider supporting my etsy shop by purchasing a Little Print Design pattern or toss a dollar or two in my paypal to show appreciation and to encourage me to offer up even more quality patterns and tutorials.
Thank you!
Questions about the Donation? FAQ here.
Oh, and it's the easiest, quickest thing to do ever. Much faster then shopping anyway (which is why I started doing this when I realized that part of the reason why Smootch wiggled so much was because her underwear were too tight. O0ps.)
You've got your baby pants. You got your scissors. Now cut off the legs, leaving about 3/4 - 1" for an elastic.
All that needs done is to stabilize the leg seams (no need to gather, they'll be snug enough.) Pull out your clear elastic (or regular elastic not wider than 3/8"). Use a zig-zag stitch to secure the elastic to the raw edge of the wrong side around the leg opening. I usually do not measure out a length but just start sewing from one seam around, pulling the elastic slightly to prevent the jersey knit from stretching out as I sew, and then cutting the sewn elastic free from my roll once I reach all the way around.

To finish, fold under the sewn elastic and top stitch around the leg opening to secure.

Done.
These fit a bit like what they call 'boy shorts', which suites us all good over here considering my little girl has absolutely no sense of modesty when wearing her twirl skirts. And Smootch assures me they are very comfortable and double very well as pjs bottoms in hot weather.
Now, to figure out what to do with the little legs left over from the baby pants. The Man suggested I use them for baby clean up after meals (we also seem to need more of those) but there are too many sweet fabrics to let them go like that. Will have to come up with something...
************************************************************
This is a free tutorial and I encourage you to use the information in any way you need to (check the disclaimer at the bottom of the page). If it works for you, please consider supporting my etsy shop by purchasing a Little Print Design pattern or toss a dollar or two in my paypal to show appreciation and to encourage me to offer up even more quality patterns and tutorials.
Thank you!
Questions about the Donation? FAQ here.
6.17.2009
later gator
We are out of here for an extended weekend at the North Country Fair music festival. I hope for new inspirations, but I'll take the good music and good friends and be happy.

In the meanwhile I thought I would share a couple of my favorite tutorial complilation sites, where there is so much crafty goodness to be found it actually makes my head hurt. The Crafty Crow is stuffed full of great children's craft ideas and One Pretty Thing has 12 to 16 mimimum links to great tutorials everyday.
Feel free to share your links to craft collective sites - I love to go see the fantastic ideas even I will never in a million years have time for even a fraction of the projects. And every one have a good weekend, which hopefully includes some good music and good friends too :)
6.16.2009
glow in the dark clay bead vine

Honestly, who doesn't need a seven foot long glow in the dark clay bead vine? It wraps very nicely around my daughter's bed frame, but I am also planning on using it later to decorate her book nook by draping it over a large stick I will attach to the wall and hanging mermaids, seashells, and fish (or paper versions of them) from the vine and stick to enhance her private magic under the sea theme she's got going there.*
This is a project that began as something else but meandered it's way through the stages to become something else entirely. The vine's green beads are made from a flour recipe and painted with glow in the dark acrylic paint (which we happen to have in the house because of a failed attempt to make glow in the dark bubbles - something we are desperate to have for some reason?!) The mid size beads are a combination of boughten beads and polymere clay beads that The Man and I have made over the years. The smallest beads are glass seed beads.

The flour clay recipe:
3/4 flour
1/2 cup salt
1/2 cornstarch
warm water
Mix together the flour, salt and cornstarch. Add warm water slowly until the clay is firm enough to form into small balls.

Beads are formed by pushing holes through to middle of a bead-esque shape with a straw or toothpick. If you find the clay begins to fall apart while you work, wet your hands with a bit of water and the clay will stick together well again.

Lay all your beads on a cookie sheet or tray of some type to dry for 1 to 4 days (depending on how big your beads are.)
Once your beads are dry, paint with a glow in the dark acrylic paint. Or whichever way you like, of course. To paint the beads evenly (something not entirely managed by us) try sticking it onto the unbristled end of a paint brush and painting all around.
When the flour clay beads are all prepped and ready, sit down with your beads and a looooonnng piece of wire (I used a .018 gauge bead wire) and begin your vine.

My vine is fast and loose on the pattern, but generally there is a patch of seed beads, an equal-ish size patch of mid-size beads, one large clay bead, a patch of mid-size beads, and back to the small seed beads. And so on. For a cohesive look or to coordinate with a room stick to beads of the same colour family, or warm/cool colours, etc. I used blue and green because I knew that eventually there would be a mermaid or two tucked nearby.
Hang your finished vine in a brightly lit room (best for the acrylic glow in the dark paint to collect UV rays). At night, after the sun goes down and with the lights off, come visit the vine and oohh over it's lovely (or alien) glow.
 * Safety note: this vine is definitely decor and not a plaything. The length and tanglability of the beads make it a hazard for children to play with and it should be securely attached wherever it is to be hung or displayed.
 6.15.2009
seed beads
Smootch has been winding beads on string of all times for years now but is just now getting the dexterity to bead with seed beads and the desire to create patterns. I'm totally thrilled! Seed beads, in addition to being inexpensive, come in every colour ever, are lightweight for the wee necks and wrists, and, because of their size, take long enough to bead a whole necklace that you can actually do a load of dishes between clasp-putting-on duties.
Smootch likes to use a beading wire that she can pick up the beads with without having to use a beading needle. We use a .018" gauge wire with a 20lb breaking point (which is less than her bodyweight - just in case). I put the findings on the end, just regular clasps held on with small crimps, and Smootch does the rest.
If you are helping out a preschooler with seed beads for the first time, I've made a list of ideas and tips that can keep the frustration levels down, for both you and the child.
- Pour the beads into a pile on a small tray or a piece of fabric like a dishtowel (to stop the beads from rolling). Teach the child to hold the needle or wire an inch or two back from the end and to pick up the beads with the wire, not with their other hand. They can even pick up two or more beads with a single pass at a pile of beads. At first it may be slower, it's a new skill after all, but when they get going it will go much faster for them than if they have to load each bead seperately.
-Start off with a small project like a braclet. The seed beads are very small and it's not an insta-craft, though you can put it down and come back later. Smootch still nearly always needs to have some end product that she can hold up to display the first few times out with a new project.
- To speed up necklaces, add long beads on the very end or throughout the project.
- When you begin to make patterns with beads, start with a two or three colour pattern. Do not worry about how many beads in each colour block, but put on some, for example, red beads, then some orange beads, then some blue beads. Then begin again with some red, some orange, some blue. The idea is that they can create a repetative pattern without getting hung up on how many of each bead to apply. Later patterns can become more exact and sophisicated. For now, it's enough to introduce the concept.
- Beading is pleasant work if there is some interesting distractions. Skip the tv, the beading will soon be forgotten as the eyes are pulled away. Music and chit-chat are ideal. Singing songs and rhymes are good too, especially if you can sing a song or a chant related to the beading. For Smootch, her love of books on tape has been rekindled while sitting at the table with a pile of beads.  (Excuse the pajamas - we seem to do most of our crafting in the morning before we're dressed.)

Smootch likes to use a beading wire that she can pick up the beads with without having to use a beading needle. We use a .018" gauge wire with a 20lb breaking point (which is less than her bodyweight - just in case). I put the findings on the end, just regular clasps held on with small crimps, and Smootch does the rest.
If you are helping out a preschooler with seed beads for the first time, I've made a list of ideas and tips that can keep the frustration levels down, for both you and the child.
- Pour the beads into a pile on a small tray or a piece of fabric like a dishtowel (to stop the beads from rolling). Teach the child to hold the needle or wire an inch or two back from the end and to pick up the beads with the wire, not with their other hand. They can even pick up two or more beads with a single pass at a pile of beads. At first it may be slower, it's a new skill after all, but when they get going it will go much faster for them than if they have to load each bead seperately.
-Start off with a small project like a braclet. The seed beads are very small and it's not an insta-craft, though you can put it down and come back later. Smootch still nearly always needs to have some end product that she can hold up to display the first few times out with a new project.
- To speed up necklaces, add long beads on the very end or throughout the project.
- When you begin to make patterns with beads, start with a two or three colour pattern. Do not worry about how many beads in each colour block, but put on some, for example, red beads, then some orange beads, then some blue beads. Then begin again with some red, some orange, some blue. The idea is that they can create a repetative pattern without getting hung up on how many of each bead to apply. Later patterns can become more exact and sophisicated. For now, it's enough to introduce the concept.
- Beading is pleasant work if there is some interesting distractions. Skip the tv, the beading will soon be forgotten as the eyes are pulled away. Music and chit-chat are ideal. Singing songs and rhymes are good too, especially if you can sing a song or a chant related to the beading. For Smootch, her love of books on tape has been rekindled while sitting at the table with a pile of beads.
(Excuse the pajamas - we seem to do most of our crafting in the morning before we're dressed.)- If you are beading your own project alongside the child, move slowly. I've found that if I work at an adult's pace Smootch gets frustrated because she feels that her pace seems too slow in comparison and wants to quit, or worse, have me finish her project for her! Save the speedy beading for later, work just a bit slower than the child to help their confidence and patience.
- For you own sanity you must learn to be okay with the tink tink tink sound of beads hitting the floor everytime the child stands up. (It took me awhile not to make the 'big sigh' and smack my head whenever there was a spill.) Seed beads are inexpensive and easy to clean up. And if a huge spill occurs you can always clean up the lot by covering the end of a vacuum with a nylon and sucking them onto it. Easy.
If you've got some ideas too for beginning seed beaders please share! We can all benefit from each others wisdom.
6.12.2009
my favorite quilt
One of my ‘if I only had time’ handicrafts to learn is quilting. For never have even made a nine patch, I have quite a few quilts in my home. Most have been made by the talented and patient grannies that have blessed my life, though one of the ones on my bed (yes, I have more than one), I’m ashamed to admit, came from one of those mall quilt shops, that are cheaply made by even cheaper labour (it’s falling apart too).
My favorite style of patchwork quilts are the ones built over months or years of scraps of fabric. They are pieced together, as time permits, and whenever a dress was scrapped or the curtains replaced. They are quilts where the design is only understood within the context of a life lived by the quilter, as seasons pass and domestic demands change and intensify.
Here is my favorite quilt that comes from my partner’s grandmother, a farm wife and mother to ten children.

For a long time it hung on the wall behind my bed as a headboard (good for the winter months to block the chill from the wall) from a couple of tiki torches duct taped together, which, in retrospect, was a bit weird. (I can sew. But not so hot on the decorating.) This was certainly made with whatever fabric scraps were at hand. Some of the assembled squares were likely put together by another lady, who passed along their squares to grandma, and I’m guessing most of the material was recycled. Some of the fabrics appear only once, as a single 4 inch square.
My babies have spent hours looking at this quilt over my shoulder while I nursed them. They are endlessly fascinated by all the different patterns and textures. Smootch played eye-spy with it almost daily until we took it down in preparation of moving. The quilt is still a part of our daily lives, but now it is our backyard blanket. It’s a new perspective of this old favorite, and it’s nice that I can now show my children where their father’s name is embroidered on the back.
This quilt also has another aspect to it that fascinates me. It’s not that obvious when you first see it, but hanging on the wall, just over my pillow for years, was this set of squares:
Do you see what I see? What is a swastika doing on grandma’s quilt? We’ve all heard stories of quilts with codes, and the use of quilts to tell tales or show allegiance, and I am absolutely one hundred percent certain this quilt is not one of them. Perhaps this particular combo of fabrics is actually a popular design that I'm just unaware of, given I know almost nothing about quilting. But knowing this quilt - and the quilter - most likely this symbol is incidental to its serendipitous production. I’m sure. Really.
The swastika symbol has a long and rich history in many cultures. For the most part, today in this part of the world, the swastika is most strongly associated with Nazi Germany. Not necessarily the image I would of chose to go to sleep under every night, but having done enough research on swastikas to add a throng more possible meanings to it, I am sufficiently stuffed with swastika trivia to avoid the most gruesome link.
Still it’s there. And I wonder how many other inadvertent faux pas are out there in a medium built on patterns and geometry. I bet there is even a club somewhere dedicated to the more humorous or shocking quilt calamities.
If this club happens to exist, please contact me. I have another case for your files.
My favorite style of patchwork quilts are the ones built over months or years of scraps of fabric. They are pieced together, as time permits, and whenever a dress was scrapped or the curtains replaced. They are quilts where the design is only understood within the context of a life lived by the quilter, as seasons pass and domestic demands change and intensify.
Here is my favorite quilt that comes from my partner’s grandmother, a farm wife and mother to ten children.
For a long time it hung on the wall behind my bed as a headboard (good for the winter months to block the chill from the wall) from a couple of tiki torches duct taped together, which, in retrospect, was a bit weird. (I can sew. But not so hot on the decorating.) This was certainly made with whatever fabric scraps were at hand. Some of the assembled squares were likely put together by another lady, who passed along their squares to grandma, and I’m guessing most of the material was recycled. Some of the fabrics appear only once, as a single 4 inch square.
My babies have spent hours looking at this quilt over my shoulder while I nursed them. They are endlessly fascinated by all the different patterns and textures. Smootch played eye-spy with it almost daily until we took it down in preparation of moving. The quilt is still a part of our daily lives, but now it is our backyard blanket. It’s a new perspective of this old favorite, and it’s nice that I can now show my children where their father’s name is embroidered on the back.
This quilt also has another aspect to it that fascinates me. It’s not that obvious when you first see it, but hanging on the wall, just over my pillow for years, was this set of squares:
Do you see what I see? What is a swastika doing on grandma’s quilt? We’ve all heard stories of quilts with codes, and the use of quilts to tell tales or show allegiance, and I am absolutely one hundred percent certain this quilt is not one of them. Perhaps this particular combo of fabrics is actually a popular design that I'm just unaware of, given I know almost nothing about quilting. But knowing this quilt - and the quilter - most likely this symbol is incidental to its serendipitous production. I’m sure. Really.
The swastika symbol has a long and rich history in many cultures. For the most part, today in this part of the world, the swastika is most strongly associated with Nazi Germany. Not necessarily the image I would of chose to go to sleep under every night, but having done enough research on swastikas to add a throng more possible meanings to it, I am sufficiently stuffed with swastika trivia to avoid the most gruesome link.
Still it’s there. And I wonder how many other inadvertent faux pas are out there in a medium built on patterns and geometry. I bet there is even a club somewhere dedicated to the more humorous or shocking quilt calamities.
If this club happens to exist, please contact me. I have another case for your files.
6.11.2009
creativity and taking the piss of your sister
Hey, anyone notice the new banner? The blog is now named 'blueprints' where I hope to debrief bits of my life and map out activites and techniques with tutorials for creative people (I mean you). At least that's the hope. I will try not to spend all your time alternately worshipping and bitching about my children and stay on the creative side of things.
Hey, speaking of children!
Yesterday the children and I went on a little picnic to our friendly neighborhood green space. Well, by 'picnic' I mean I chopped some fruit and smoked tofu into baby size pieces, threw them into an old butter container and made sure I had a hand left to carry a large coffee.
Why am I telling you this? Here's how it works in with creativity. I spend stupid amounts of time thinking about creativity. Now just how to do or achieve it, but the actual defintion. It's almost a hobby. What makes an act/thought/relationship creative? Have you wondered about this?
This is what I think.
Creativity is a process. Creative efforts do not necessarily yield a product or end result.
Creativity is universal. The creative medium need not be what is traditionally thought of when you think of creative expression – paints, canvas, the handmade. There are creative thoughts, creative acts, creative solutions, creative relationships. Creativity is not intrinsically beneficial. It can be used with equal finesse by good and evil.
Creativity is purposeful. It is making something with intent. You can not be accidentally creative.
Creativity is desire. To achieve a desired effect. The bringing about of new beings, pregnancy, birth, creation, is not creative in and of itself. But when a pregnant woman thinks ahead of her baby, imagines it’s face and the smiles it will bring with, then there is creativity.
Creativity is original. Though it seems that history repeats itself and that the same idea can crop in many parts of the world all at the same time, this repetition doesn't erase the creativity a person has when they have a thought or an action that is completely to new to them. We all invent the wheel.
With this, admittedly suspect, definition in mind, I come back to our picnic in the green space. I am blown away by the creative lengths my son will go to harrass his big sister.
Here he is in action, with the goopy fork poke:
 Awww, lookit the little smile! Stabbing his sister and making her scream, what a happy little fellow!
Have I mention he pulls hair, bites, pinches, kicks, and whines with aggression. These are fairly standard tactics, sure, but he also turns off the tv, goes after his sister's lovey (to chew on it's ear), and stuffs her shoes full of toys. All to get her attention. Because he loves her.
I would say that Birdie Boy puts a lot of thought into how to get his sister's attention and that he is displaying creativity.
Okay, now I need some creativity to be used for good. My goal is to take this desire Birdie Boy has to be with his sister and turn it into an activity that they both enjoy. Does anybody please have some ideas or games that the two can play together. We have a 8 hour car trip next week to, so you can understand that I'm feeling the need to have my children behave peacefully towards each other with urgency.
I would be most grateful for any ideas!
Hey, speaking of children!
Yesterday the children and I went on a little picnic to our friendly neighborhood green space. Well, by 'picnic' I mean I chopped some fruit and smoked tofu into baby size pieces, threw them into an old butter container and made sure I had a hand left to carry a large coffee.
Why am I telling you this? Here's how it works in with creativity. I spend stupid amounts of time thinking about creativity. Now just how to do or achieve it, but the actual defintion. It's almost a hobby. What makes an act/thought/relationship creative? Have you wondered about this?
This is what I think.
Creativity is a process. Creative efforts do not necessarily yield a product or end result.
Creativity is universal. The creative medium need not be what is traditionally thought of when you think of creative expression – paints, canvas, the handmade. There are creative thoughts, creative acts, creative solutions, creative relationships. Creativity is not intrinsically beneficial. It can be used with equal finesse by good and evil.
Creativity is purposeful. It is making something with intent. You can not be accidentally creative.
Creativity is desire. To achieve a desired effect. The bringing about of new beings, pregnancy, birth, creation, is not creative in and of itself. But when a pregnant woman thinks ahead of her baby, imagines it’s face and the smiles it will bring with, then there is creativity.
Creativity is original. Though it seems that history repeats itself and that the same idea can crop in many parts of the world all at the same time, this repetition doesn't erase the creativity a person has when they have a thought or an action that is completely to new to them. We all invent the wheel.
With this, admittedly suspect, definition in mind, I come back to our picnic in the green space. I am blown away by the creative lengths my son will go to harrass his big sister.
Here he is in action, with the goopy fork poke:
Awww, lookit the little smile! Stabbing his sister and making her scream, what a happy little fellow!Have I mention he pulls hair, bites, pinches, kicks, and whines with aggression. These are fairly standard tactics, sure, but he also turns off the tv, goes after his sister's lovey (to chew on it's ear), and stuffs her shoes full of toys. All to get her attention. Because he loves her.
I would say that Birdie Boy puts a lot of thought into how to get his sister's attention and that he is displaying creativity.
Okay, now I need some creativity to be used for good. My goal is to take this desire Birdie Boy has to be with his sister and turn it into an activity that they both enjoy. Does anybody please have some ideas or games that the two can play together. We have a 8 hour car trip next week to, so you can understand that I'm feeling the need to have my children behave peacefully towards each other with urgency.
I would be most grateful for any ideas!
6.10.2009
list
Smootch is taking her first steps towards reading. To give her some letter practice I often ask her to write out lists, helping her spell the words letter by letter. Lists are good practice, and they can be stopped at any time, avoiding frustration of finishing a project when we are tired or bored. Smootch has written lists of fun activities to do, names of family members, animals. And grocery lists. Like this one:

Written on her precious Hannah Montana note paper, Smootch complied our grocery list yesterday, dictated by myself as I did the dishes. Much appreciated on my part. Or was until I got to the grocery store and, with the grabby handed baby and hyper endorphine crazed jogging crowd who stop by for juice post-workout, I lacked the focus to make out what the heck kind of crazy secret code the grocery list was written in.
After I picked up the obvious items I wheeled my giant space ship cart over to the quiet corner of the store and sat down to figure out the rest. And to acknowledge that the momentarily frustration I feel trying to read what Smootch writes is what Smootch feels everytime she picks up a book or looks at a sign. That she has gumption, taking on the monumentous task of learning to read while all this distracting life is going on. And sometimes she needs a quiet corner to help her focus too. My job is provide books, encouragment, as well as space and time. Oh, and Hannah Montana notepaper.
6.09.2009
sleeve plackets
One of the great things about learning is it is never ending. This is fantastic for me because learning is my passion. I am an addict for the satisfied high I get from mastering a new skill. Despite my attempts to appear otherwise, this blog is mostly about my role as a novice and my ongoing training, not really what I already know. It was about three years ago now when I first learnt how to wind a bobbin. Since then sewing has proven to be a fertile valley of things I do not know about, thus a rich source of potential skill mastery to feed my learning addiction.
I have lots and lots to learn. Yay!
Last week I tackled a new sort of garment. I’ve been mired in the girls’ clothes for awhile now and I’m overdue for some new techniques. My great hesitation in the past has been button down shirts for men and boys. I’ve been worried about some of the bits on button shirts, namely the plackets. The word ‘placket’ is a bit intimidating – bit of a sharp, bark sound - and a traditional button shirt has not only front button plackets, but big bad sleeve plackets too. Plackets are the folded over bits that the buttons attach to, which isn’t frightening itself, but other parts like the collar and cuffs somehow rise out of the plackets and I haven’t been very sure how it all comes together. My Birdie Boy, though, needs some lightweight, long sleeve shirts to keep him cool this summer while protecting his finicky skin from the sun. And there’s a button shirt pattern in Ottobre (summer 3, 2008) with a sweet little mandarin collar I’ve been thinking about for awhile now which finally spurred me to swallow my fear of plackets (and get a much needed learning fix).

Turns out these placket dealies aren’t so horrible. The front button placket was easy-peasy, and the sleeve placket took a bit of doing but with a hot iron and the children sleeping so I could concentrate, really not too bad. In fact, after doing my first sleeve placket I fancied myself enough of an expert to share how the second sleeve placket came together.
Here is Birdie Boy in his new button down shirt, which happens to match the lamp shade I covered (why not? Smootch matches our tv cozy :D)

(Birdie adores trains, wouldn't you know it, and if given half an opportunity to pull down this lamp he will pull the base of it as close as he can to his body and try to ride the train, saying "ugh ugh ooo! ooo!" Which is 'chugga chugga choo choo!' in mama speak.)
Sleeve plackets:
With your sleeve and corresponding placket cut out, cut the sleeve where indicated on the pattern.

Press a small fold, wrong sides together, on the side closest to the edge (this will face towards the back of the sleeve and be hidden by the placket).

Stitch small hem in place.
Attach the placket as shown in the illustration below, with the right side of the placket against the wrong side of the sleeve.

Stitch the placket to the sleeve, leaving a seam allowance at the very top.

Make a small snip from the top of the sleeve opening to the seam on the placket. You are looking for a cut big enough to smoothly allow the placket to flip over to the otherside without slicing into the top seam allowance. This area will all be covered by the placket.

Pull the placket through the sleeve opening to the right side of the sleeve.

*********************************************
This is a free tutorial and I encourage you to use the information in any way you need to (check the disclaimer at the bottom of the page). If it works for you, please consider supporting my etsy shop by purchasing a Little Print Design pattern or toss a dollar or two in my paypal to show appreciation and to encourage me to offer up even more quality patterns and tutorials.
Thank you!
Questions about the Donation? FAQ here.
I have lots and lots to learn. Yay!
Last week I tackled a new sort of garment. I’ve been mired in the girls’ clothes for awhile now and I’m overdue for some new techniques. My great hesitation in the past has been button down shirts for men and boys. I’ve been worried about some of the bits on button shirts, namely the plackets. The word ‘placket’ is a bit intimidating – bit of a sharp, bark sound - and a traditional button shirt has not only front button plackets, but big bad sleeve plackets too. Plackets are the folded over bits that the buttons attach to, which isn’t frightening itself, but other parts like the collar and cuffs somehow rise out of the plackets and I haven’t been very sure how it all comes together. My Birdie Boy, though, needs some lightweight, long sleeve shirts to keep him cool this summer while protecting his finicky skin from the sun. And there’s a button shirt pattern in Ottobre (summer 3, 2008) with a sweet little mandarin collar I’ve been thinking about for awhile now which finally spurred me to swallow my fear of plackets (and get a much needed learning fix).
Turns out these placket dealies aren’t so horrible. The front button placket was easy-peasy, and the sleeve placket took a bit of doing but with a hot iron and the children sleeping so I could concentrate, really not too bad. In fact, after doing my first sleeve placket I fancied myself enough of an expert to share how the second sleeve placket came together.
Here is Birdie Boy in his new button down shirt, which happens to match the lamp shade I covered (why not? Smootch matches our tv cozy :D)
(Birdie adores trains, wouldn't you know it, and if given half an opportunity to pull down this lamp he will pull the base of it as close as he can to his body and try to ride the train, saying "ugh ugh ooo! ooo!" Which is 'chugga chugga choo choo!' in mama speak.)
Sleeve plackets:
With your sleeve and corresponding placket cut out, cut the sleeve where indicated on the pattern.
Press a small fold, wrong sides together, on the side closest to the edge (this will face towards the back of the sleeve and be hidden by the placket).
Stitch small hem in place.
Attach the placket as shown in the illustration below, with the right side of the placket against the wrong side of the sleeve.
Stitch the placket to the sleeve, leaving a seam allowance at the very top.
Make a small snip from the top of the sleeve opening to the seam on the placket. You are looking for a cut big enough to smoothly allow the placket to flip over to the otherside without slicing into the top seam allowance. This area will all be covered by the placket.
Pull the placket through the sleeve opening to the right side of the sleeve.
Turn down all the seam allowances, wrong sides together, and press in place.


Fold the placket back so the right side is facing up in a natural position. Press.

Top-stitch from the bottom of the sleeve up the placket along the attached edge, around the top, and back over to form a little pentagon shape. 

Top-stitch from the bottom of the sleeve up the placket along the attached edge, around the top, and back over to form a little pentagon shape.
And that's all! Not scary. I can't wait to make more of this style for Birdie Boy!

*********************************************
This is a free tutorial and I encourage you to use the information in any way you need to (check the disclaimer at the bottom of the page). If it works for you, please consider supporting my etsy shop by purchasing a Little Print Design pattern or toss a dollar or two in my paypal to show appreciation and to encourage me to offer up even more quality patterns and tutorials.
Thank you!
Questions about the Donation? FAQ here.
6.08.2009
down by the river
I've been having what is turning out to be an ongoing debate with a friend about the role of nature in children's lives. Lately, there is much discussion culturally about what is being called a 'nature deficiency' in children. My friend is exceptionally opposed to the term 'deficiency' being haphazardly applied to children. I agree with her on the semantics of the issue. However, I do believe that nature plays a vital role in the well-being of humans and is necessary for healthy child development.

By observing my children and myself, I know that our contact with nature calms and balances our moods. It provides us with knowledge grounded in reality. It's a whole body, full sense experience everytime, which somehow also transports us away from our limited thinking and mortal bodies, to connect us with enduring, expansive life.
I can almost hear the buzz of her synapses growing and connecting as my child's understanding of the world clarifies.
Nature is not all and everything to good health. But it is a component, as important as water, vitamin C, and care from loving adults.
Back to my friend, who is not as certain as I in this need for nature. She is suspicious of dosing children without care as to the ingredients or without complimentry teaching in respect. In short, what good is nature for one child when as a culture we destroy it without remorse? How is this healthy?
She is right, of course. Nature isn't just 'nature'. It is something we understand through the filter of our culture. When we see tv ads for suvs, parked on a cliff overlooking a valley of lush forest, nature is something that we drive through and conquer. Nature belongs to the toughest and most affluent. Or we see 'living on the land' as some laughable hippy idea, as outdated as daisies and bell bottoms. We think of nature through consumerist lenses, believing in our own goodness as we save the earth by buying 'eco-friendly' cars and recycling our #2 plastics. It's a frightful image, this supposed knowing about nature without being anywhere near it.
Which is why I say to my friend, let's go out and sit by the river and continue this discussion. We'll take our kids, and we can talk about whether or not being in nature without the filters of toys, activites, or even 'education' is a good thing, a necessary thing, for our children. About our health and the health of our society. And if support for the the development of respectful appreciation for nature and holding on to the wonder and timelessness of it all begins with our society or begins with us right now. Just hanging out.

6.04.2009
indulge me
This past month or two has been the time of shuffling, rearranging, false starts, and new beginnings for our family. It's been sort of nuts and I'm feeling pulled in way too many directions. Nevermind being a mama to two small children and domestic partner, we are also trying to sell our beautiful blue house and looking for a new home, and life, a whole province over. It's unsettling and exciting and exhausting.
What does this have to do with you?
Okay, I'll give it to you plain: I have more blogs than I have children and keeping them separate is tearing me apart. And, weirdly enough, I still do not have a space to just chit chat about what crafty/creative/silly thing I am playing with. It's time for me to blend the blogs into one holistic endeavor and this is the space to do it. Don't worry, this blog will still be primarily concerned with the creative, the sewing, and the general know-it-all-ness, but it will no longer be 'Just Tutes'.
You can comment your disapproval. I've already heard it from The Man, who believes my creative life to be somehow separate from my family life, which is, well, the way men are taught to think, yes? In compartments? It's not how I work, anyway. Children, creativity, working, home, walking, learning, loving, reading, arguing, gratitude, and just living is all mish mashed together in my head and body and impossible to pull apart without a big mess. These hands do a whole lot of different things, but they are still just one pair.
So, off with the separate hats for tutorials, show and tell, and family life. It all gets put here now. But, I will keep on with the tutorials, of course. I live to tell people what to do! Mwwaahhahaha! Tell you what, though. I will make it easy for you who do not want to read me blathering on in non-tutorial formats. I will post a tutorial every tuesday. I will not call it 'Tute Tuesday', but you can privately call it that if it helps you remember to come back here on tuesdays for a fresh and happy idea. Not saying I won't tute on other days (everybody has to tute every now and then, and it's nothing to be ashamed about :), but I will definitely tute on tuesdays. Ahem.
Okay, is that all sorted out? Because now is the really, really important stuff. It's the fundamental question that has plagued scholarly institutions, political bodies, and rock bands through out all of time: what are we going to call ourselves? Obviously, this blog needs a new name, not being 'just tutes' anymore. I have a number of maybe titles floating around in my mind, bumping into the walls, but I don't want to be too hasty. I'll give them a few days to ripen. If you have any suggestions, please share - I am open to ideas :)
After all this justifying and rationalizing my craving for blog simplicity, I'll finish by telling you I'll be back tomorrow with, you'll never guess... a tutorial! Until then...
6.01.2009
dandelion games
My yard is in full, glorious, gaudy bloomin' wonder! Yours?

I generally do not let the kids pick flowers, whether from our gardens, off trees, or wild. I teach them to appreciate the flowers as they are, where they are. For Smootch, we are starting journals, doing drawings, and learning about ecosystems by observing flowers and the creatures that interact with them (notably bumble bees - ever met a girl not afraid of spiders or bees, but screaming, finger bitting terrified of ants?) For Birdie Boy, well, it is enough to try to stop him from pulling off the flower buds. "Gentle, gentle... I said, 'gentle,' damnit!" We'll build on that later :)
The exception to the no flower picking rule is on rhubarb and chives (to keep them producing) and dandelions. It is open season on dandelions. Smootch and Birdie can get out all their flower picking, de-petaling, curling, weaving and eating out on poor, suffering dandelions.
So we play with dandelions a lot. I have buckets of dandelion blooms on my window sill. I have woven enough dandelions in my hair, made dandelion rings and necklaces to extinct the species. But, as you know, there are more than enough dandelions to overwhelm even my stem plucking mad four year old.
With all this dandelion play, the two - and only two - dandelion word games I know get played an awful lot. One that Smootch chants for what seems to be hours on end is my personal favorite, "Mama had a baby and her head popped off!" followed with a dandelion bloom popped off with a snapped thumb. Endlessly decapitating mamas: good times, good times...
The only other game I know is no less mature. You get yourself a dandelion bloom and hop that bloom back and forth along someone's arm saying, "Mama had use the bathroom, Papa had to use the bathroom, Sister had to use the bathroom, Brother had to use the bathroom, and baby, ewww, baby didn't make it!" at which time you smear a long streak of dandelion pollen across the skin. A huge hit with my daughter. But not so much with my husband who suffers hayfever and doesn't enjoy Smootch's little brother when he has gone under attack by dandelion babies with poor bladder control.
Since the dandelion torture is not going to stop anytime soon, I think we some new games.
Okay everyone, I have a plea. Since I shared with you both of the dandelion word games in my repertoire, can you share a dandelion game or two with me? Dandelion crafts or activities would also be very welcome. I've got to keep this manic little girl going:
Thanks! Appreciate it very much !
(Oh, hey, the patchwork skirt probably looks familar. This is it's latest incarnation, as the top bodice has been removed and an elastic casing put in to make a very perky little skirt.)
Subscribe to:
Posts (Atom)