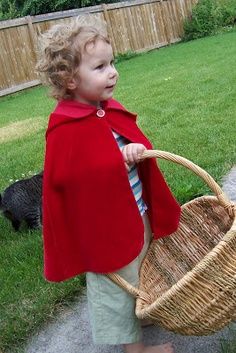
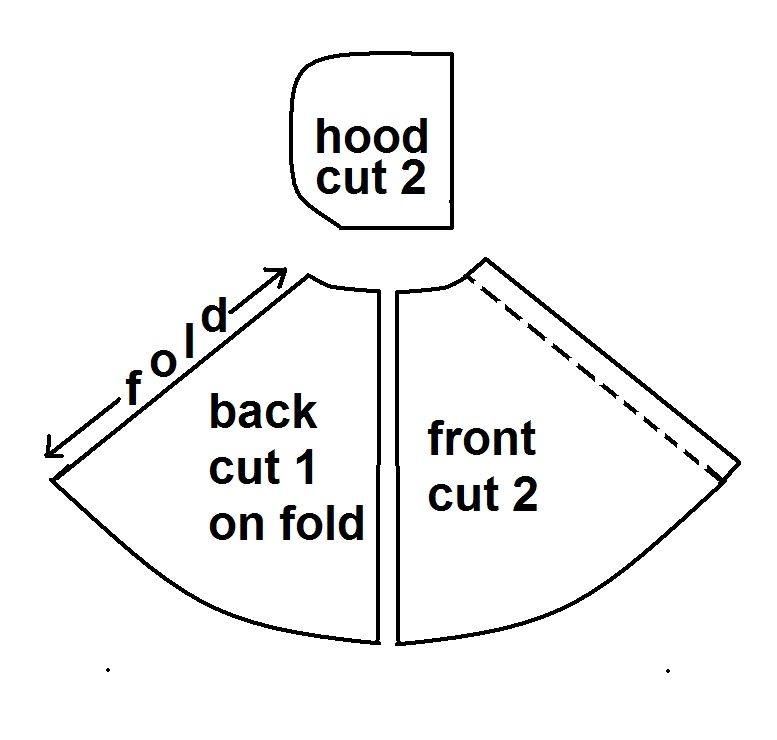
Three basic pieces:
Hood piece: Used your favorite hoodie to trace out a hood shape by folding your existing hood in half and tracing around the outside of it onto a piece of paper. Be sure to add seam allowances on all sides. If you want to line your hood, you will need to cut four pieces, two of the shell fabric, two for the lining.
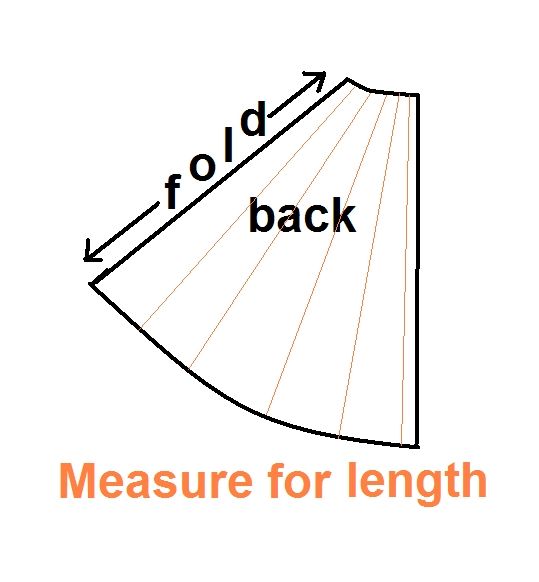
Back piece: Make this piece as long as you want, but make sure that the neckline is going to fit you. use the neck of your favorite tee shirt as a guide. The neck curve should be about half of your hood piece's neck measurement. The other half of the hood's neck measurement will be taken up with the front piece's neckline. That way when the two hood pieces are sewn together it will come all the way around to make a nice full hood. The neckline will begin at a ninety degree angle from the folded edge.
Once you determine how long you'd like your cape and drawn in the neckline on a large piece of paper (or on your folded fabric in chalk), measure out your desired length from your neckline in several places. Use the ends of those measurements to draw in the bottom curve of the cape.
 |
| (Let's pretend that my orange 'measurements' are of equal length.) |
Note: If your fabric is wide enough or your cape small enough, you may be able to get away with using just one pattern piece for the front and back, eliminating the side seam. Make up both the front and back pattern pieces on paper and then tape the side seams together to overlap your seam allowance amount. Cut the cape as one piece.
Construction: You have your pieces cut and pressed. Get ready to sew:
1. Align hood pieces right side together. Sew curvy side. Hem front of hood.
2. Align one front piece side seam with back side seam, right sides together, and sew. (I know I don't have to say this, but take note that the pieces are placed together so the side neck is aligned with the back neck and it's not all turned around. This is a long seam you don't want to have to rip out.) Repeat for other side.
3. Attach hood by putting middle seam in the middle of the back, right sides together, and pinning away from there along both sides. Sew hood in place. Take note that sewing curves can be challenging, and the fabric will want to stretch out on the bottom. Control your stitching and fabric, keeping your pins in place as you sew to prevent outrageous amounts of stretching.
4. Hem bottom of cloak.
5. Fold over the front opening into a double fold and hem, making sure an inch or two is left to overlap the other side. Repeat for other side.
6. Attach button so your cloak doesn't come off in the wind.


This cloak is to die for--thanks so much for posting the tute!
ReplyDeletemost welcome!
ReplyDeleteThank you so much for this! My dd just told me yesterday she wanted to be Little Red Riding Hood for Halloween! Funny that I stumble upon this while looking at your patchwork twirly skirt following a link from Crafster! Yay! Thanks!
ReplyDeleteI've just stumbled on to your blog and I think its absolutely fantastic! Thank you so much! I also love your shirred top tute. I had always thought shirring was way way too advanced for me. Now, I'm more willing to give it a go.
ReplyDeleteThank you!
Thanks eilleen for the kind words!
ReplyDeleteWhooooo hooooo! let there be rejoicing in the streets!
ReplyDeleteI am getting married in about 3 weeks and need a cape for my daughter to wear. Do you think I could find an easy to interpret pattern?
You betcha! Here!
Thankyou so much! I am going to whack this together tomorrow!
Thanks bunches!
Congrats kristie!
ReplyDeleteHope the cape turned out well and your wedding even better!
What a valuable wealth of knowledge this site has!!! I am new to sewing but would love to try and make this cape. Thank you for sharing you knowledge and making it seem doable...only 3 basic pieces. I'll be checking back often to see what other goodies you have made. Thanks again.
ReplyDeleteTotally adorable!
ReplyDeleteThank you for this pattern!
ReplyDeleteI just got a call asking me to make a halloween costume, and this was the first helpful thing I found in a google search.
Keep it up!
Thanks all!
ReplyDeleteooh, I've been goggled! I feel rather special now. Good luck with your costume making Linda!
Hello! Just stumbled on this site today. Fabulous! Clear instructions, great photos- you make it look simple, classy and can-try-worthy! I love the scoodie, the shirred top (I now know the difference between shirred and smocked, thank you!) and the peasant blouse, esp. I hope you keep posting more tutes. Will surely be a regular visitor.
ReplyDeleteThis is exactly what I was looking for, I couldn't figure out how long everything should be to save my life (but I sure looked like a fool trying!) Thanks for the help.
ReplyDeleteAwesome! This will be perfect for my daughter's witch Halloween costume.
ReplyDeletethis is just what i need! finaly! thanks so much i was looking for a last minute halloween costume!
ReplyDeletethanks again.
I'm so glad I found your blog! I needed a cloak pattern for my twin boys who are dressing as Hobbits for Halloween and, thanks to you, they turned out great! Thanks for making it so clear and simple for a non-sew-er like me! :)
ReplyDeleteI found your tutorial last year and forgot to send a photo of my cloaks! I'm going to post one on your Flickr pool.
ReplyDeleteAnyway, I'm being asked to make another and came straight back here.
Thanks for the great information!
I made it smaller to fit my sons stuffed fox. Thanks. He loves it
ReplyDeleteI JUST made your clock in 2 hours (with added bells and whistles) AND COULD NOT BE MORE PLEASED! Lovely! I also peeked at your post about "becoming domestic" and I agree whole-heartedly. Love the blog, hope the moving is as pleasant as can be. (AND MAN, ISN"T the world of warcraft spam the most hilarious thing ever? What is even the point?)
ReplyDeleteHi this is a great tutorial! My neice's teacher expects her to turn up in a hooded cape tomorrow and I was wondering how to make one!
ReplyDeleteI want to make an adult sized one =)! The pictures are so cute. Did you line the cloak? If not, could you give me some pointers about hemming around the curved edge of the front?
ReplyDeleteLOVE it!!! am making for my six year old for halloween - but I know for sure that her two little sisters will each want one too after they see it!!!
ReplyDeleteThanks! LOVE your blog, very cool!!
I've been searching for an easy pattern for my daughter and this cloak looks perfect. I have very little sewing experience, but I think I can be more successful with some type of pattern and instruction on the curved hem. Do you have anything that might help me?
ReplyDeletep.s. thanks for the great ideas and info on your site!
Anon, the easiest way to handle a curved hem is to not have to do one at all. if you haven't purchased fabric yet for the cape, buy a type that is non-fray. Many novelty fabrics out for halloween are non-fray, as are some velvets.
ReplyDeleteYou culod also handle the curve with bias tape: http://indietutes.blogspot.com/2008/09/bias-tape-only-little-bit-evil.html
Or, if all else fails, hem it as usual, using the thinnest hem you can manage, making small tucks as necessary.
Hope that is helpful :)
I absolutely loved this! I am not into sewing these days but this inspires me to try my hand again!
ReplyDeleteThanks for sharing the tutorial.
I came across your blog through 'the artful parent'.
Thank you so much... I am getting married this winter and i have been trying to find a hooded cape pattern for both myself and my bridesmaids.Then i came across this pattern. I have made my cape out of an emerald green brocade and lined with an ivory faux fur and it turned out beautifully...and it was also so easy to make...so i am looking forward to making my bridesmaid's capes. Once again thank you...your post has helped me so much.
ReplyDeleteToday was Cow Appreciation Day at chick- fil. I had some extra cow print material and was able to make an adorable cow cape, complete with armholes (because he wouldn't wear it otherwise) and horns. Thanks so much for making this pattern available. So many people loved my son's outfit!
ReplyDeleteGreat tutorial. I'm going to try it out soon! What fabric did you use? I'm thinking of using a red wool. I also couldn't find this tute on your side bar. Am I blind or is it missing??
ReplyDeleteThanks again! I LOVE your blog. I am a loyal reader.
Emily
I'm so excited about trying out this tutorial...thank you for posting it! My 5 yr. old is going to be a bride for Halloween. We have the dress and accessories, but I wanted to find a way to keep her warm (we live in MN) that wouldn't cover up her costume. I found a great large piece of fabric in the bargin bin at the fabric store that would make a great cape...but I was struggling finding the perfect tutorial...until I found this one! YAY!
ReplyDeleteThis was such a great tutorial, thank you so much! I made my daughter a cape to go over her Halloween costume. She loves it!
ReplyDeleteI posted pictures of mine in my blog if you're interested :D
http://avamaeve.blogspot.com/2010/10/halloween-fun.html
Thanks! I'm using this to make a reversible Hobbit/Harry Potter cloak for my daughter for Christmas.
ReplyDeleteThanks so much for this - my daughter was desperate to be little red riding hood for her nursery's world book day event - and with only 24 hours to come up with the costume you saved my life! FYI I used red felt to make the cape which meant no hemming - which meant I was able to retain my sanity! Thanks again! x
ReplyDeleteThis is exactly what I wanted, I've just finished my cape and it only took just over an hour! Next I'm going to make a reversible one, or a massive one out of a blanket for when I go camping!
ReplyDeleteThanks again!
This is a fantastic pattern im sograteful to you, I was wondering if you could advise on a rough sizing for the hood, I understand the neck measurement but how high/wide should I make the pattern?
ReplyDeleteThank u so much, watched several YouTube videos and they were either too complicated for my quick project or not enough info.little red ridding hood is so excited thanks to u.
ReplyDeleteIf you are unsure how big to make the hood, use the hood of your favorite hoodie to make a pattern from by folding it lengthwise and tracing the shape.
ReplyDeleteThanks for the inspiration! I used this post to help me create a hooded cape for my daughter. Check it out on my blog!
ReplyDeletehttp://artstork.blogspot.com/2011/10/little-red-riding-hood-costume-preview.html
Very cute, but I did not find a pattern. Is it something I would need to purchase from you or would you be willing to share how to measure one's head?
ReplyDeleteEach time I try to eyeball something, it comes out wrong--it even comes out wrong when I use a pattern unsupervised! LOL!
Please help
Thanks for the pattern! It turned out great for my fantasy little red riding hood photo shoot
ReplyDeleteI dont know why but I can never get the pictures to load for me, is there any way you could send me the pictures? I am wanting to make this for my little girl to be red riding hood.
ReplyDelete