There seems to be quite a few talented people making their own patterns at home and wanting to share them with the world. I've been asked what steps I take to convert a paper pattern into a PDF or ePattern. As you may or may not know, I have been making PDF patterns for several years and have found a method that works fairly well for me. I would like to share it with you here to help out any budding home businesses share their patterns online.
I make no claims to how other people create PDF files for their sewing patterns, but this is the process I use. Before I get into specifics, I want to describe in general what the process looks like. A full pattern is broken down into printer paper sized chunks which are scanned into a computer and made into a PDF file. The PDF file is then printed by another user and the pattern pieces are reassembled (much like a puzzle) into the full pattern. The method I use here is the easiest and least tech savvy way I could come up with in order to make the PDF patterns accessible to as many people as possible without the use of any more equipment than a computer and printer. It also works well for me because I did not have to learn any special drafting or editing programs. Which means if I can do it, you can too.
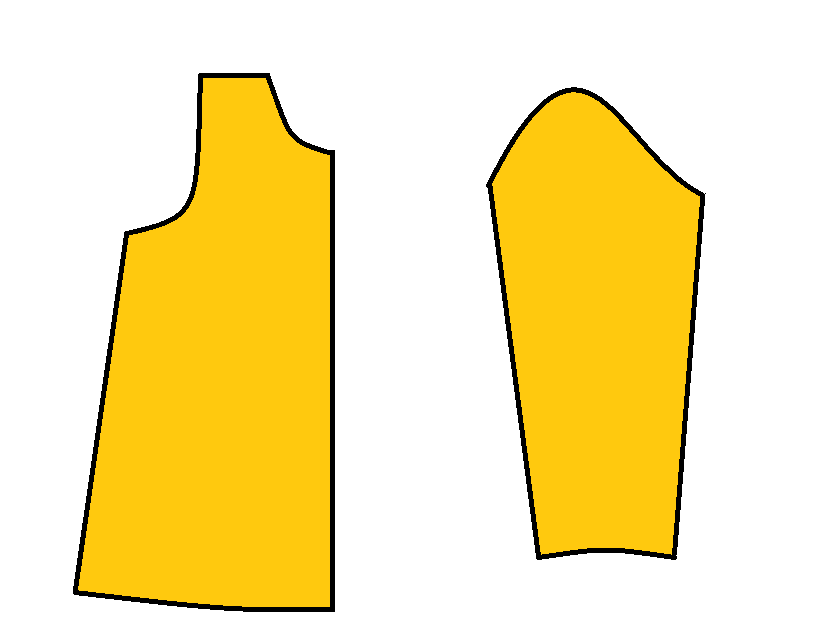
To start, I create my pattern on paper and hand draw the lines as neatly as I can using permanent marker.
In the olden days, to add text to the pattern pieces, I would print off the name of the pattern, sizes and other pertinent information on a separate piece of paper, then cut and glue in my printed labels. Very much like traditional zines were put together. Now I use a photo editing program to label the pieces after they have been scanned into the computer.
In addition to text, I also like to give some sort of indication of real life dimensions. I put a box that measures 1” square, so that anyone printing off the pattern can measure the box and know if the print is properly sized. To put in the 1" box I have used three different methods over time. One is using a printed square (the ultra sophisticated print, cut, glue zine method). A variation is to glue in a 1” square of coloured paper, on which text can later be added with an editing program. I have also created the square entirely in the editing program.
Okay, back to your clean, ready to go pattern pieces.
Any large piece needs to be broken down into components small enough to fit on standard 8” x 11” printer paper.
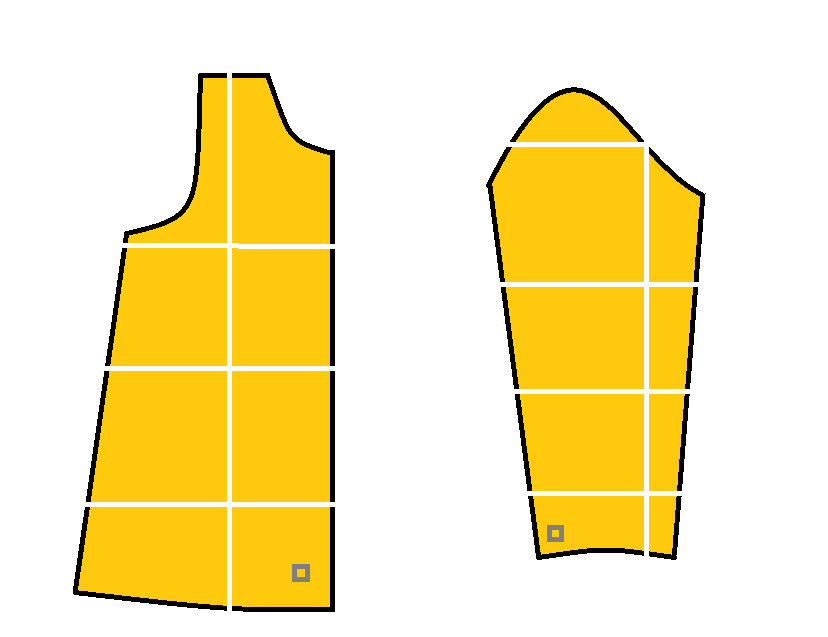
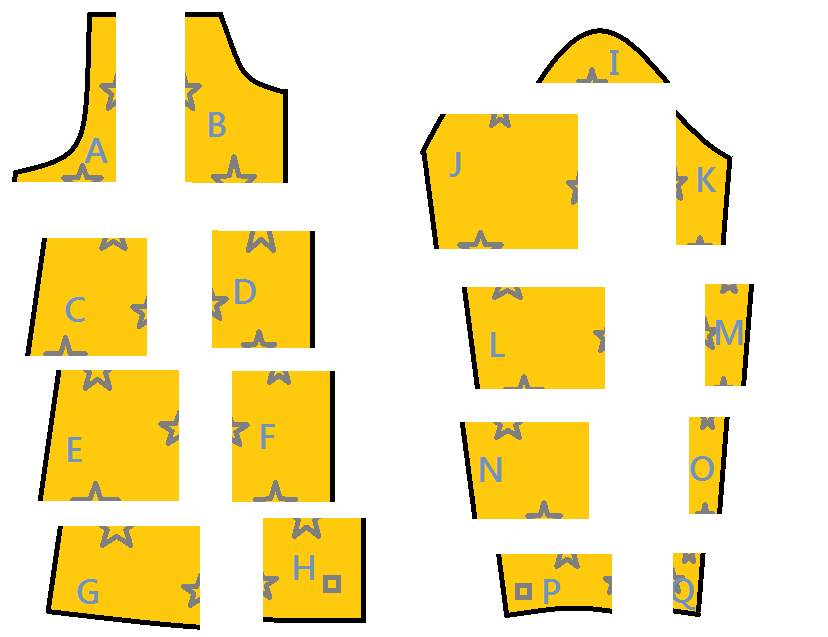
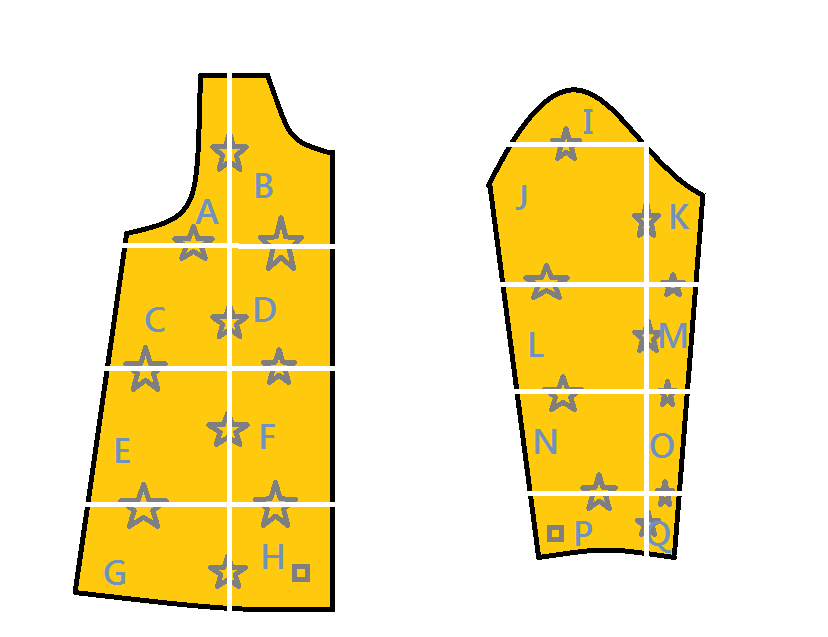
I use a pencil to mark my patterns into a grid, with each square measuring approximately 6” x 9”. The size of each piece is smaller than a regular piece of paper to ensure that the pieces will be in the printable area of most home printers.
Note the 1" boxes on each pattern piece.
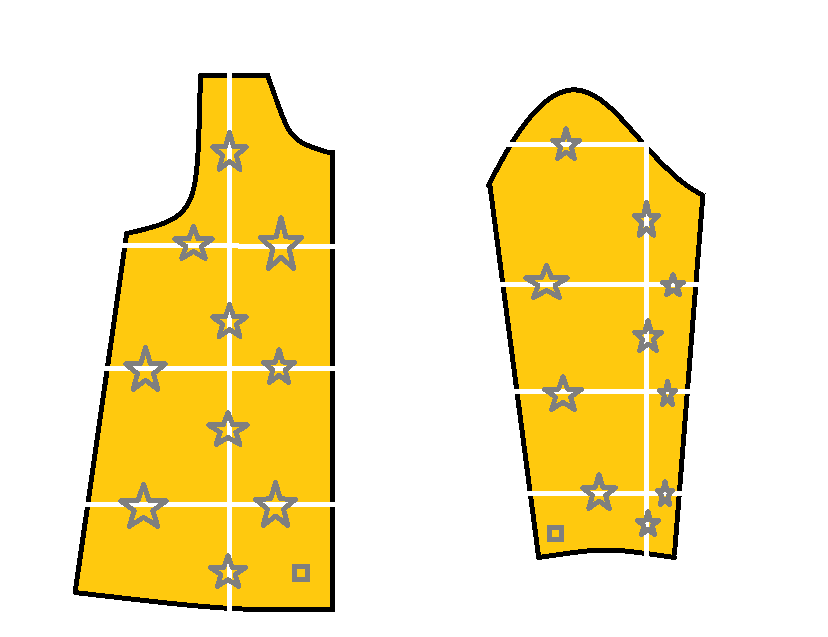
Before I cut my grided pattern pieces, I make some sort of mark on the dividing lines between the pieces that will help me put the pattern back together again. I’ve used arrows, lines, and even stuck stickers over the line. When the pattern is cut, the marks can be lined up exactly to provide a double check to correct pattern piece assembly.
The line markers are greatly over-emphasized in the above illustration. A couple of small perpendicular lines on each cut will be sufficient.
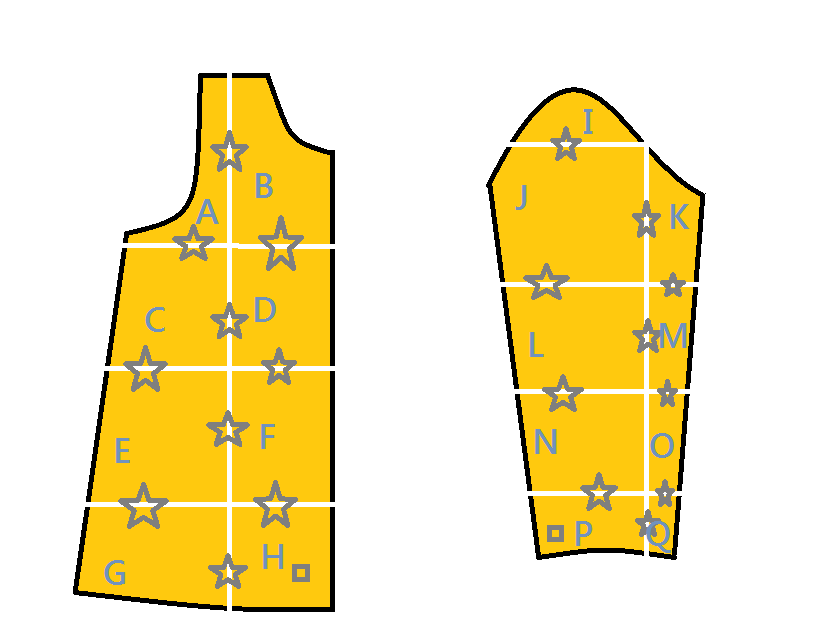
I also give each sub-sectioned piece a distinct identity, usually indicated with letter of the alphabet, which aids in creating a legend to pattern reassembly.
Once the pattern is physically cut along the penciled lines, each individual bite sized piece can be scanned into your computer.
To ensure that your scan comes through in real-life size - something I like to do whenever working with a new scanner or printer - print off a copy of the pieces and compare to the originals to the print.
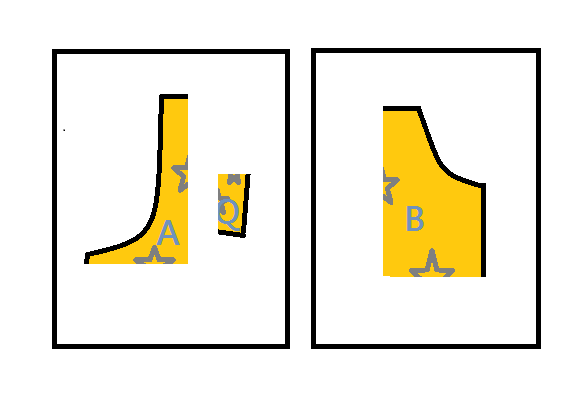
As you may have noticed above, patterns themselves do not lend themselves to exact griding and sometimes I end up with some odd shaped pieces, much smaller than the optimal size for printer paper. In such situations, I will put more than one pattern piece in a single scan to save printer paper.
With the scanned pieces in the computer, any edits, line erasures and text additions can be done with a photo or drawing editor. My own computer came equipped with Photoshop Elements 8.0, so that is what I use. There are many, many different programs available, ones that probably more suited to the task, but generally I’ve found that almost anyone is adequate for the small amounts of text to add.
My only recommendation is to make sure that the program does not resize your scans (or undo your formatting), destroying the integrity of the sizing. Once you’ve done an edit, save the edit under a different name (in a jpeg format) and print it off using the ‘actual size’, ‘no scaling’ or ‘100% scaling’ option on your printer. This just ensures that the actual size is printed and not a scaled down version. Compare the edited piece to the original (or use the 1” square marker) to see if any program settings need tweaked or changed.
Assuming you’ve gotten to the point where all your pieces are scanned in, edited (with additional text and whatever else you need) and the pattern is all ready to go, it is time to PDF the pages. A PDF is a way to format your document so that it can be read by all computers. You need a program to change your regular computer files (jpegs, .docx, etc.) into PDF format.
(I am excluding specific information on the making of instructions from this tutorial but a brief foray into the process may be helpful at this point. I create my instruction using Microsoft Word and good ol’ Microsoft Paint for illustrations. I know the designers out there are cringing, but it’s better to go with what you know to create clear and concise instructions that are easy to understand then to get caught up in a technical stage show. If it works, it works. A technology created ten years ago is still incredibly powerful and the bonus part is that I actually know how to use it so that I can make something now, not three months from now after finding the time to learn a whole new program [which will be considered obsolete in six months anyway].
In addition to your pattern instructions, you will also want to detail how to reassemble your pattern pieces. I like to put in the actual pieces in a miniature format [by inserting the jpeg file in a text box, for the Microsoft Word users] to create a legend.
I am a visual person and use a lot of illustrations to reinforce my text. Sometimes text alone will do, however. To find the best way to present your pattern piece reassembly instructions, try printing out the pieces and giving it to a friend to puzzle together. Talk her through the process and write down what you say to her. This will give you a great start to writing clear instructions.)
Each pattern piece file and the instruction file can be turned into separate PDF files using a free online program such as PDF 995. This is my favorite one, and I use it in preference to the temperamental one supplied with my computer. There are, like editing programs, many PDFing programs out there, so have a look or use the one you are most familiar with.
The next step is to merge or compile your separate PDF files to create one big PDF file containing the all the instructions and pattern pieces. I have used a number of different programs but my favorite right now is I<3PDF. Just select the merge option, upload your files and save a copy to your computer.
Print the whole thing one last time to see that all the formatting is accurate and it looks pretty. To share your pattern, either for free through your blog or for sale online, you can either email the complete PDF file or use a digital storage online that provides a link to gain instant access to the file. I do both, depending on the size of the finished file. The online data storage program I use is DigitalBucket, but like anything else, look around and see what will work best for you.
And that is how I do it. Feel free to ask any questions about this processes and if you know of great PDF programs (no cost is best!), either to PDF or merge, please share in the comments below.
Good luck to all the pattern makers! I look forward to hearing about how it goes :)


What a fantastic tutorial! I am bookmarking this for later. Thanks for sharing!!
ReplyDelete~Angela~
I do it the same way! Makes me feel better...I thought I was doing it the hard way or something! Also, at the beginning, I tape 8.5 x 11 pages together, and then trace the pattern onto it. Then untape and your pattern is already in sections. Just an idea.
ReplyDeleteThank you so much for sharing this! i had been wanting to share so many patterns with my blog readers, now i will do so confidently!.
ReplyDeleteFirst up i plan to share the pattern for 'Back to School Dress'for which i have a tutorial ready. Now the pattern can also be made available to my readers. Thanks once again
Back to School Dress Tutorial
Thanks for this. It will certainly come in handy!
ReplyDeleteGreat tutorial! Thank you
ReplyDeleteI'm always impressed with your intellect. And I've always wanted to ask you where you get your paper patterns printed in this province?
ReplyDeleteThe Sewing Dork,
ReplyDeleteKindopps, Red Deer
Arcprint (in BC, but they have one in Calgary too)
thank you for sharing!
ReplyDeleteThanks - I will check out that printer!
ReplyDeleteI have been reading your blog since I saw your "Adult tee to child's dress" in crafsters... and I think your ideas are always awesome!.
ReplyDeleteThanks so much! This is the best explanation I've ever seen, and also explains why I (old, and not computer savvy) could not make it work by myself! Now, if I can just find some time to try this.
ReplyDeleteLove you blog!
Wow this is fantastic! I have been trying to find someone to break it down for me. Thank you so much! I am sharing this with a lot of my friends!
ReplyDeleteI can say this is best explanation described by you in this post. Thanks for the support..:)
ReplyDeleteRegards,
Micheal
Thank you for sharing such a great tutorial! I have been wanting to learn how to do this for ages and was actually going to do a google search for instructions. Luckily someone pinned this on Pinterest and I found your clear-cut and well-written tute. Thanks again!!!
ReplyDeletethanks so much for sharing this tutorial!!! i can't wait to try it. :)
ReplyDeleteThank you. Your tutorial is easy to understand, and so many are not.
ReplyDeleteTemporary Cat
I just wanted to tell you that because of your tutorial, I sold my first pattern today! I am definitely not a techy person. But, reading the simple way you were able to create an epattern gave me the extra push I needed. I really thought that I would not be able to accomplish what I did. I can't thank you enough! Gina
ReplyDeleteThank you so much for putting together this tutorial!! I can't wait to try it out. Your time and effort are seriously appreciated! Hugs! Sabrina
ReplyDeleteThank you for posting this, I am learning so much from your blog! You're very intelligent and helpful.
ReplyDeleteThis is a wonderful tutorial. Thanks so much for posting it. I'm inspired and can't wait to get started drafting. Thanks again, very helpful and encouraging.
ReplyDeleteThank you! This is a really helpful and clear tute. Really inspiring and encouraging. Can't wait to get started.
ReplyDeleteVanessa
Thanks very much for your help!
ReplyDeleteThis is pretty much what I did with my one PDF pattern (on BurdaStyle), but I did something a bit different - I placed my pattern pieces on the paper as space-economically (as close to one another) as possible to begin with, and then just made a neat grid from one end of the paper to another... leaving me with no odd pieces! I could just cut it into nice almost-A4-sized tiles, and those were the pages of my final PDF as well.
ReplyDeleteP.S. I forgot to mention that I determined the size of my tiles after I traced my pattern-pieces on the paper, also for optimum space usage!
ReplyDeleteThank you very very very much!
ReplyDeleteThis is a important tutorial for me.
Bye
Once again, you have provided me with useful information in the form of a helpful tutorial! Thank you oodles! I googled "how to make a sewing pattern into a pdf" and there you were. I would like to make a maternity/nursing maxi dress pattern I designed into a free pattern on my blog. You are making this possible, and I'm grateful.
ReplyDeleteWhen making the scaled down version to make a legend, how is this done using Microsoft Word? I'm unclear how you get the original picture of the whole pattern in order to do that. Thank you.
ReplyDeleteCindy,
ReplyDeleteYou can either draw up an approximation in your draw program or, even easier, 'insert' a picture of each of the pattern pages through Word and then arrange them on your document.
Okay. I get that now! Thanks so much for everything!
DeleteI realize this is an old post, but I'm hoping to find some help, I'm having a little trouble. You say " To ensure that your scan comes through in real-life size - something I like to do whenever working with a new scanner or printer - print off a copy of the pieces and compare to the originals to the print"
ReplyDeleteIf it doesn't come out the right size, how do I fix that? I'm printing with no scaling, but the scanned image is only printing at about 75% the original size. I'm frustrated to tears!!