Hey, I found me a computer so I can drop a quick hello. For all of you who were wondering how in the world I am going to do crafts while travelling/living in an RV, I am now among your ranks. Except for a brief time, as a good friend of mine explored her new (second hand) serger for the first time and I offered supportive words ('just giv'er!' and 'would you like me to cut all the threads so you can practice threading from scratch?'), I have done not a stitch of anything. Smootch hasn't even applied glue to paper since we started out. I hope thing will settle down soon (we are experiencing some serious technical difficulities with the RV still) and I can get back to playing. I miss it all so much.
But, I do have some crafty type blathering with a slight deviation into a macro-scale analysis social phenomena (that whole university degree in sociology seems to surface occassionally despite my supression efforts), a bit of my story, and a whole shwack of my know-it-all-ism. The words below were originally posted as a guest contributor on
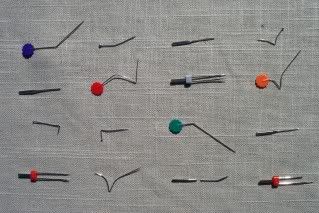
Things Mommies Love a couple of weeks back. Check out my broken needle collection (which is just a small sample). Does anyone else save broken and bent needles? Are we hardcore or what?! :D
**************************************
Let me introduce myself by showing you how incompetent I am.
Below is a small portion of the embarrassingly large collection of bent, broken and really messed up needles and pins I saved from my first year of learning to sew.
A natural with the sewing machine I am not. Almost every day for a year I would be stitching along, gently muttering to myself as is my way, and be suddenly interrupted by an unnatural crunch or bang or shiny pointy thing flying by at eye embedding velocity. Despite my painfully obvious lack of natural ability at sewing, I persevered. Which I think is why I saved all the little bits of broken needles that were not lost to the carpet or my husband’s feet. I knew that I was so bad at it that I couldn’t help but get better. And I wanted to one day show myself how useless I was when I began.
Three years later, I still break a frightful number of needles. But I am hooked enough on sewing that I’ve begun making a small income from making patterns. For myself, this learning to sew and actually making a small but respectable living from it is a change in character on par with demon possession. Four years ago I would of declared I’d rather have my tongue eaten by red ants than to actually thread a needle. Four years ago I was an academic with a new baby, who considered handicrafts as a topic only suitable for research and dissection, a pastime of the pioneers and Victorian women with parlors. Not really something having to do with me or the real world. But, despite myself, here I am.
What happened? Simple. I was bitten by the same bug that now plagues so many of us: She who elevates the domestic into Art. The new baby was my entry into a world of pacifiers, onesies, and the kitchen (eventually the little mite had to eat something besides me.) Trying to learn a little about what I was doing turned out to be a gateway to all sorts of glossy magazines and cleverly illustrated books about what is loosely called domestic skills. I got hooked on Martha.
So many of us who are now in the parenting trenches with young children have come to our domestic situations with alternating distain for housework (and a reflexive gag to the word ‘housewife’), and a semi-erotic fascination with the art of homemaking. It is the domestic divas, all the way from the corporate illusions with their glossy magazines to the earthy honesty of crafty bloggers, that we love. It’s their decorous lives and staged calm that we envy and emulate. We want to be them and live in their unbounded and unfractured homes, where friends, children, baking bread and having to do the dishes all come together in a seamless package, achievable by anyone with a glue gun and some rudimentary sewing skills.
Seduced by the possibility of glitter glue, the courage hinted at by the term DIY, along with some honest urges to create and build, a whole lot of women are teaching themselves some time honored skills. Sewing, knitting, crocheting, scrap booking (documenting), cooking, quilting, needlework, jewelry making and more. We do it for our children and for ourselves.
The learning of the domestic arts is not straight forward. It is a realm loaded with political meaning, culturally, on the newsstands, from our families. There is often strong feelings, both positive and negative associated with learning to sew or knit. Many of us actually have a bit of previous experience in what we are trying to learn. The first encounter is usually with one of those sweet old granny types who get us going as preschoolers with some yarn and a crochet hook to knot into endless chains of rainbow garland.
If only we could of stayed at grandma’s knee! But, off to school to learn the three Rs and not until junior high does someone official decide that a brief introduction, a half term for each topic in the domestic, will round out our academic careers. I know some of you loved Home Ec., but for many of us it was a test to discover our pain thresholds. Sewing, knitting, these things are best taught – if someone is to teach you – one on one by someone loving (or at least kind), where we feel safe and warm and there are cookies in close proximity. Because there is going to be a lot of hard work and no guarantees that the end product will be attractive or wearable. In a classroom, or, in my junior high, a fluorescent lit chamber of horrors, the handcrafts become a form of torture, meant to highlight our adolescent awkwardness and hold our eternal hopelessness with an ancient Singer up for our classmate’s amusement. Remember, this is the same class that would publicly weigh 12 year old girls and give provide helpful advice on weight management. Obviously there is a malevolent force at work.
By the time we are adults we are convinced that needlework/knitting/rug hooking is ‘just not our thing’. Our sewing goes as deep as stapling a fallen hem back up before work and our cooking skills amount to a folder full of restaurant delivery menus. Yet, now, here we are, full grown, with kids, and looking at the magazines, the blogs, the quilt shows, and feeling primal inspiration. And inspiration is not a feeling that is easily dismissed.
The question is, then, how to start again, now that we are adults? How does one learn to sew/knit/bake bread?
I think of this question often. How do we learn? Especially now that we are in our 20s, 30s, 40s and are so busy with children, home, and work that a few moments to ourselves at the end of the day is an invitation to a margarita and some darkly ironic television. How to plunge ourselves into learning something so intimidating? More than that, if you are going to learn, how do you not waste time?! We’ve only got a few minutes a day! No time to meander through endless instructions and silly projects designed to teach you the basics but are basically useless. We want something we can sew during a naptime and not feel that we would have better spent our time vacuuming when junior wakes up.
I’m feeling pretty good about the small distance I’ve covered since I began to sew three years ago. But I have a long list of things I’d like to get some practical knowledge of, including my old nemesis knitting, which always makes me say words that I’d rather my children not repeat. To help myself out, I keep in mind some of the lessons I learnt along with the stitching. I’d like to share them with you, on the small chance that you will pass along some of your gleaned wisdom to me.
- Start with what interests you. Do not think, “I’ll make a Kleenex holder because the book says it’s a good beginner project and making a shirt like I really want to is for people who know what they are doing, which isn’t me.” Kleenex holders are boring. Make the shirt. You may not have a good shirt at the end, but you will know a whole lot more than any silly Kleenex holder would of taught you. Keep your motivation by pursing what is interesting to you right now.
- Learning is holistic. There is much range to what can be learnt, and going from A to B to C is the slow way. We are smart (and busy). Aim to start with M, N, and O, and most likely the ABC will be learnt along the way.
- Find a spot in the bottom of the closet (underneath where the cat sleeps preferably) for unfinished or just plain bad projects. Truth: not everything you will make will be beautiful and perfect. Make room for the ugly and messy. Mistakes and failures are inevitable. And useful, because we really do learn more from our mistakes. Grow comfortable with these inevitable blunders, look and learn from them, and then move on.
- Because moving on – the processes or flow - is what it is all about, not the end product. If you are not enjoying the overall activity (keeping in mind that not every moment will be rapturous), then rethink your attachment to it. Why are you doing this? Learning is not about gritting your teeth and struggling through. Learning is exciting and fun and, sometimes, about discovering your own determination and character. Learning is about following your heart, and if your heart says, ‘this sucks!’, then you’d better listen.
- Find a loving community. The internet is a fantastic resource for all sorts of interests. There also are community groups, friends, and perhaps even grandmas. Somewhere are some good people who are also learning or know what you want to know. Go find them.
Most of all, I have found that I should not get too invested in the labels – academic, mother, crafty person, pattern maker. Labels are limiting and really do no justice to what those titles actually mean. And labeling misses content. I know people who knit pink infant pinafores and others who knit skulls on bikinis. Night and day. Yet the skill set is the same and both come from the well-spring of creativity that we all share. Let your intuition and desires be your guide and you will find yourself learning exactly what you need to know.


 Tape down the sleeve in the new orientation. With your pencil, redraw the top of the sleeve (use a french curve square if you've got one for smooth lines). The outside pieces will naturally lead you into a higher curve on the top. Go with it, using the original pieces as a curve guideline.
 Cut out the new piece. When you sew in you sleeve, first gather between the two outside cut pieces until the gather is the same size as the armhole (use the original sleeve piece as a guide if it is helpful.)
 That will give you adequate puff, Grace, I believe.

